


Hướng dẫn lắp đặt cụm đồng hồ kỹ thuật số Audi A4 A5 – Chuyển PCB, Cài đặt & Kiểm tra
Điều này Hướng dẫn lắp đặt cụm đồng hồ kỹ thuật số Audi A4 A5 bao gồm tuyến cụm đồng hồ kỹ thuật số iKAGOO tương thích cho Audi A4 B8/B8.5 và Audi A5/S5/RS5 thuộc dòng B8: kiểm tra xe, tháo cụm đồng hồ nguyên bản, chuyển bo mạch PCB, kết nối dây điện, kiểm tra, điều khiển trên vô lăng, cài đặt cơ bản và xác minh cuối cùng.
Hướng dẫn lắp đặt cụm đồng hồ kỹ thuật số Audi A4 A5: Bao gồm những xe nào?
Trang này dành cho các cấu hình cụm đồng hồ kỹ thuật số iKAGOO được hỗ trợ trong dòng Audi B8/B8.5. Audi đã sử dụng nhiều kiểu dáng thân xe, tên gọi thị trường và mô tả đăng ký khác nhau trên khắp thế giới, vì vậy đừng chỉ nhận diện xe dựa trên từ “A4” hoặc “A5”.
| Dòng xe | Tên gọi phổ biến / tên tìm kiếm | Cách gọi phổ biến theo khu vực | Vị trí hướng dẫn |
|---|---|---|---|
| Audi A4 B8 / B8.5 | A4 B8, A4 B8.5, Audi A4 8K, A4 Sedan, A4 Saloon | “Sedan” phổ biến ở Bắc Mỹ/Úc; “Saloon” phổ biến ở Anh; “Limousine” có thể xuất hiện trong các tin đăng ở lục địa châu Âu. | Chỉ được hỗ trợ khi cụm đồng hồ nguyên bản, bảng táp-lô và tuyến iKAGOO được cung cấp khớp nhau. |
| Audi A4 Avant | A4 Avant B8 / B8.5, A4 Wagon | “Avant” là tên chính thức của Audi cho kiểu dáng thân xe; “wagon/estate” có thể xuất hiện trong tìm kiếm và mô tả đăng ký. | Xác nhận bảng táp-lô và cụm đồng hồ nguyên bản trước khi dựa vào quy trình này. |
| Audi A4 allroad | A4 allroad B8, A4 Allroad Quattro | Phổ biến ở châu Âu, Anh, Bắc Mỹ và Úc dưới tên allroad. | Phải xác nhận khả năng tương thích từ cụm đồng hồ nguyên bản và thông tin chi tiết xe. |
| Audi A4L | Audi A4L, A4L B8 / B8.5 | Tên gọi A4 trục cơ sở dài thường được dùng tại thị trường Trung Quốc. | Chỉ sử dụng phiên bản sản phẩm đã được xác nhận cho bảng táp-lô và tuyến đầu nối của A4L. |
| Dòng Audi S4 / RS4 B8 | S4 B8, S4 B8.5, RS4 B8 | Các phiên bản hiệu suất cao của nền tảng A4 thuộc dòng B8. | Không tự động giả định khả năng tương thích A4; hãy xác nhận chính xác sản phẩm đã đặt hàng. |
| Audi A5 B8 / B8.5 | A5 B8, A5 8T, A5 Coupé, A5 Coupe, A5 Sportback | Cách gọi Coupé/Coupe và Sportback khác nhau tùy theo thị trường và ngôn ngữ. | Các đơn hàng thuộc dòng A5 được hỗ trợ yêu cầu bố trí bảng táp-lô, cụm đồng hồ và giắc kết nối phải khớp. |
| Audi A5 Cabriolet | A5 Cabriolet, A5 Convertible, Type 8F | “Cabriolet” là cách gọi của Audi; “convertible” phổ biến trong tìm kiếm ở Bắc Mỹ. | Xác nhận trước khi lắp đặt vì sự khác biệt về thân xe/phiên bản có thể ảnh hưởng đến tuyến dây được cung cấp. |
| Audi S5 / RS5 dòng B8 | S5 B8, RS5 B8, S5 Coupé, S5 Cabriolet, RS5 Coupé | Tên gọi thay đổi theo kiểu thân xe và cách ghi đăng ký tại địa phương. | Chỉ sử dụng sau khi iKAGOO xác nhận sản phẩm và cấu hình cụm đồng hồ nguyên bản. |
Nếu bạn vẫn đang cân nhắc nên mua gì, hãy xem hướng dẫn nâng cấp Virtual Cockpit cho Audi A4 B8, và hướng dẫn mua Virtual Cockpit cho Audi A5 B8 hoặc hướng dẫn mua cụm đồng hồ kỹ thuật số trước khi đặt hàng.
Trước Khi Mua: Nâng Cấp Cụm Đồng Hồ Kỹ Thuật Số Cho Audi A4 hoặc A5 Khó Đến Mức Nào?
Câu trả lời thực tế là đây không phải kiểu nâng cấp “đẩy màn hình mới vào bảng táp-lô rồi lái xe”. Quy trình được hỗ trợ yêu cầu tháo bảng táp-lô cẩn thận, kết nối dây điện đúng cách, chuyển hoặc giữ lại linh kiện điện tử của cụm đồng hồ nguyên bản ở những vị trí được chỉ định, và kiểm tra chức năng đầy đủ trước khi lắp ráp lại hoàn chỉnh.
Quan trọng: Đây là Hướng Dẫn Lắp Đặt Sản Phẩm iKAGOO
Không sử dụng hình ảnh, trình tự giắc kết nối, quy trình chuyển PCB, cài đặt hoặc tham chiếu phần mềm trên trang này như sự xác nhận rằng sản phẩm của người bán khác nên được lắp đặt theo cùng cách. Hư hỏng, vận hành không đúng hoặc vấn đề tương thích do áp dụng hướng dẫn dành riêng cho iKAGOO này cho phần cứng bên thứ ba không liên quan sẽ nằm ngoài phạm vi hỗ trợ kỹ thuật và bảo hành thương mại của iKAGOO.
This support boundary does not remove any non-excludable statutory consumer rights and does not exclude responsibility for a verified defect or incorrect product-specific instruction relating to an eligible iKAGOO order.
Before Installation: Vehicle, Product and Function Checklist
A professional Audi A4 B8 digital cluster installation hoặc Audi A5 B8 digital cluster installation starts before the first trim panel is removed. Record the original condition of the vehicle so you have a reliable baseline for comparison after installation.
1. Confirm the vehicle and the product
2. Photograph the original vehicle condition
- Take one complete dashboard photo showing the steering wheel and original cluster.
- Take one clear photo of the original instrument cluster switched on.
- Record the original mileage/odometer.
- Record the approximate fuel level.
- Record any warning lights already present before the retrofit.
- After removing the cluster, photograph the original connector and PCB before changing anything.
3. Test the factory functions before removal
A digital display cannot be expected to repair an unrelated factory fault that already existed before installation. Recording the baseline separates an installation issue from an existing vehicle issue.
4. Prepare tools and workspace
- Dụng cụ tháo gỡ các chi tiết trang trí bằng nhựa — do not pry visible trim with a bare metal screwdriver.
- Correct screwdriver / Torx driver for your cluster screws.
- Small screw tray so original fasteners are not lost inside the dashboard.
- Clean soft towel for the original cluster and PCB work.
- Ánh sáng tốt so connector locks and ribbon cables are visible.
- Phone or camera to record connections before changing them and to send evidence if support is needed.
5. Electrical and handling preparation
- Ignition fully OFF before disconnecting instrument-cluster connectors.
- Keep the key/fob away from the vehicle while working on disconnected electronics.
- Do not allow an exposed PCB or connector to contact metal trim or tools.
- Handle the original PCB by its edges and avoid touching contacts or small components.
- Never force a connector that does not naturally match the socket.
Audi A4 A5 Digital Cluster Installation Overview
Step-by-Step Audi A4 / A5 Digital Cluster Installation
Move the Steering Wheel Down and Toward You

Unlock the steering-column adjustment and move the wheel to its lowest position and as far toward the driver as possible. Lock the lever again. This creates working space directly in front of the instrument cluster.
Locate and Remove the Instrument-Cluster Trim
Find the correct trim seam before applying pressure.
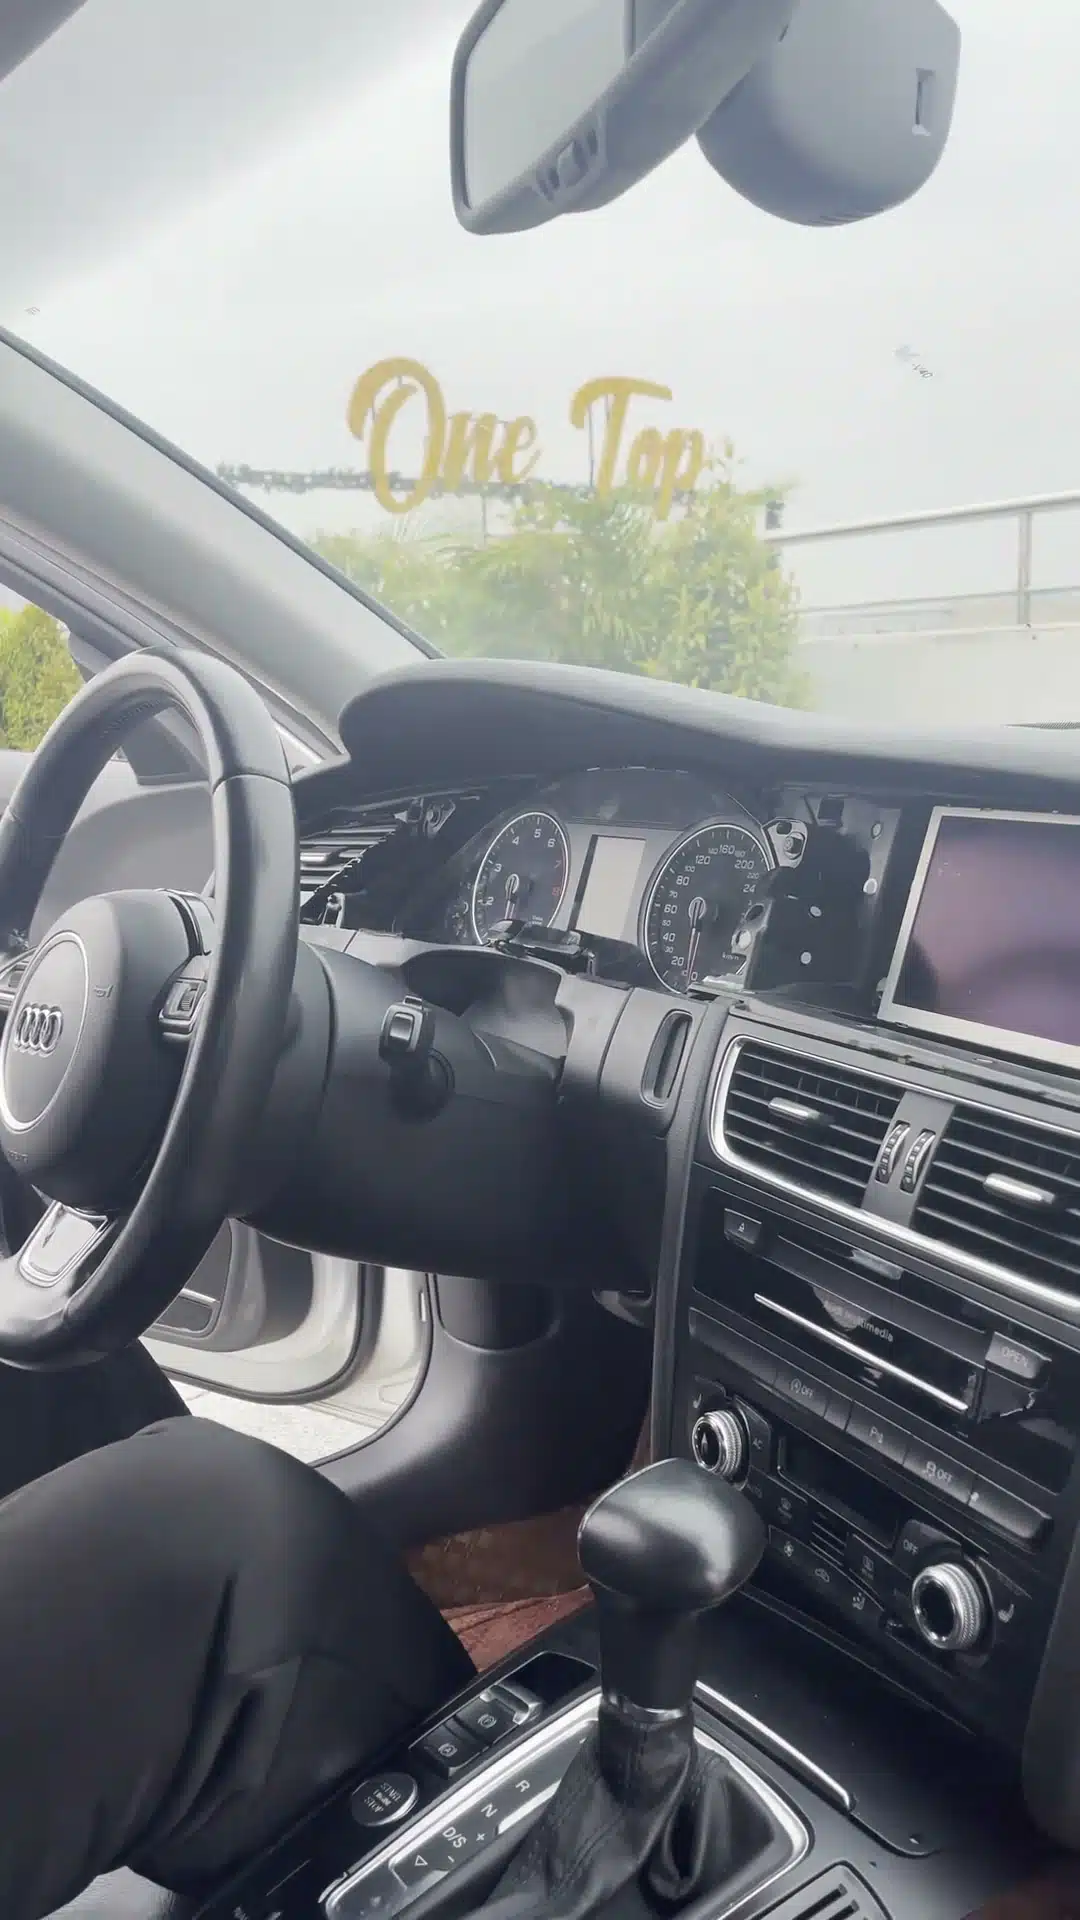
Release clips progressively rather than pulling one corner violently.
Work around the trim with your fingers or a plastic trim tool. Pull the panel toward you with controlled pressure. Clip-release sounds are normal; sudden heavy resistance is a reason to stop and check for another fixing point.
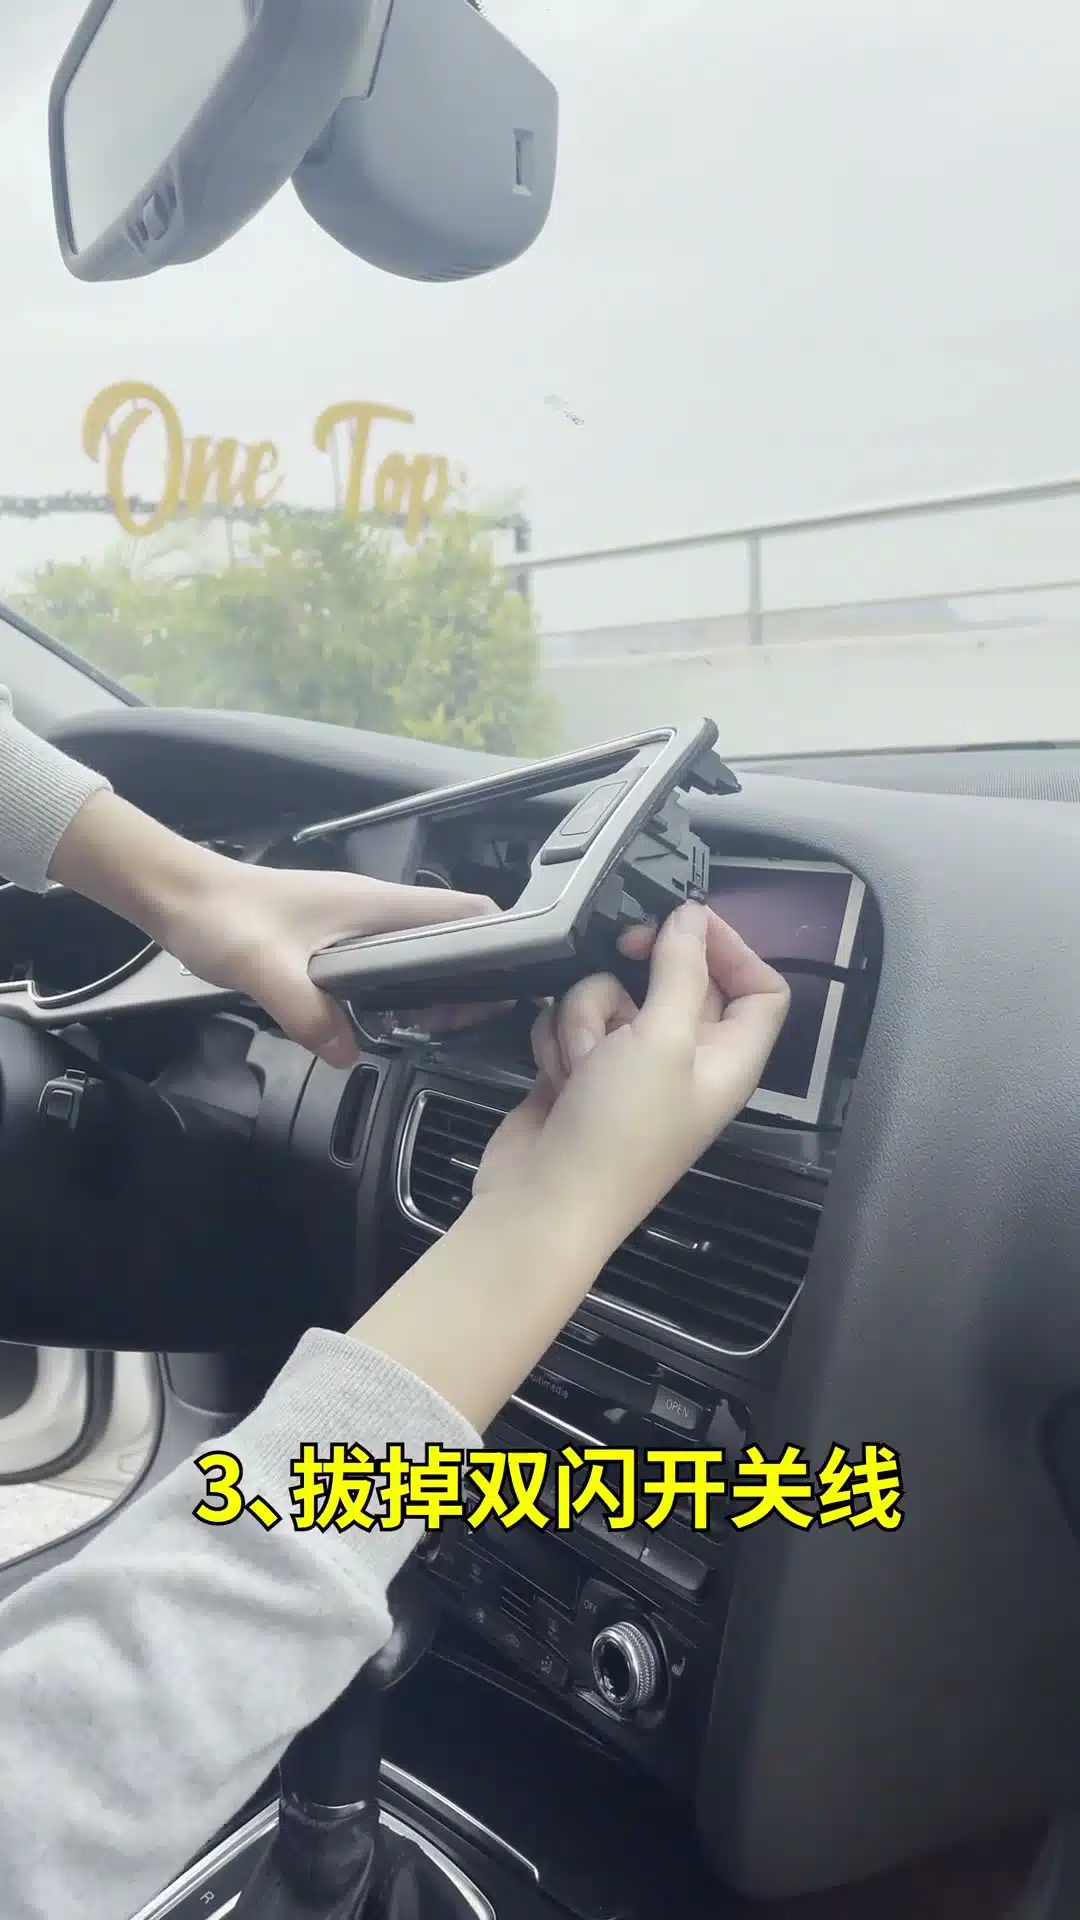
Disconnect the Hazard Switch and Set the Trim Aside
Press the locking tab before removing the hazard-switch connector.
Keep visible trim on a clean, soft surface.
Release the connector lock and unplug the hazard switch. Do not pull by the wires. Put the trim where its visible face and rear clips cannot be scratched or bent.
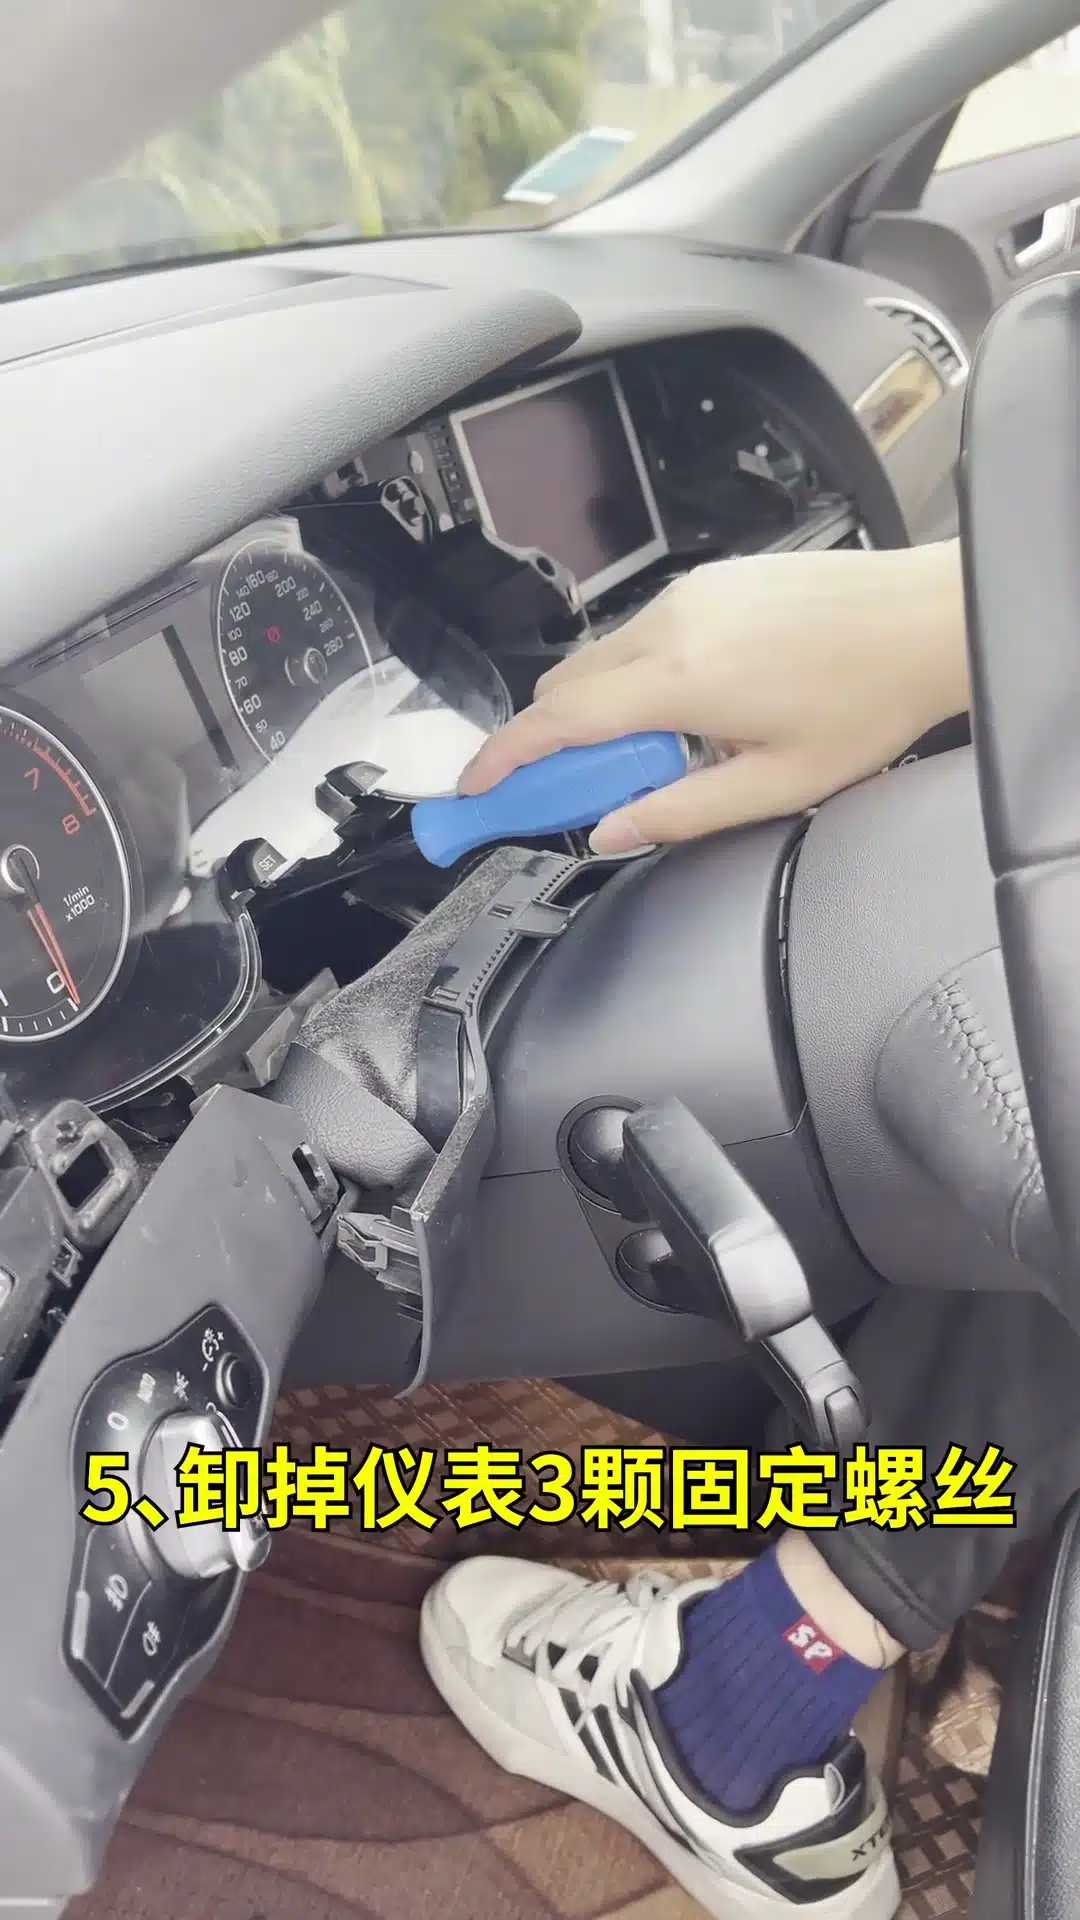
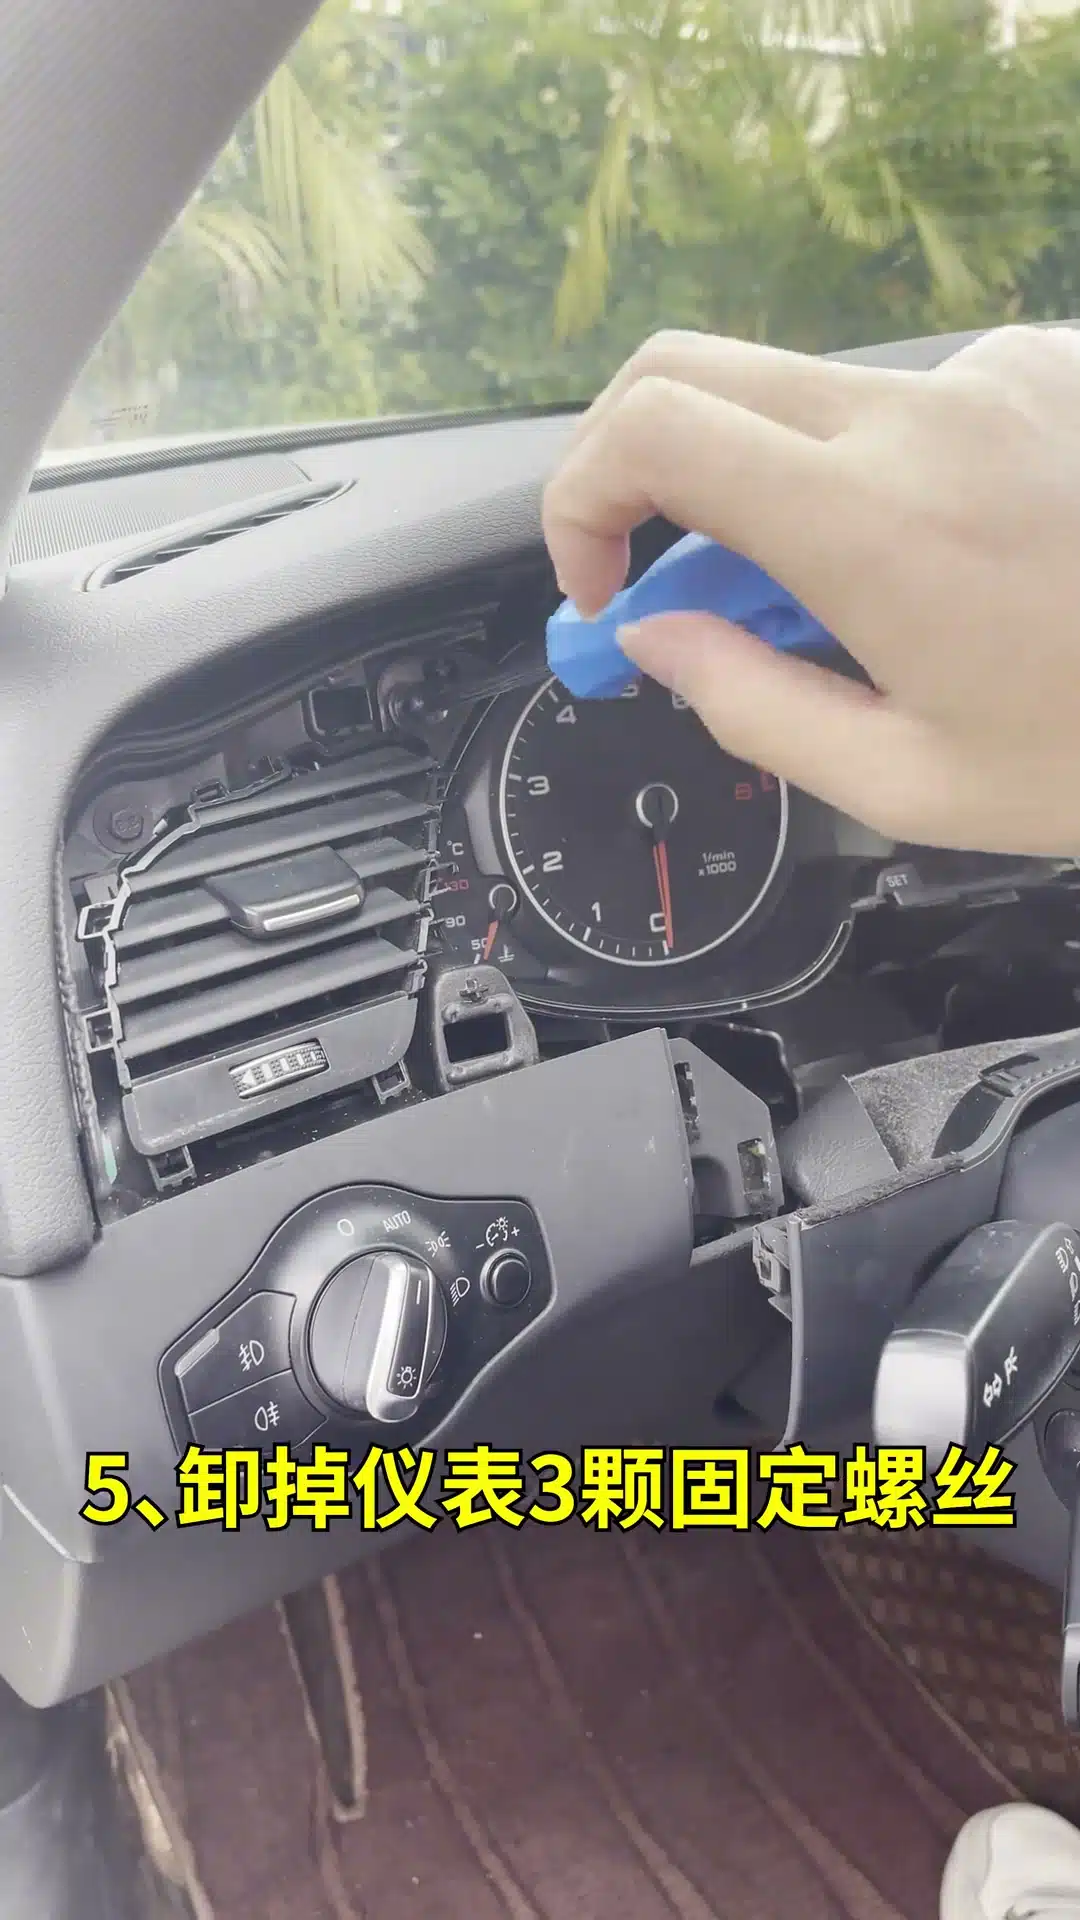
Remove the Steering-Column Cover and Original Cluster Screws
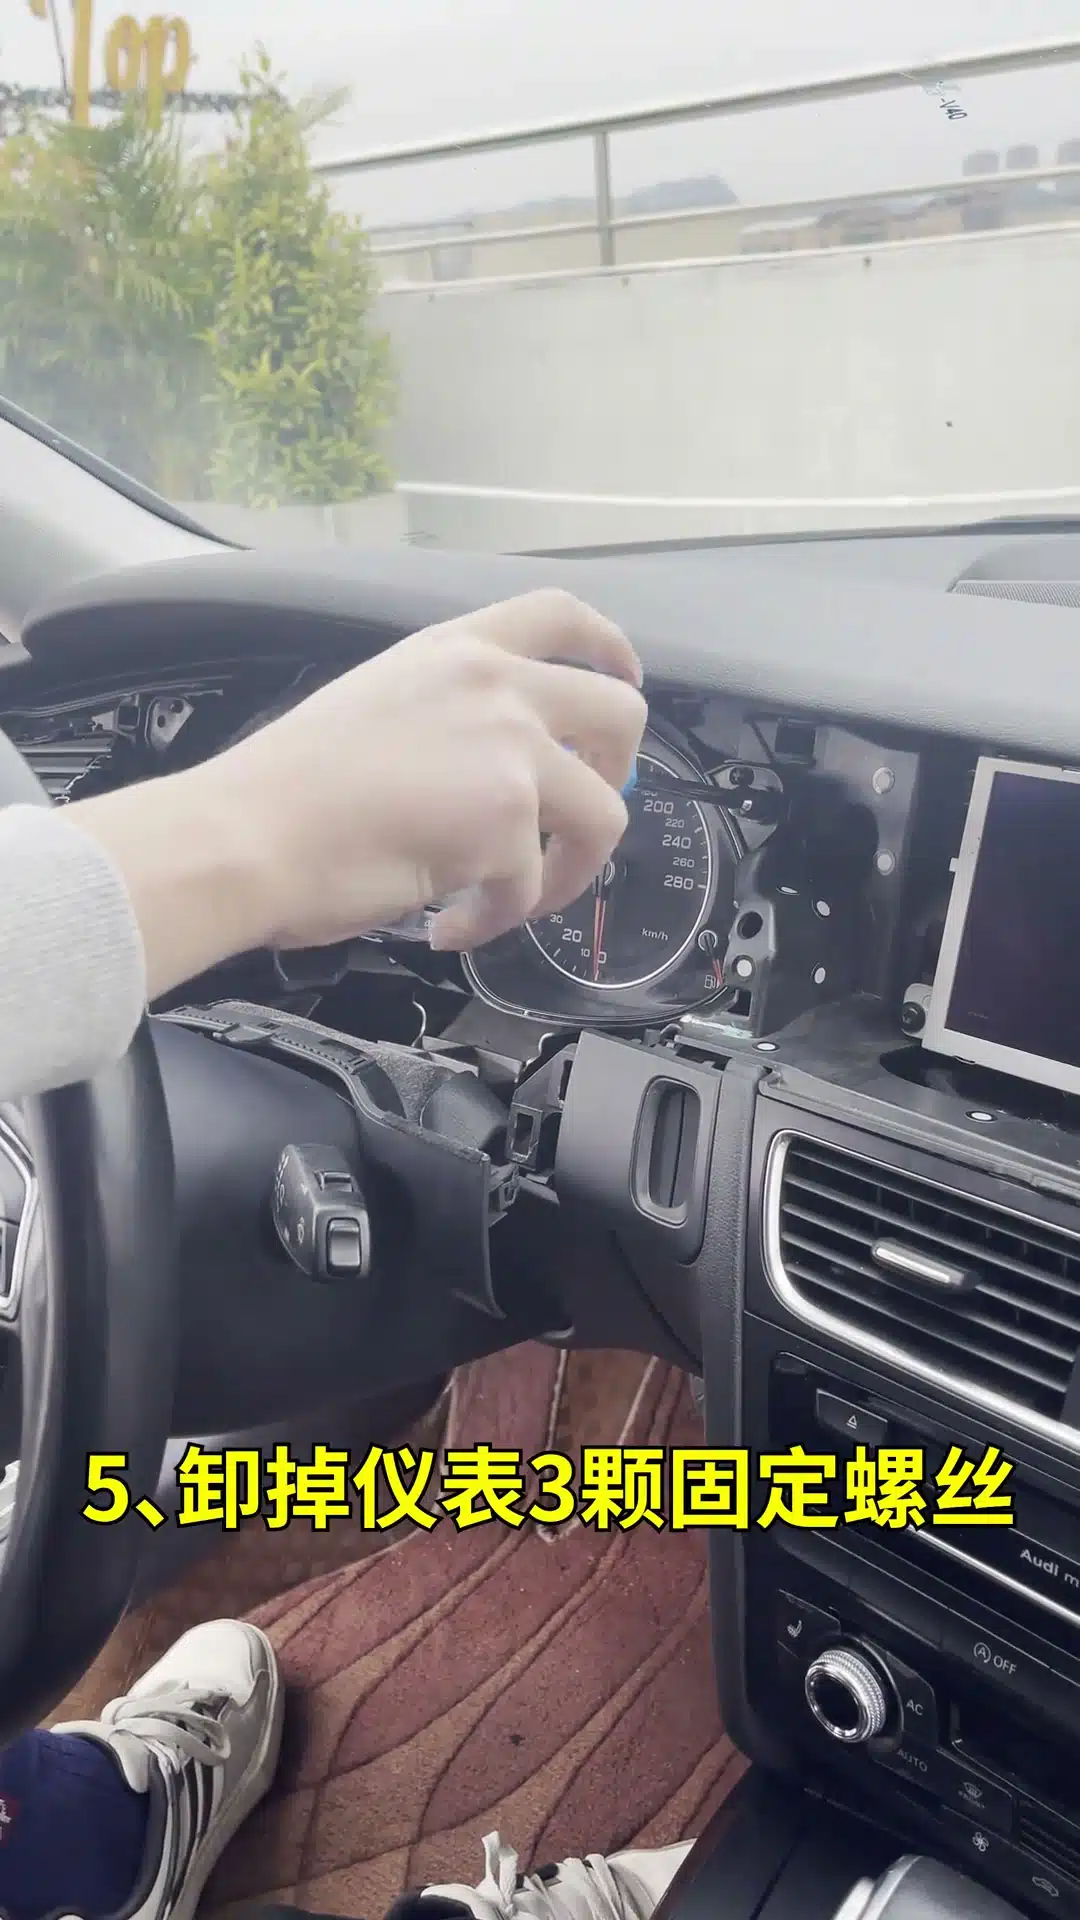
Remove the flexible cover around the steering-column opening.
Locate the original cluster retaining screws.
Keep the original dashboard screws together for reinstallation.
Remove the flexible steering-column cover and identify the three cluster retaining screws on the documented route. Put the screws directly into your screw tray.
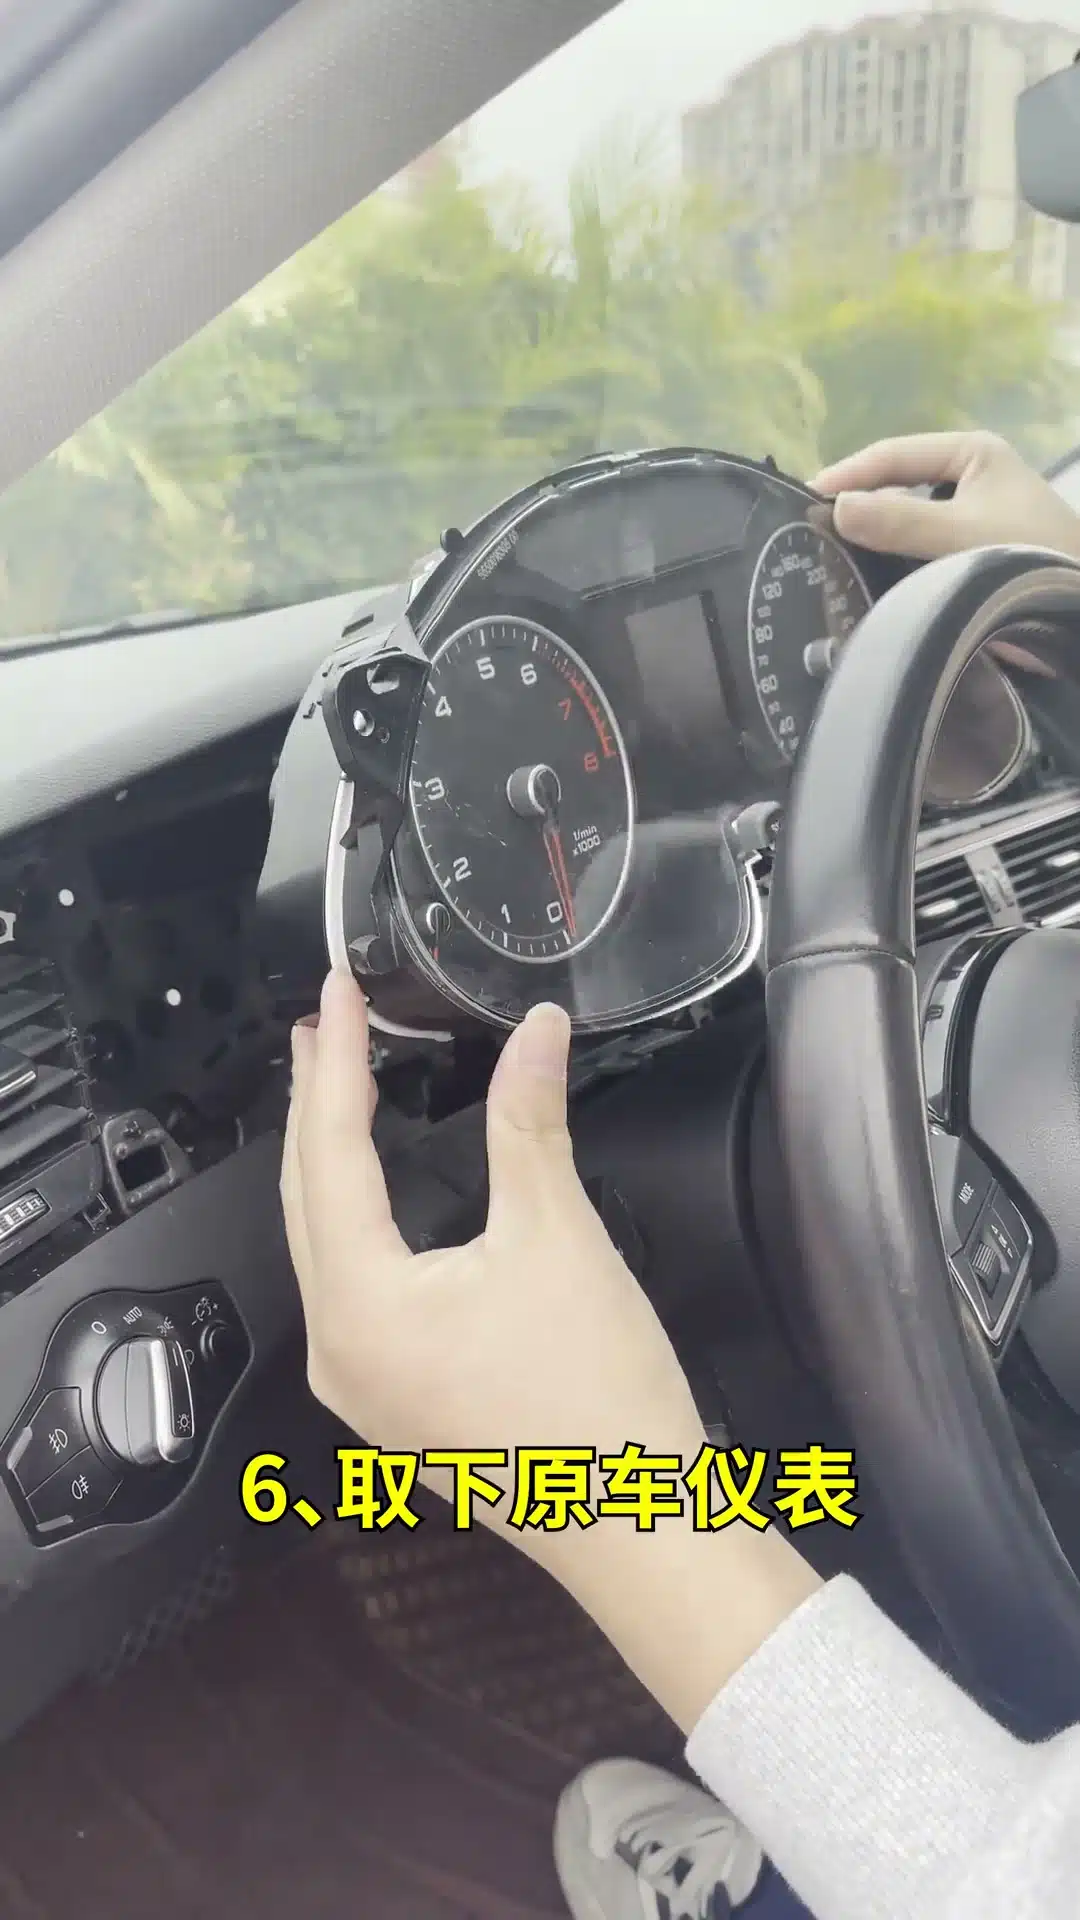
Remove the Original Audi Instrument Cluster
Pull the cluster forward only far enough to reach the rear connector.
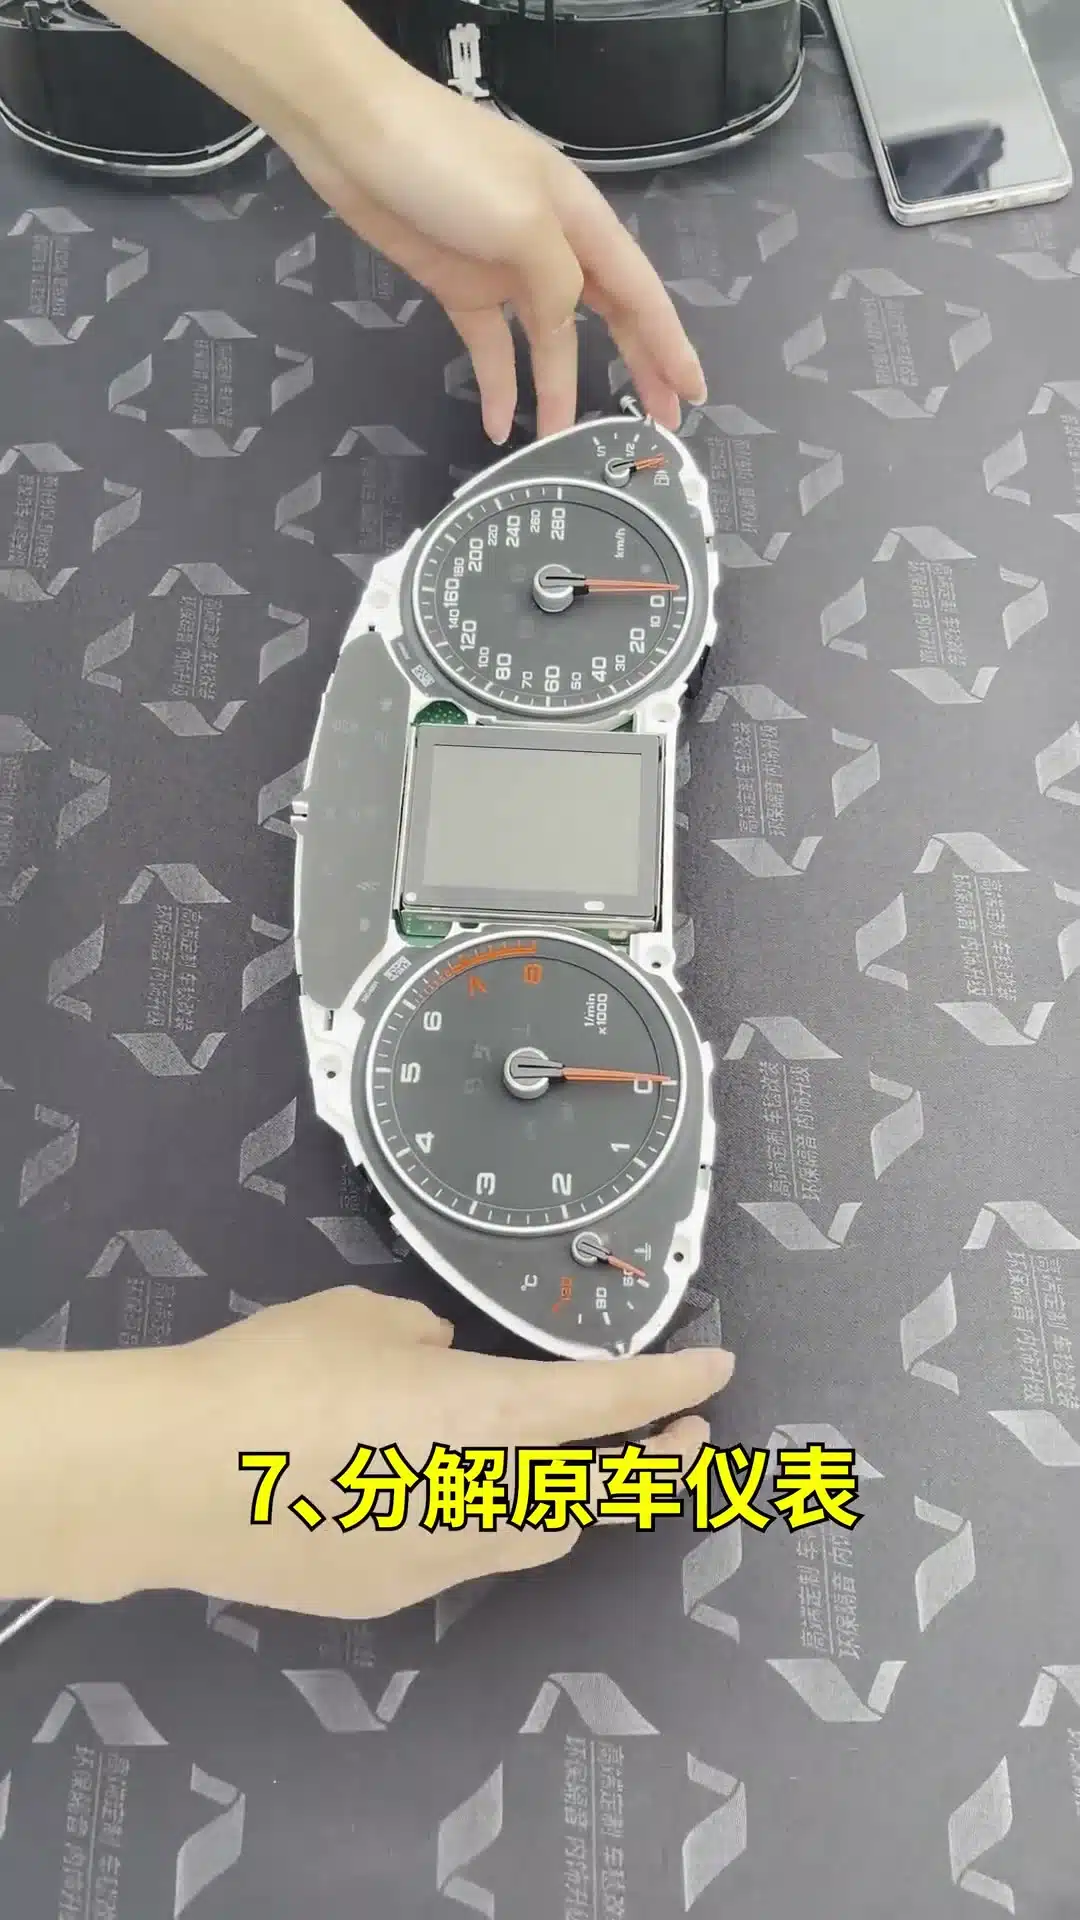
Release the connector lock before unplugging the main harness.
Ease the cluster forward without twisting it against the dashboard. Support the unit with one hand, release the main connector lock and disconnect the original harness. Photograph the rear connector and cluster before continuing.
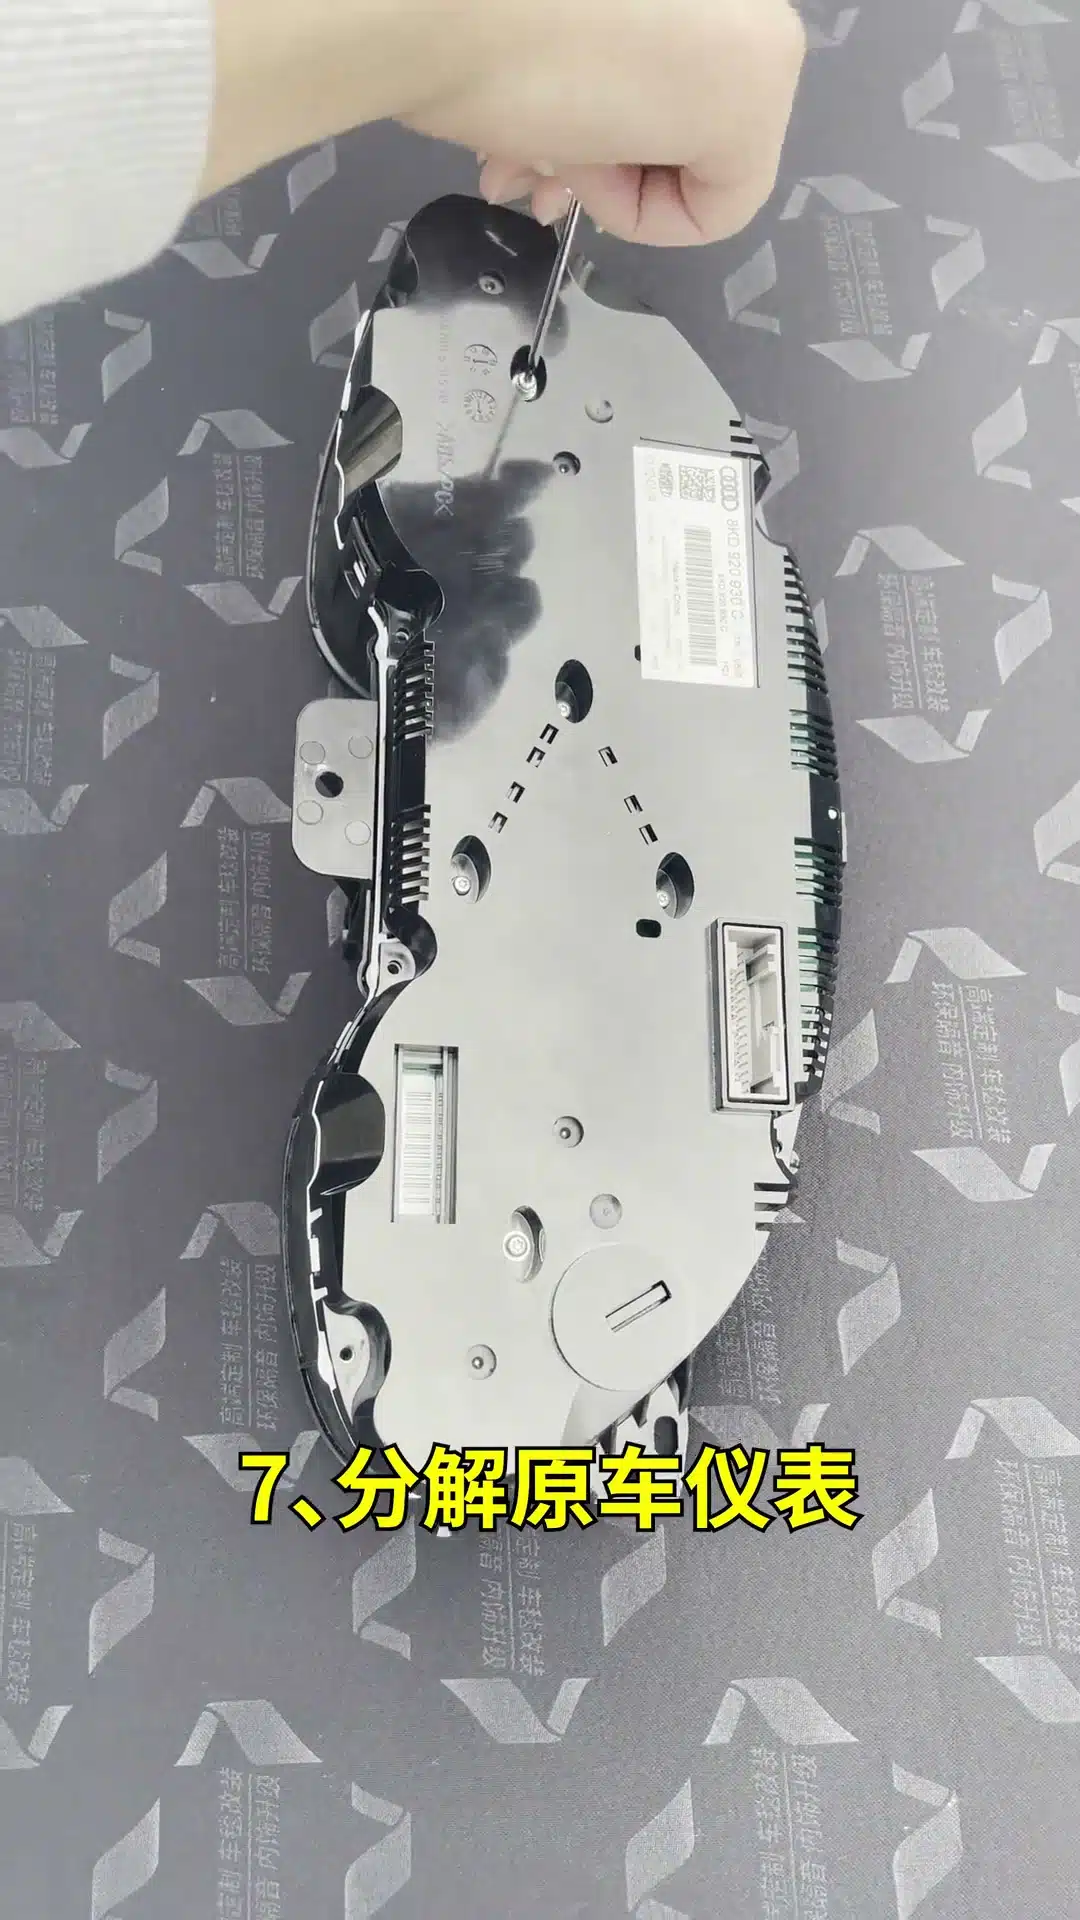
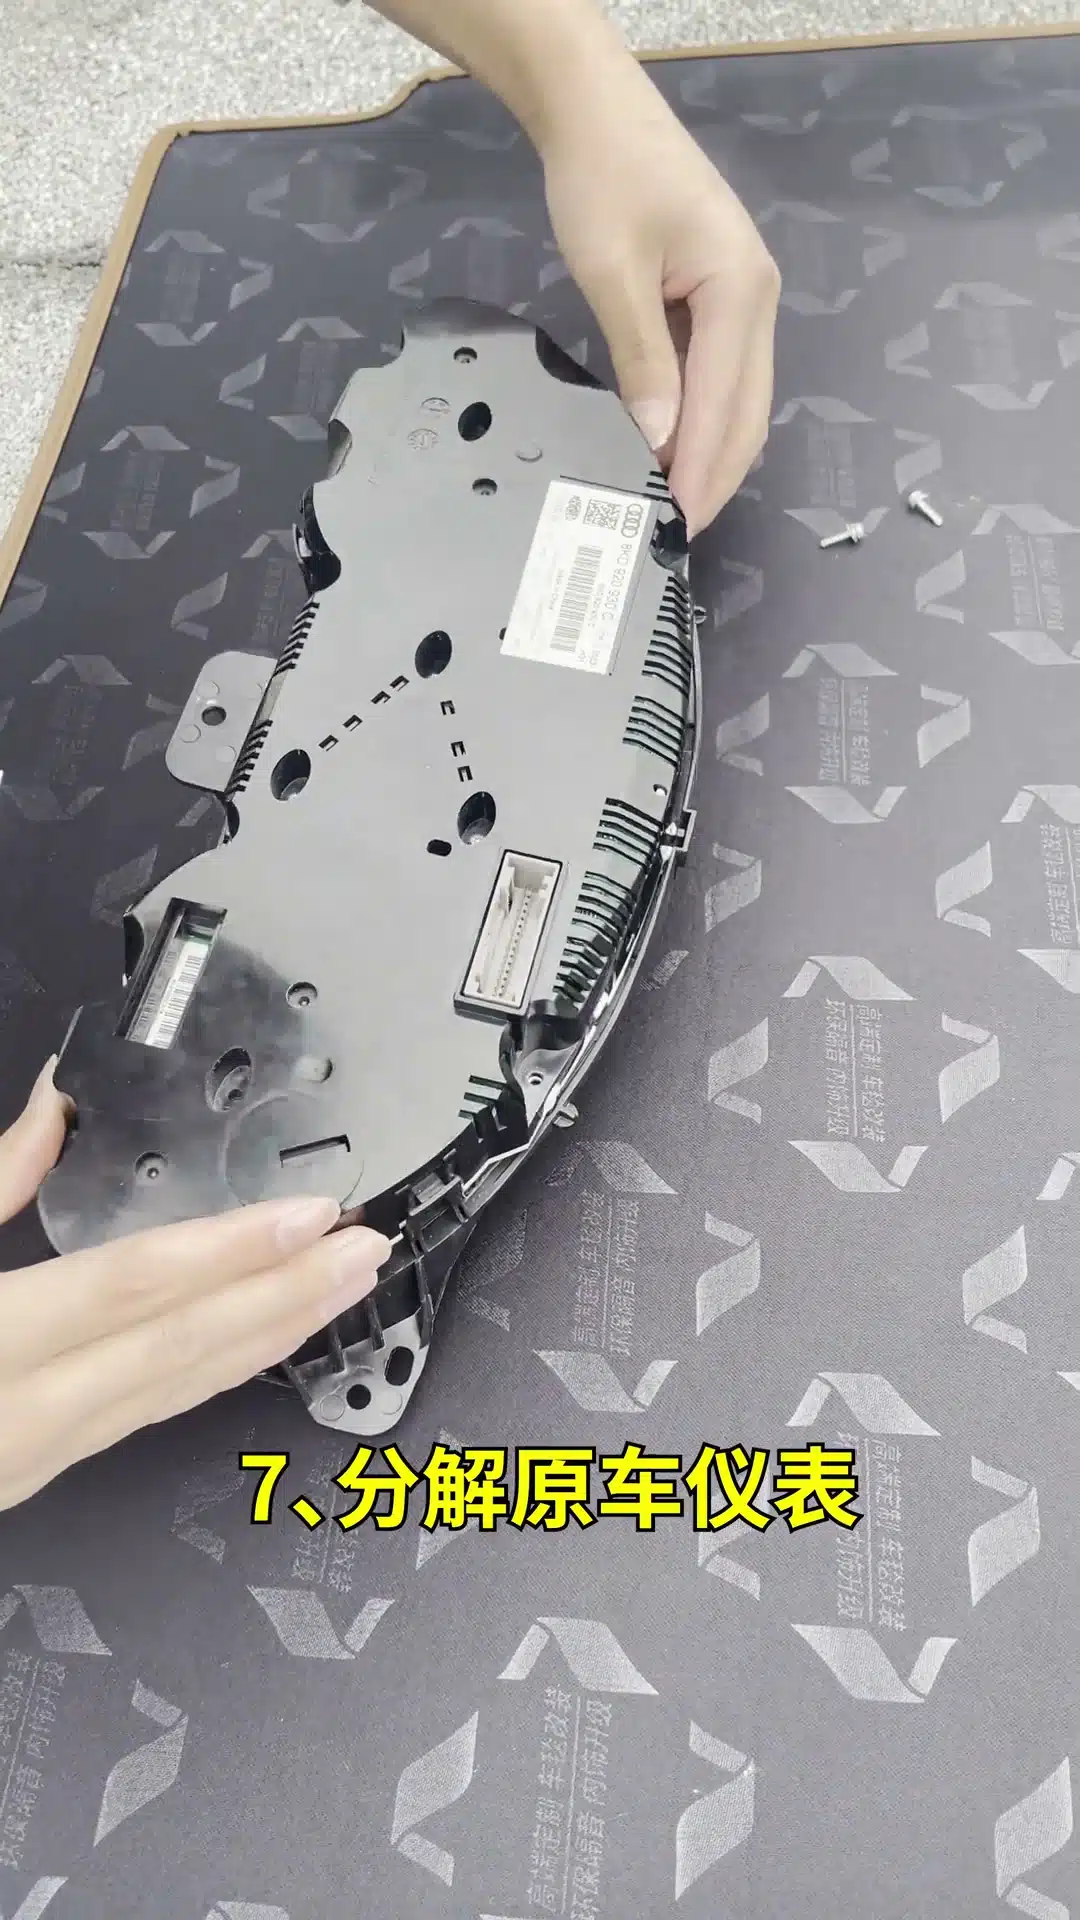
Open the Original Cluster and Inspect the PCB Route
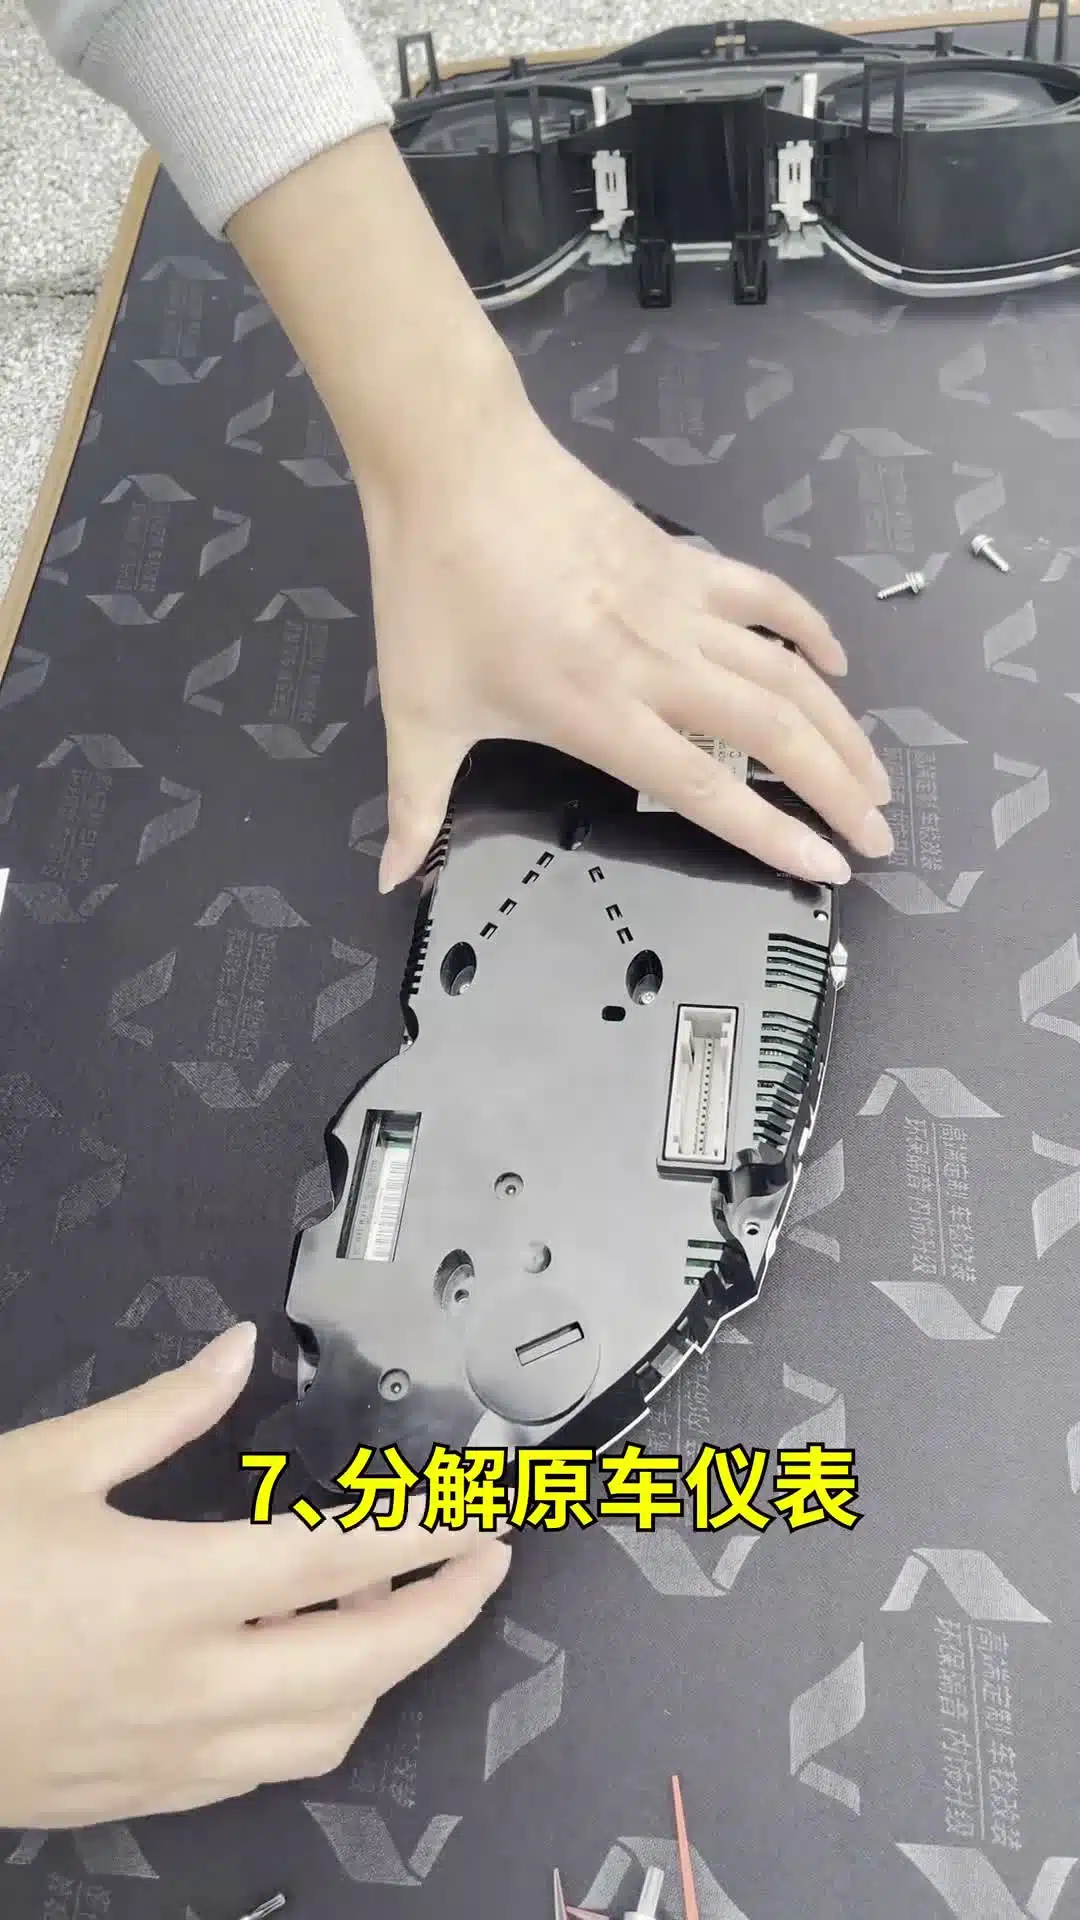
Open the original housing on a clean, soft surface.
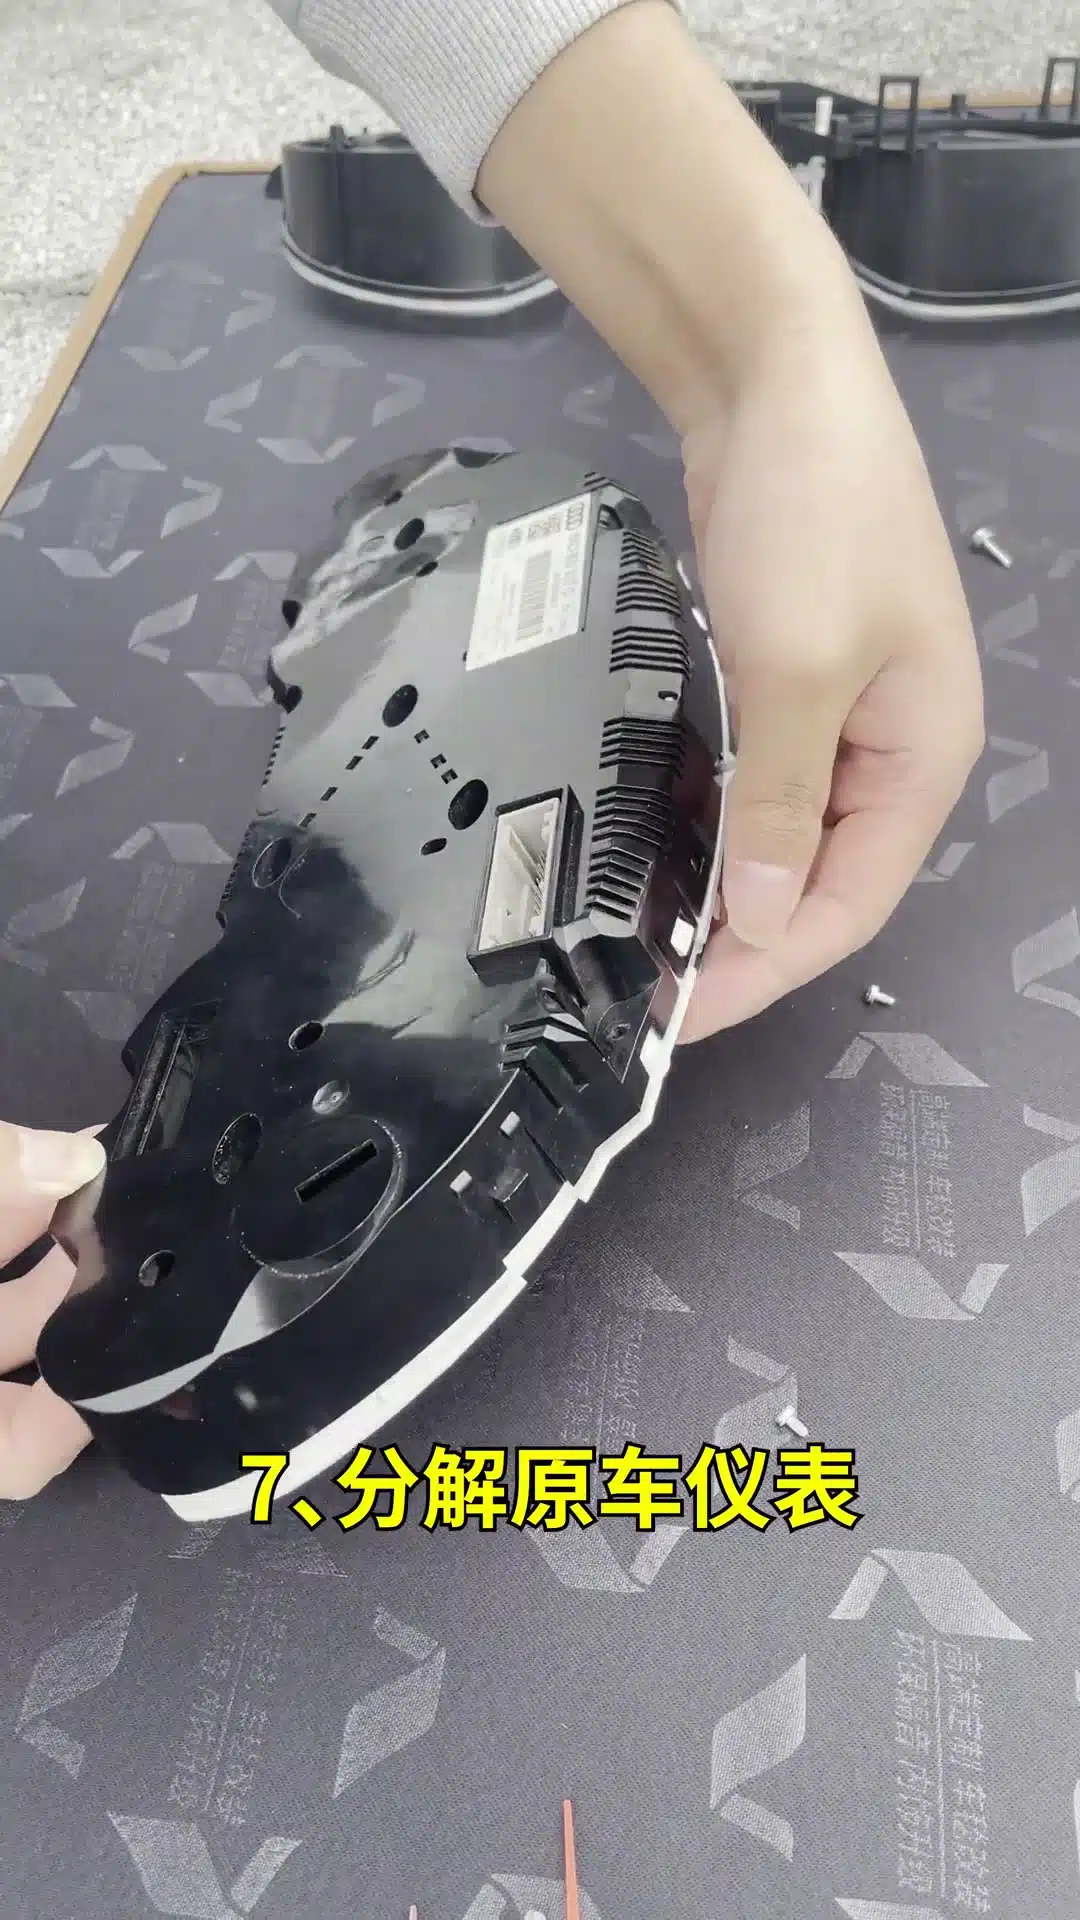
Handle the original circuit board by its edges.
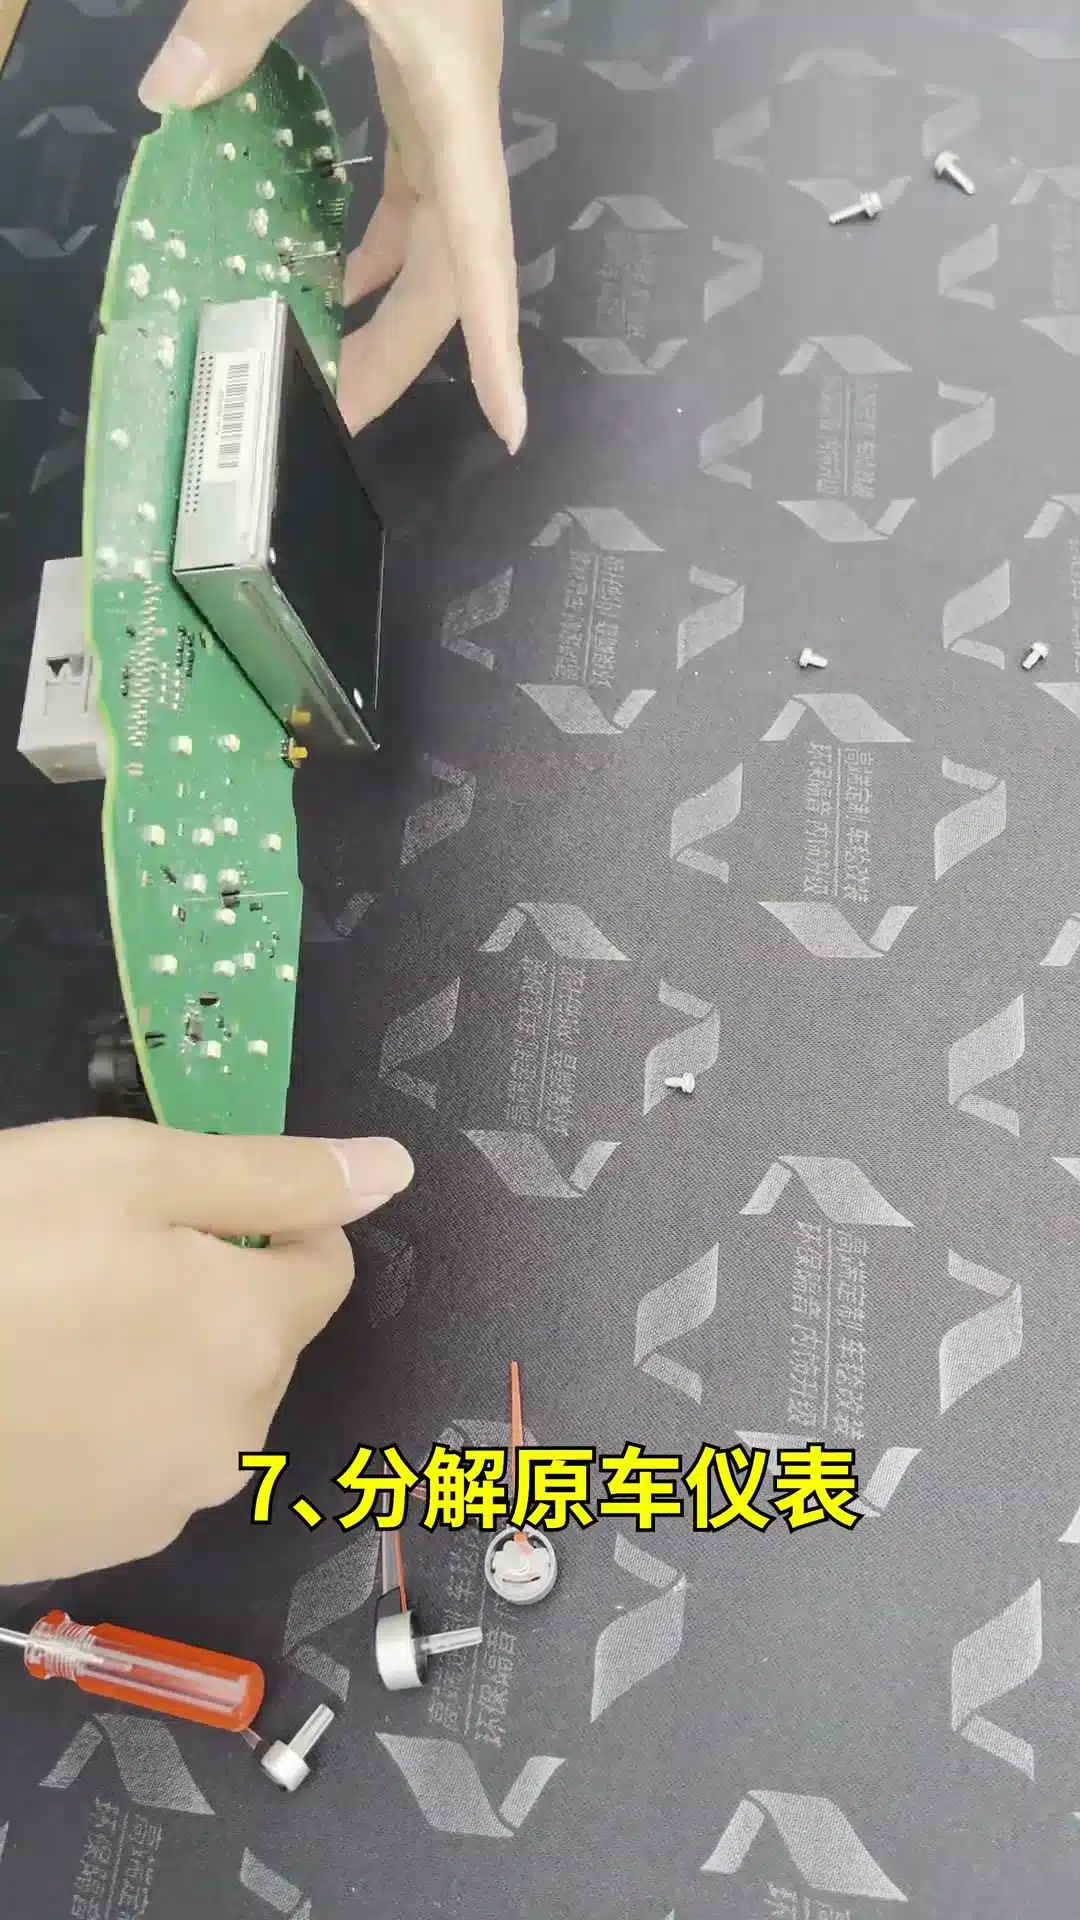
Record the original board position and connector orientation before transfer.
- Photograph the complete original PCB before removal.
- Hold the board by the edges.
- Release ribbon-cable locks correctly before pulling a ribbon.
- Do not touch exposed contacts unnecessarily.
- Never tighten screws directly against PCB components.
Install the Original PCB into the Supplied Protective Route
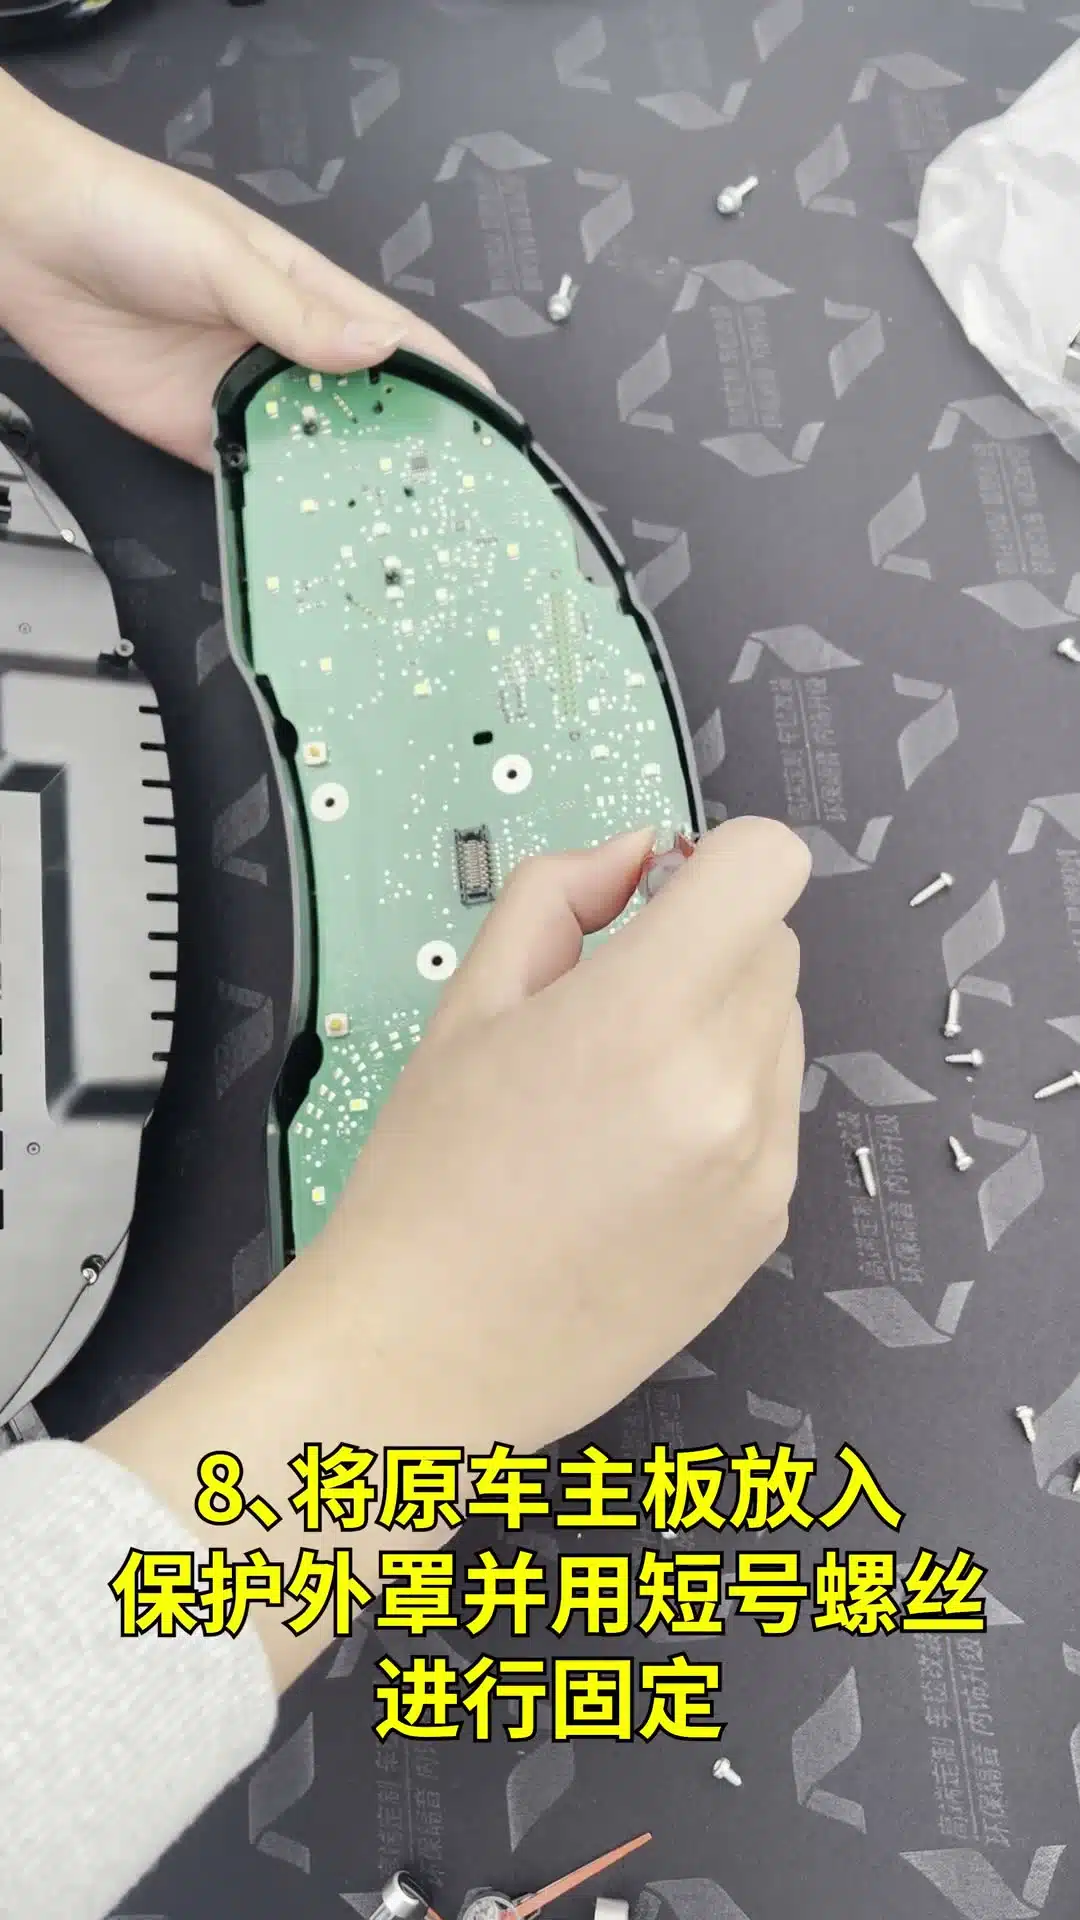
The PCB must sit flat without pressure on components or cables.
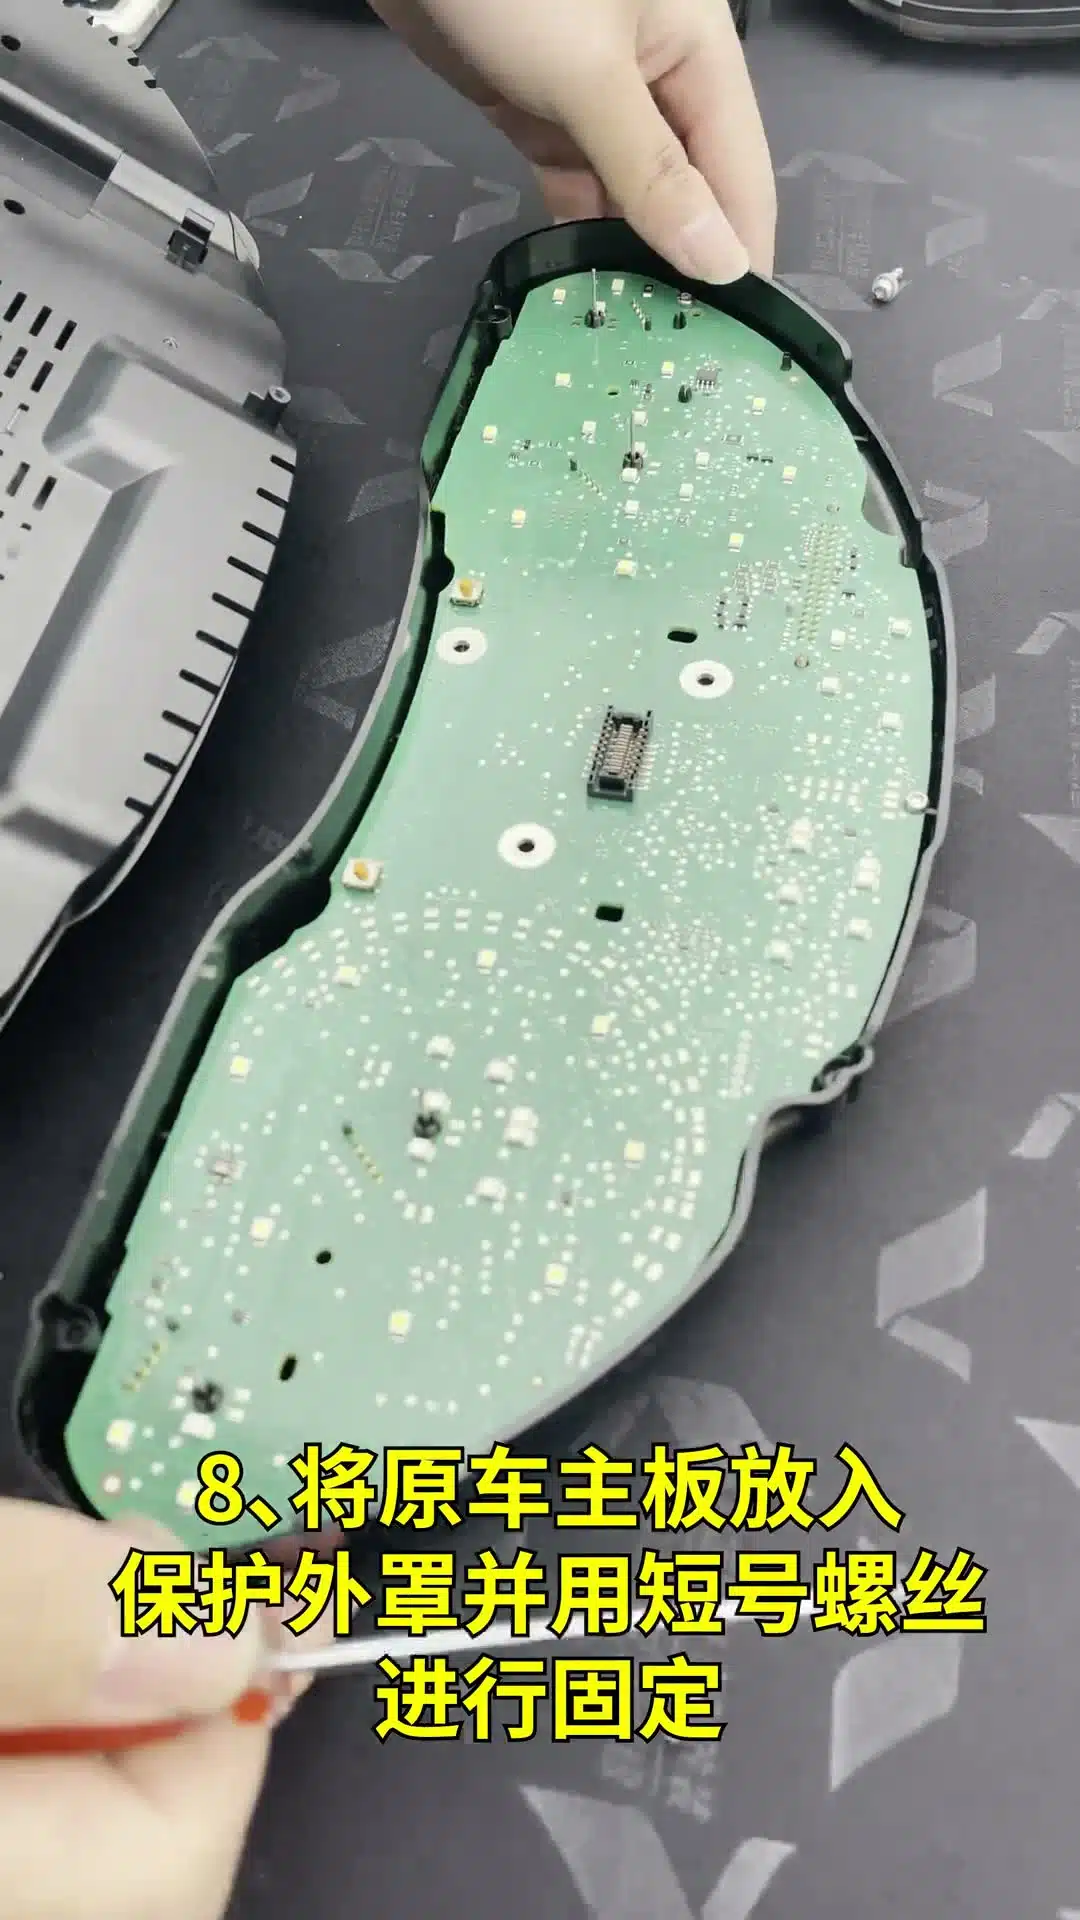
Use the correct short screws and stop when gently secure.
Position the original PCB exactly as required by the supplied housing. Confirm that no ribbon cable is trapped, no component is under pressure and the board sits flat. Tighten only enough to secure it.
Identify and Connect the iKAGOO Harness
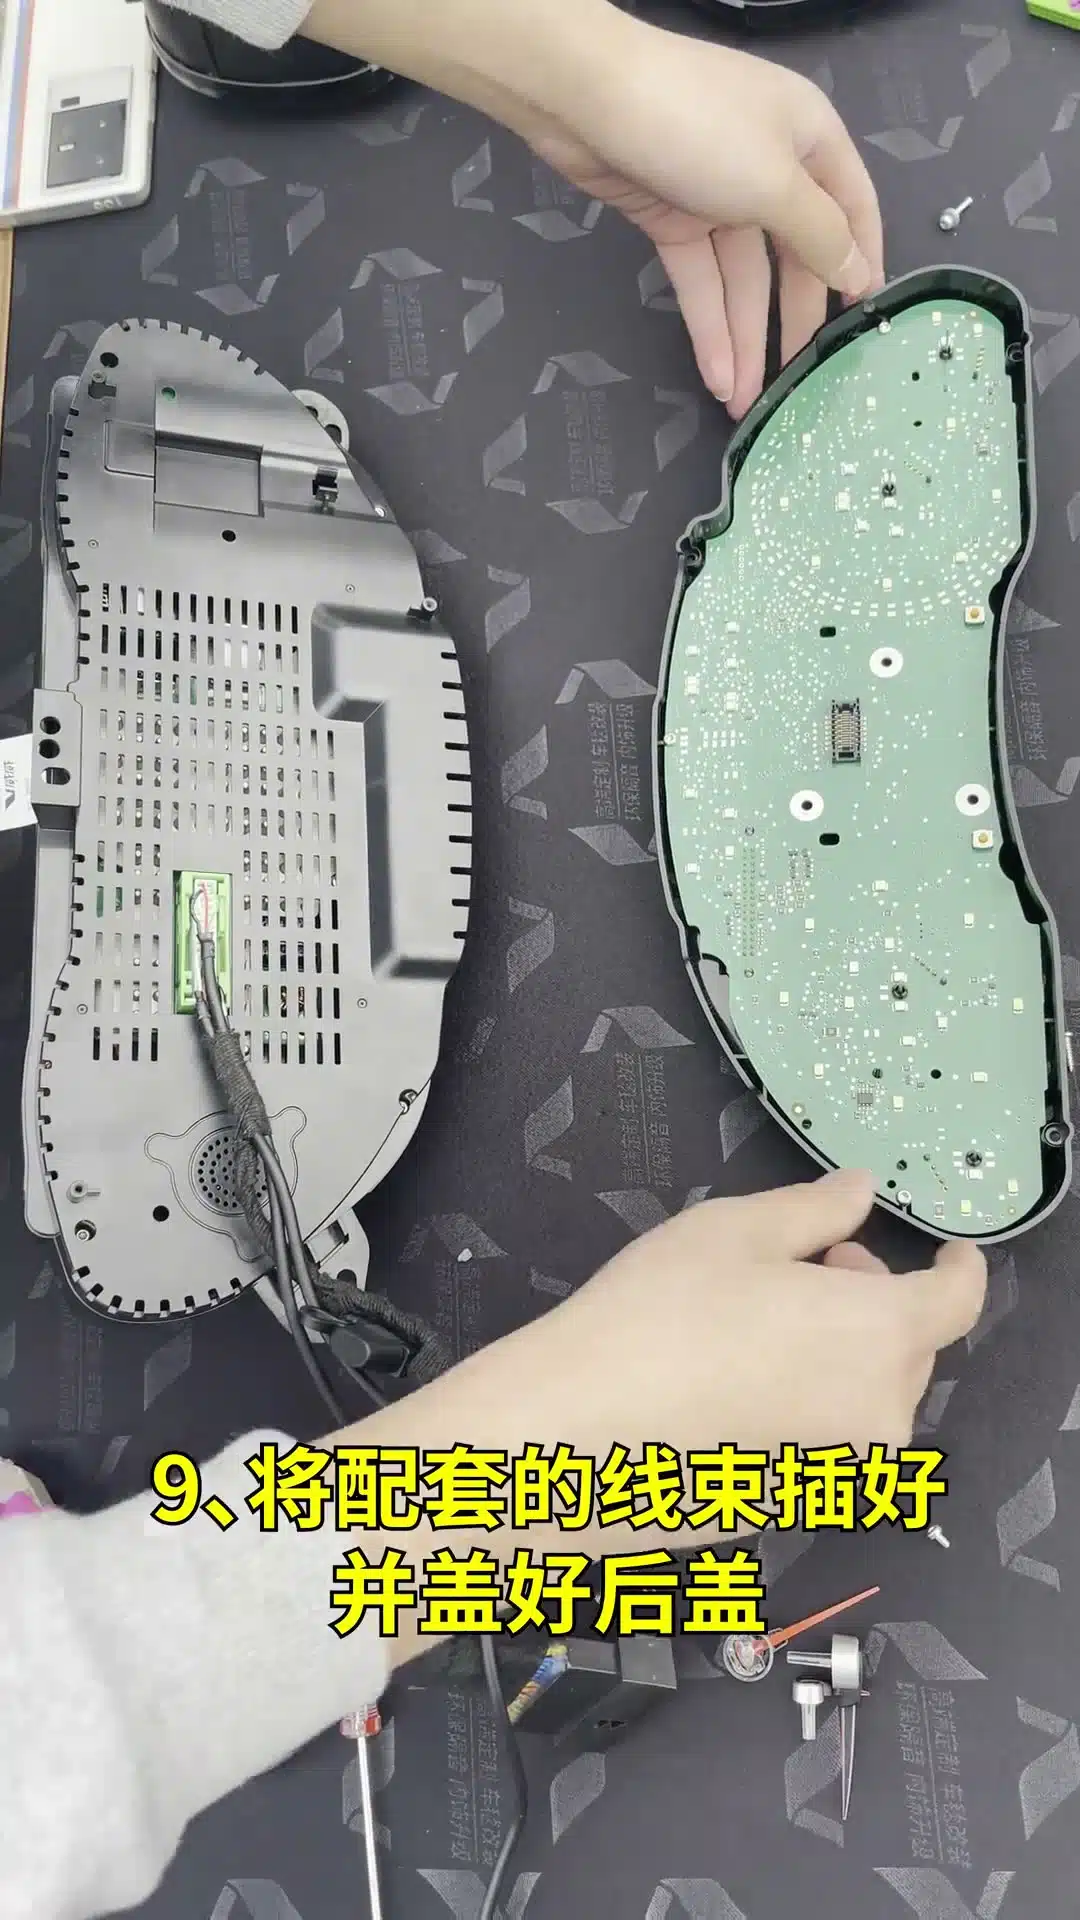
Lay out and identify all supplied connectors before installation.
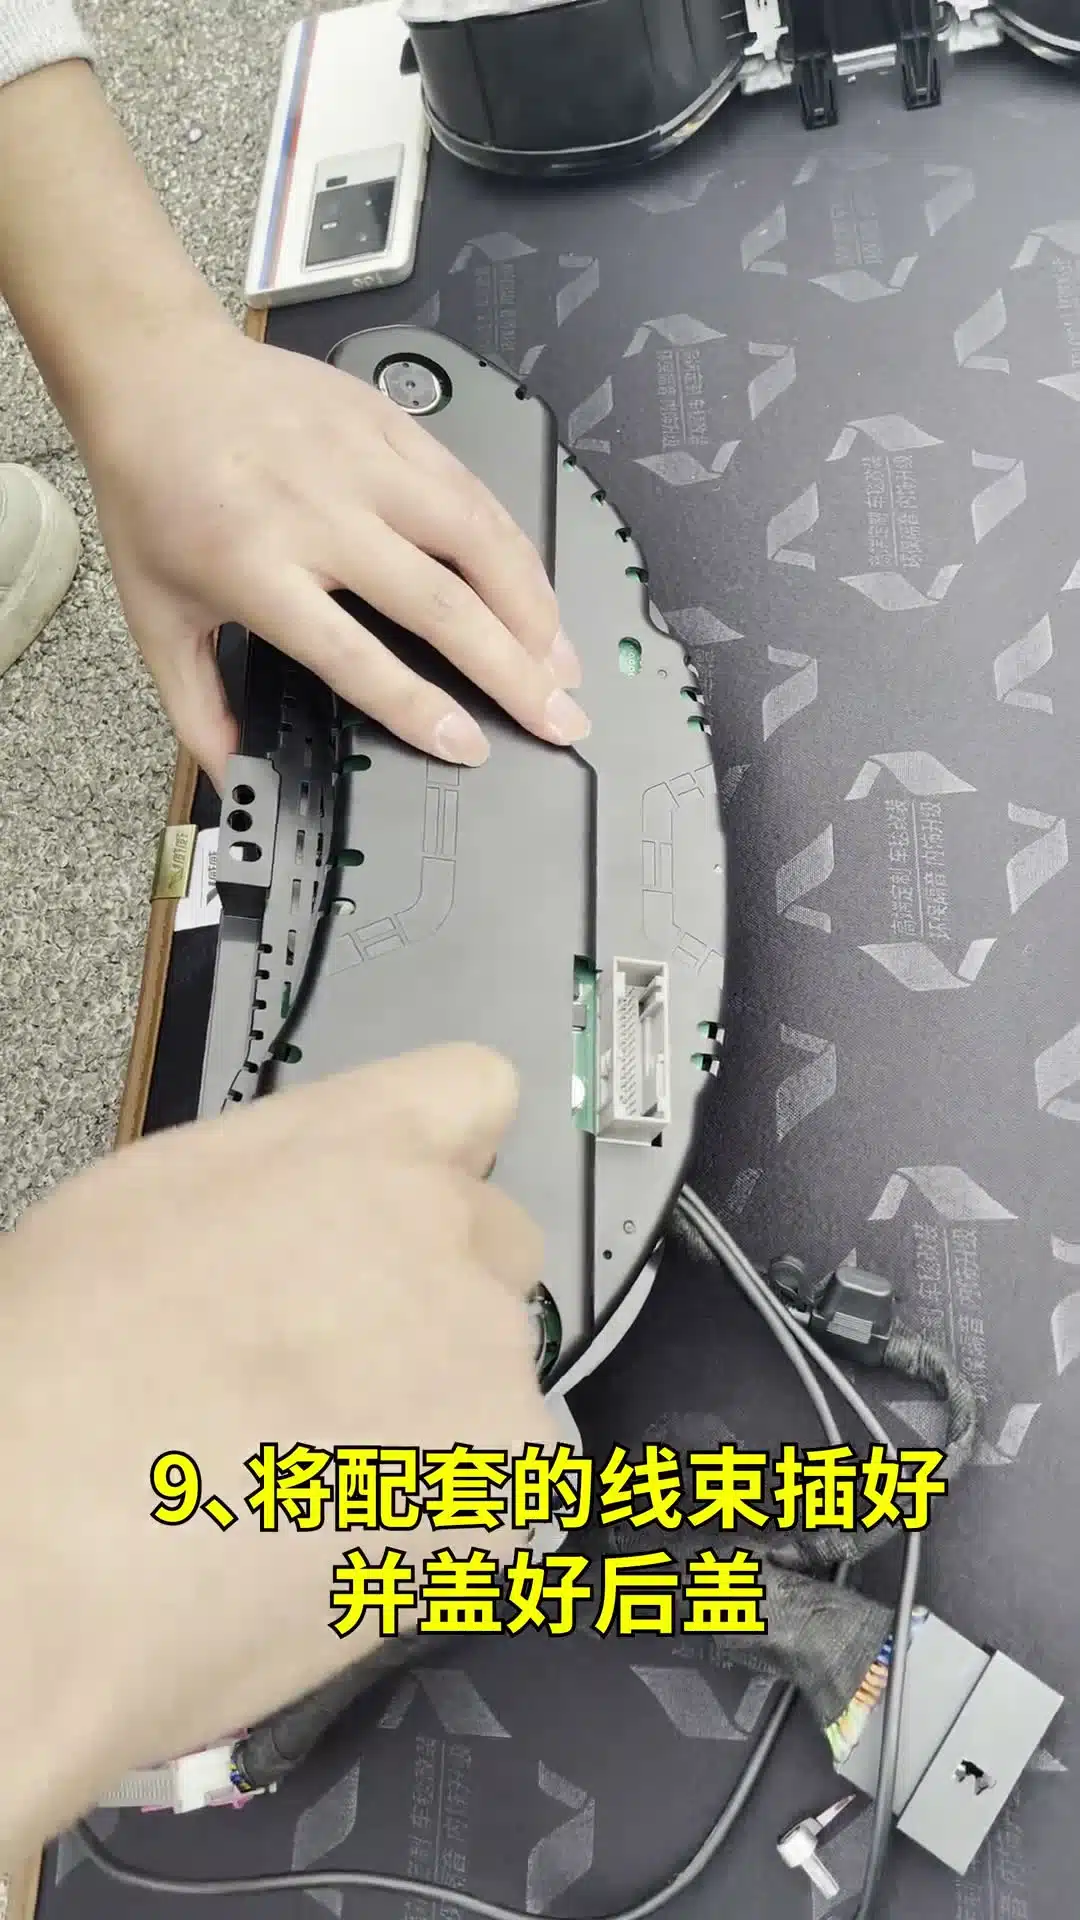
Connect only matching sockets and confirm each locking tab.
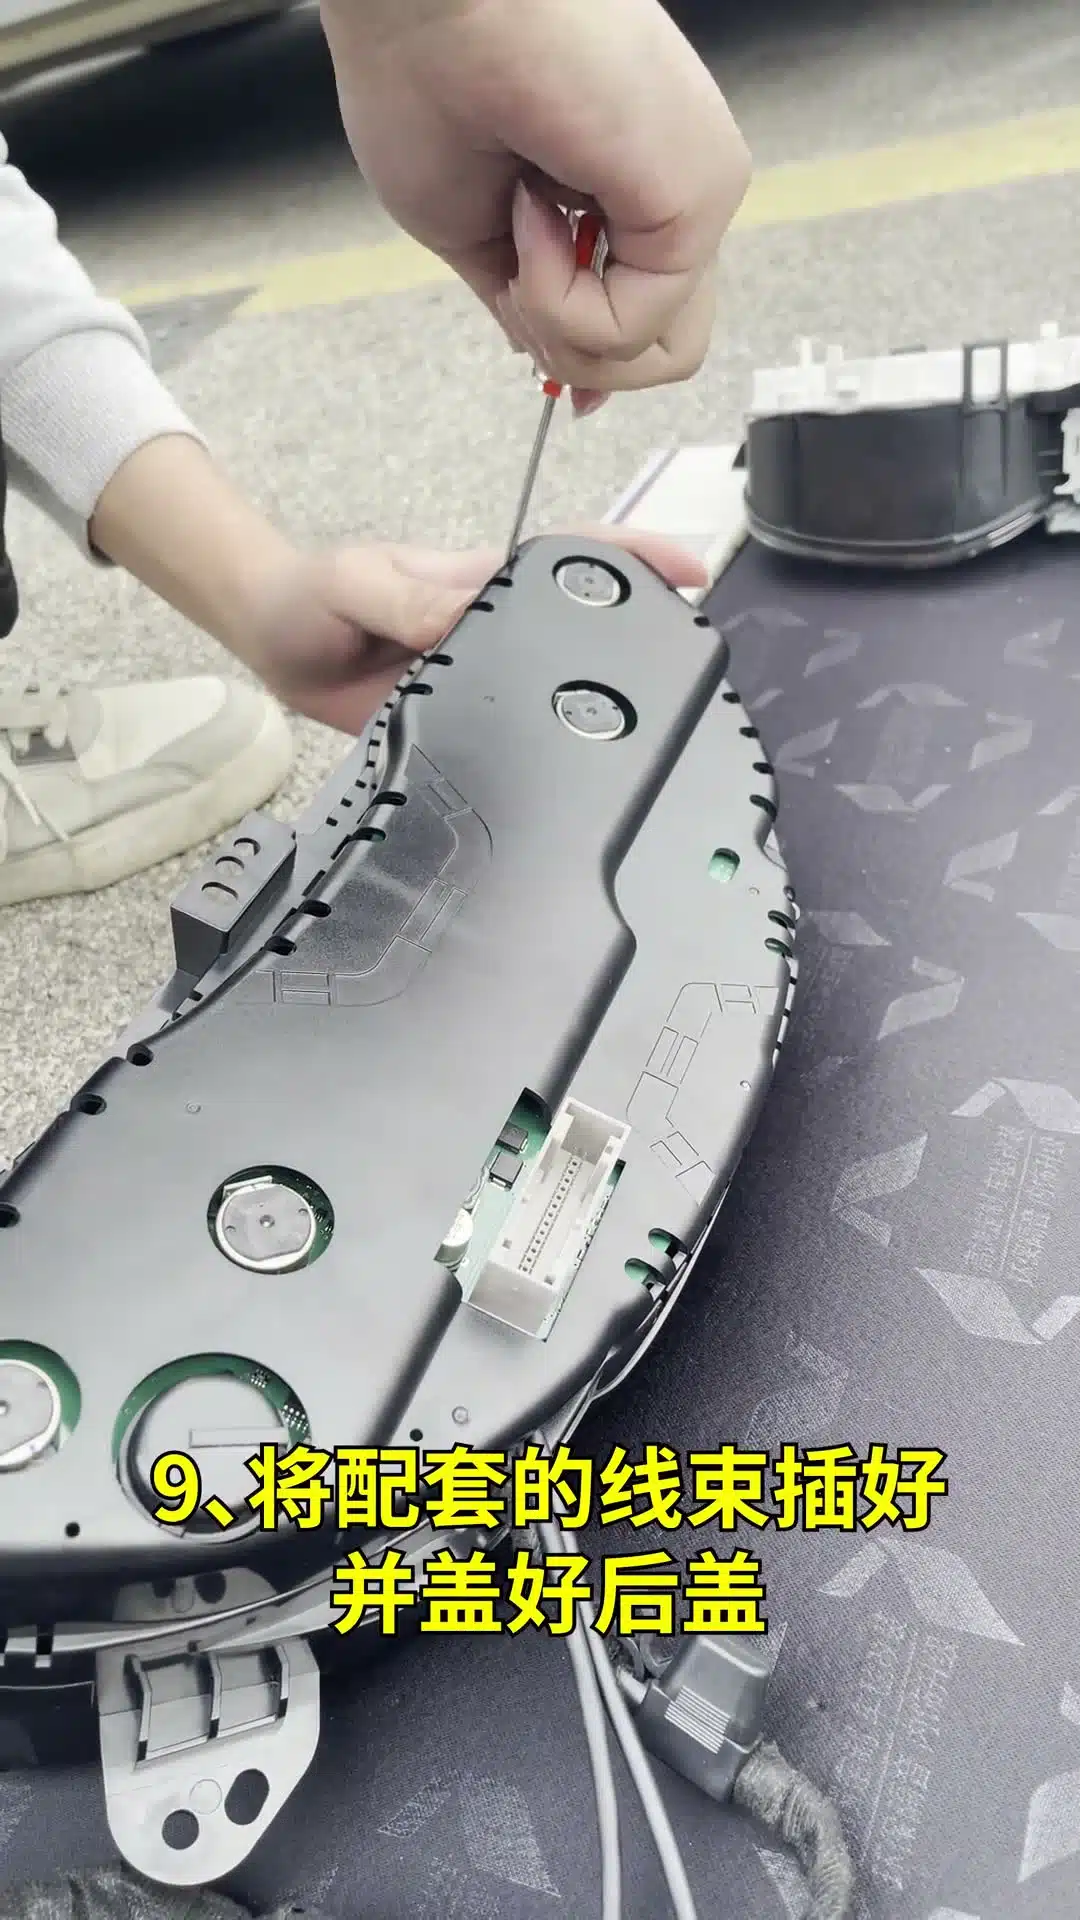
Close the rear housing only after every internal connection is checked.
Match each connector to the corresponding socket. A connector should seat naturally and lock securely. Never modify a plug or force it into a socket because it appears “almost correct”.
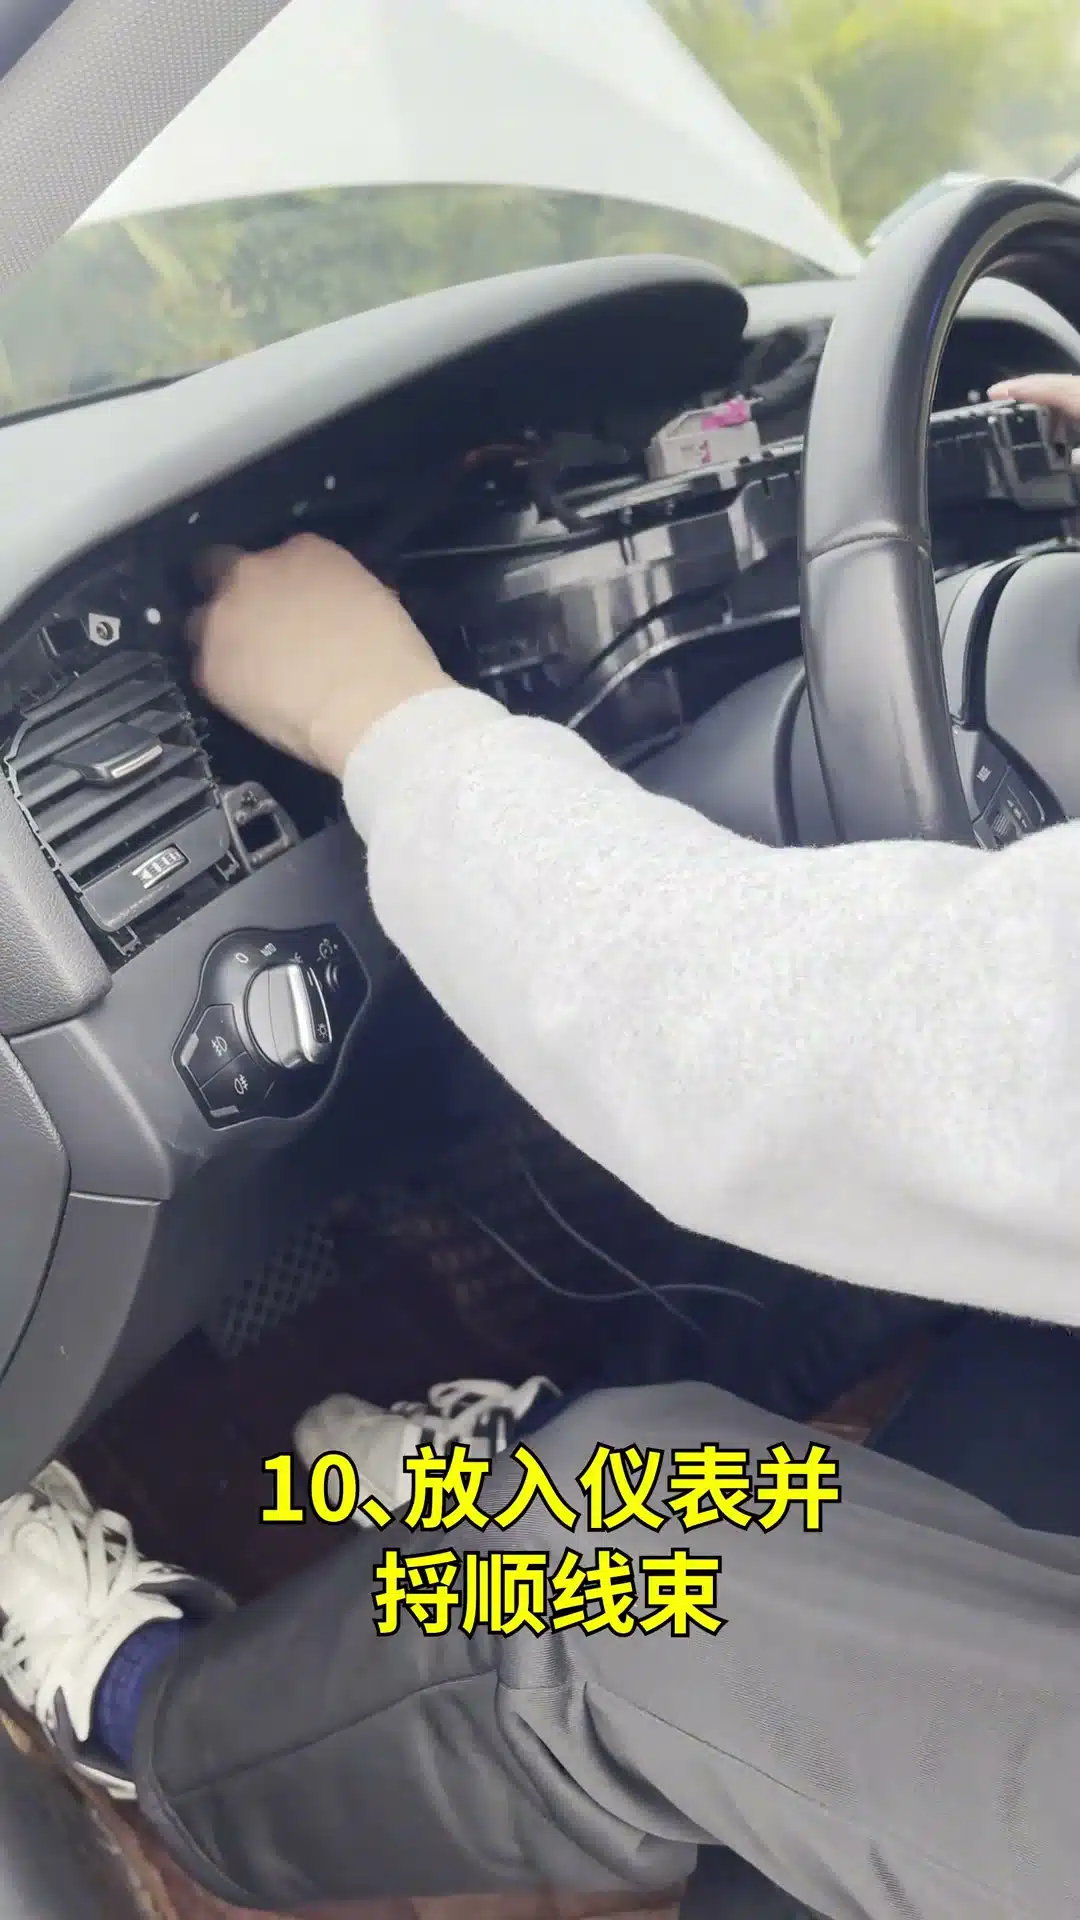
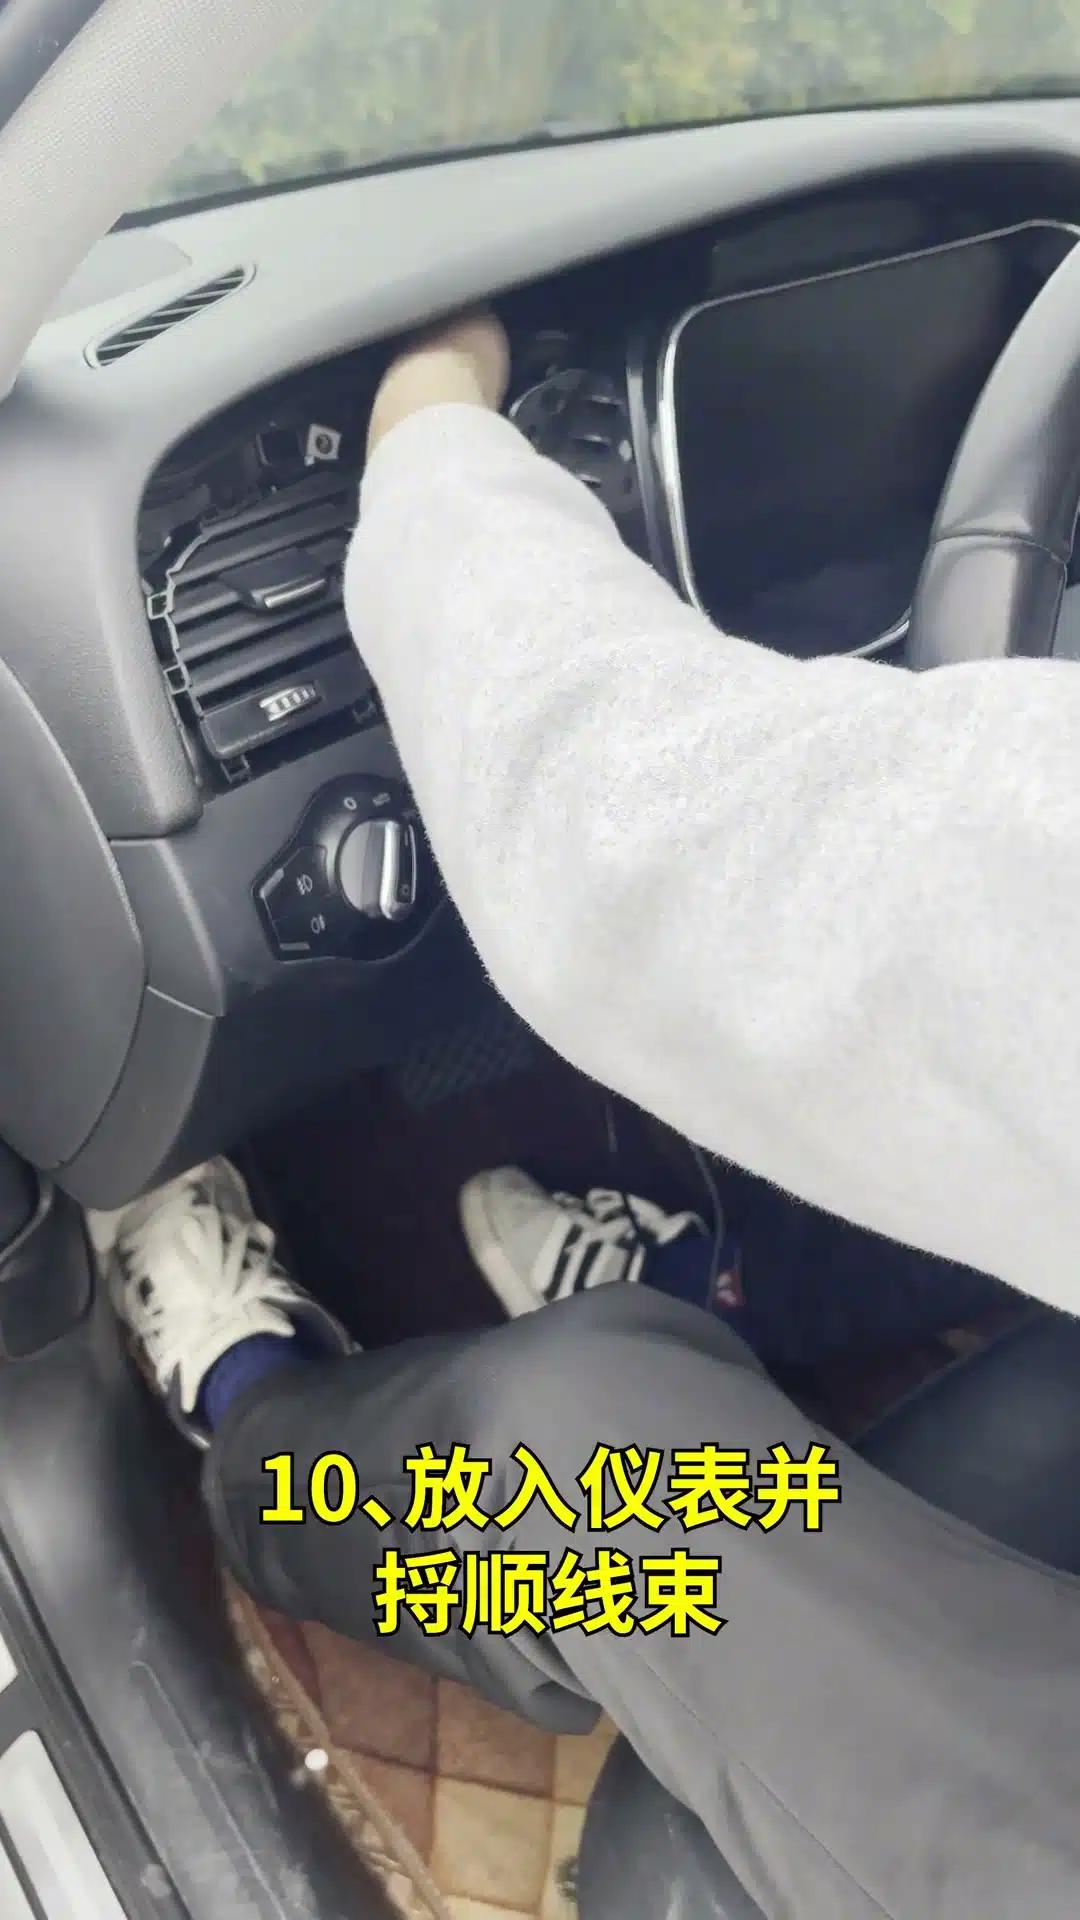
Position the New Cluster and Route the Wiring Correctly
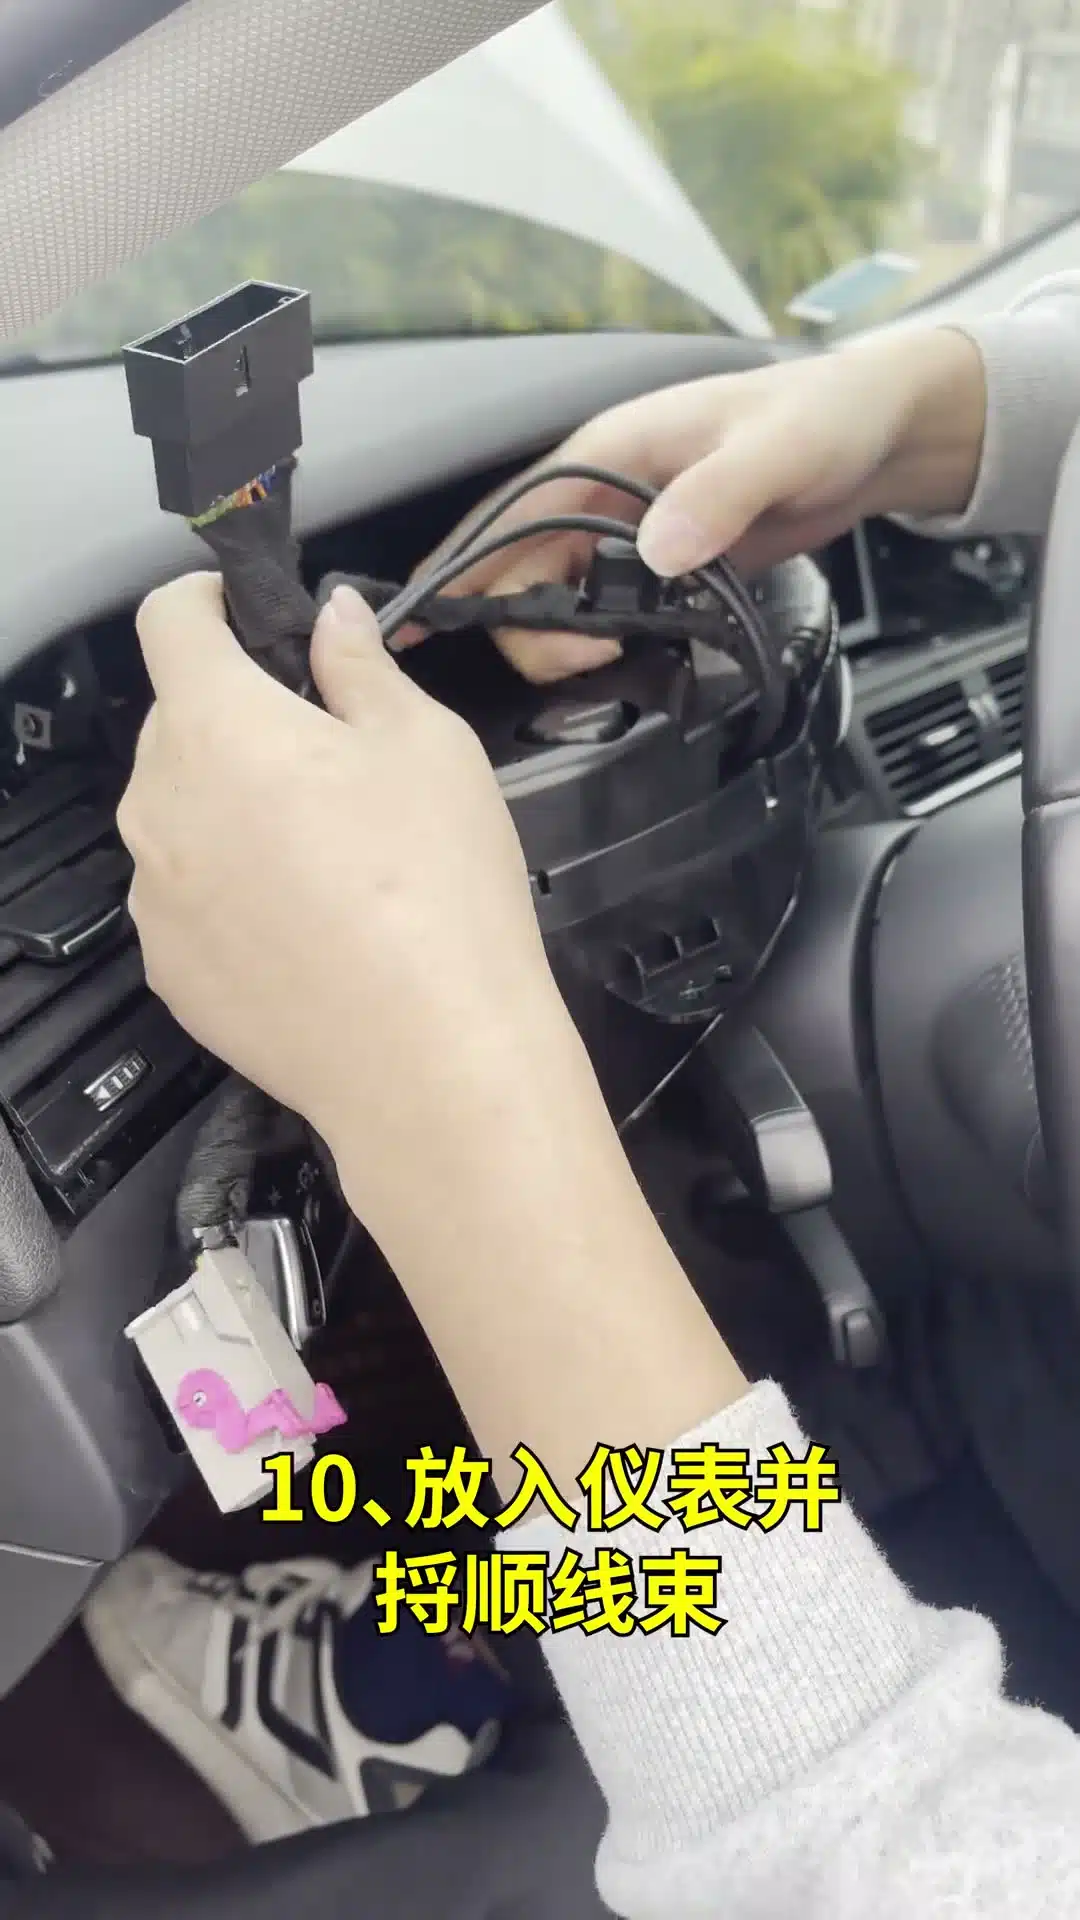
Guide the assembled cluster into the dashboard without forcing the housing.
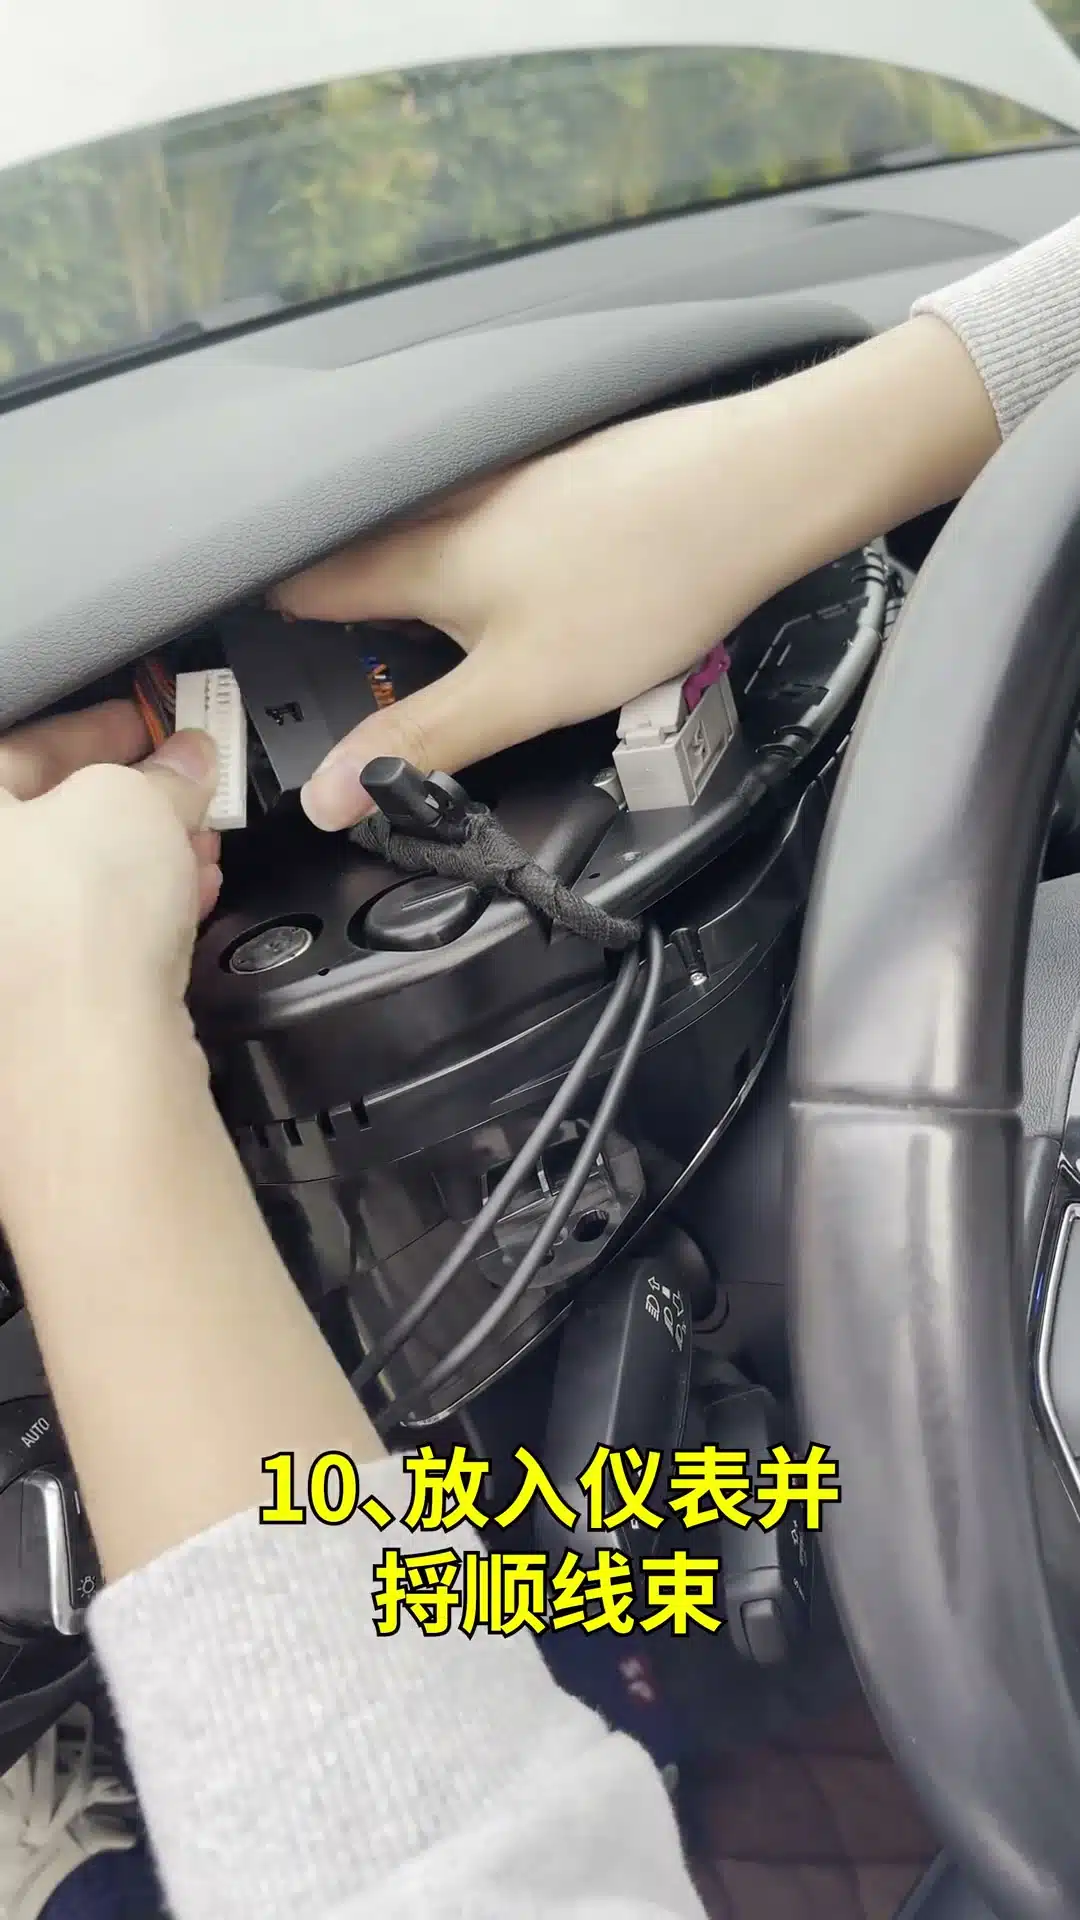
Keep wiring away from pinch points and the moving steering column.
- No cable should be trapped between the cluster housing and dashboard frame.
- Keep wiring clear of the moving steering column.
- Do not leave large bundles directly behind a pressure point on the display.
- Connect the vehicle's original main plug to the confirmed adapter route and verify the lock.
Test the Digital Cluster Before Final Reassembly
Before permanently clipping the dashboard trim back into position, complete a stationary preliminary test with the installed unit safely supported and all required connections secured.
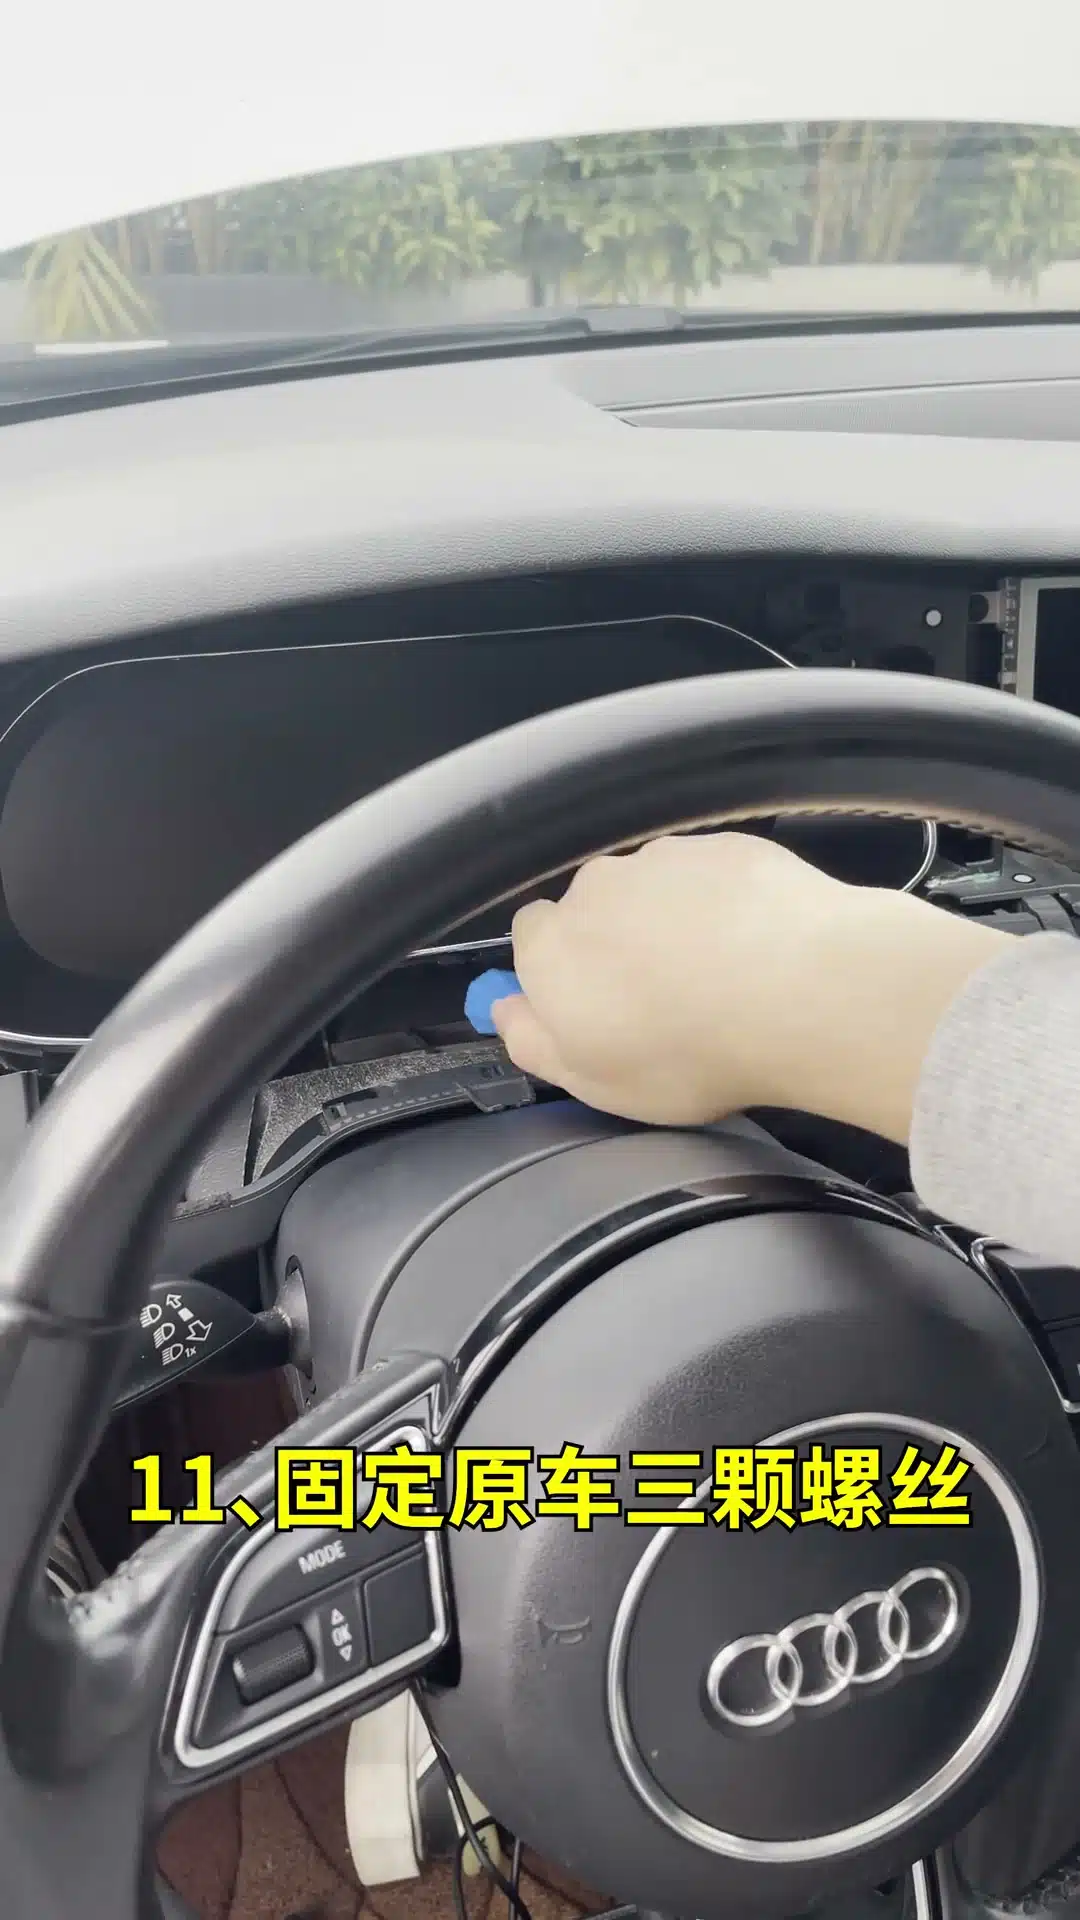
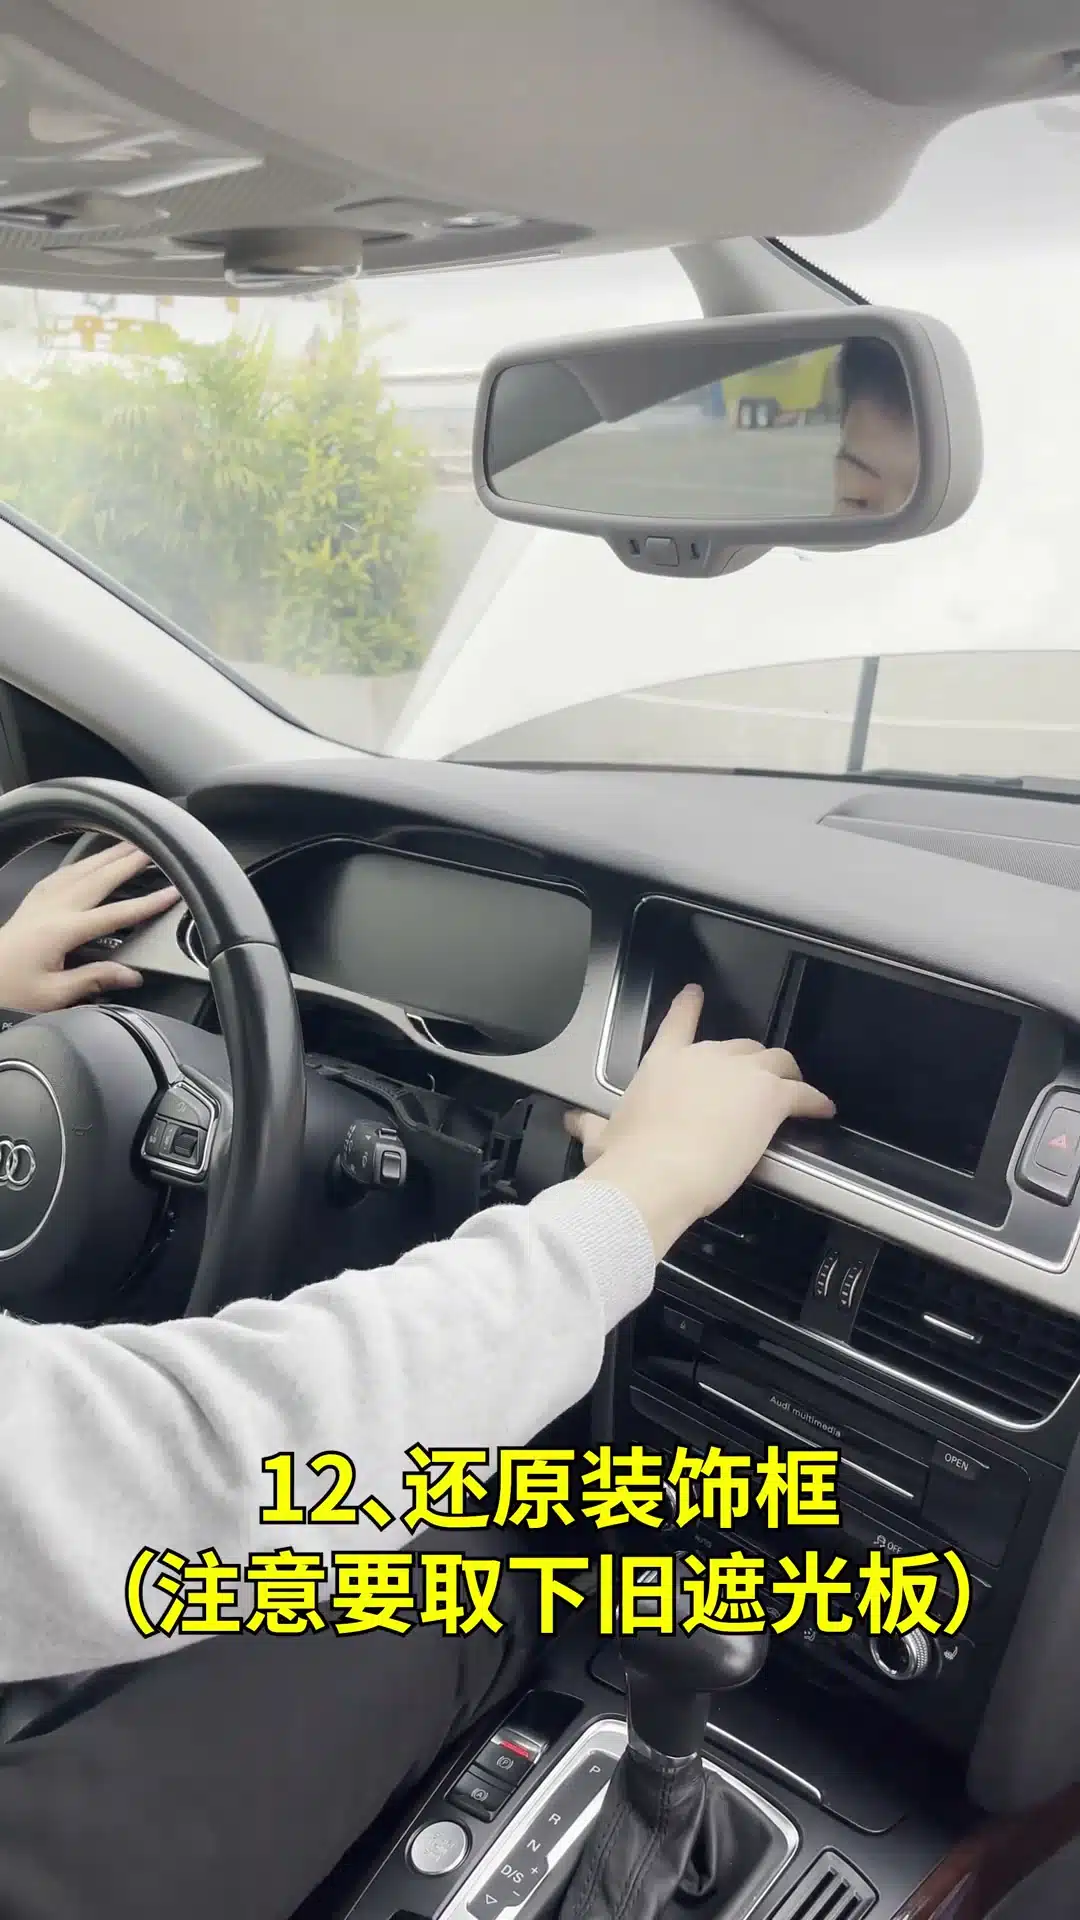
Secure the Cluster and Remove the Old Sunshade Where Required
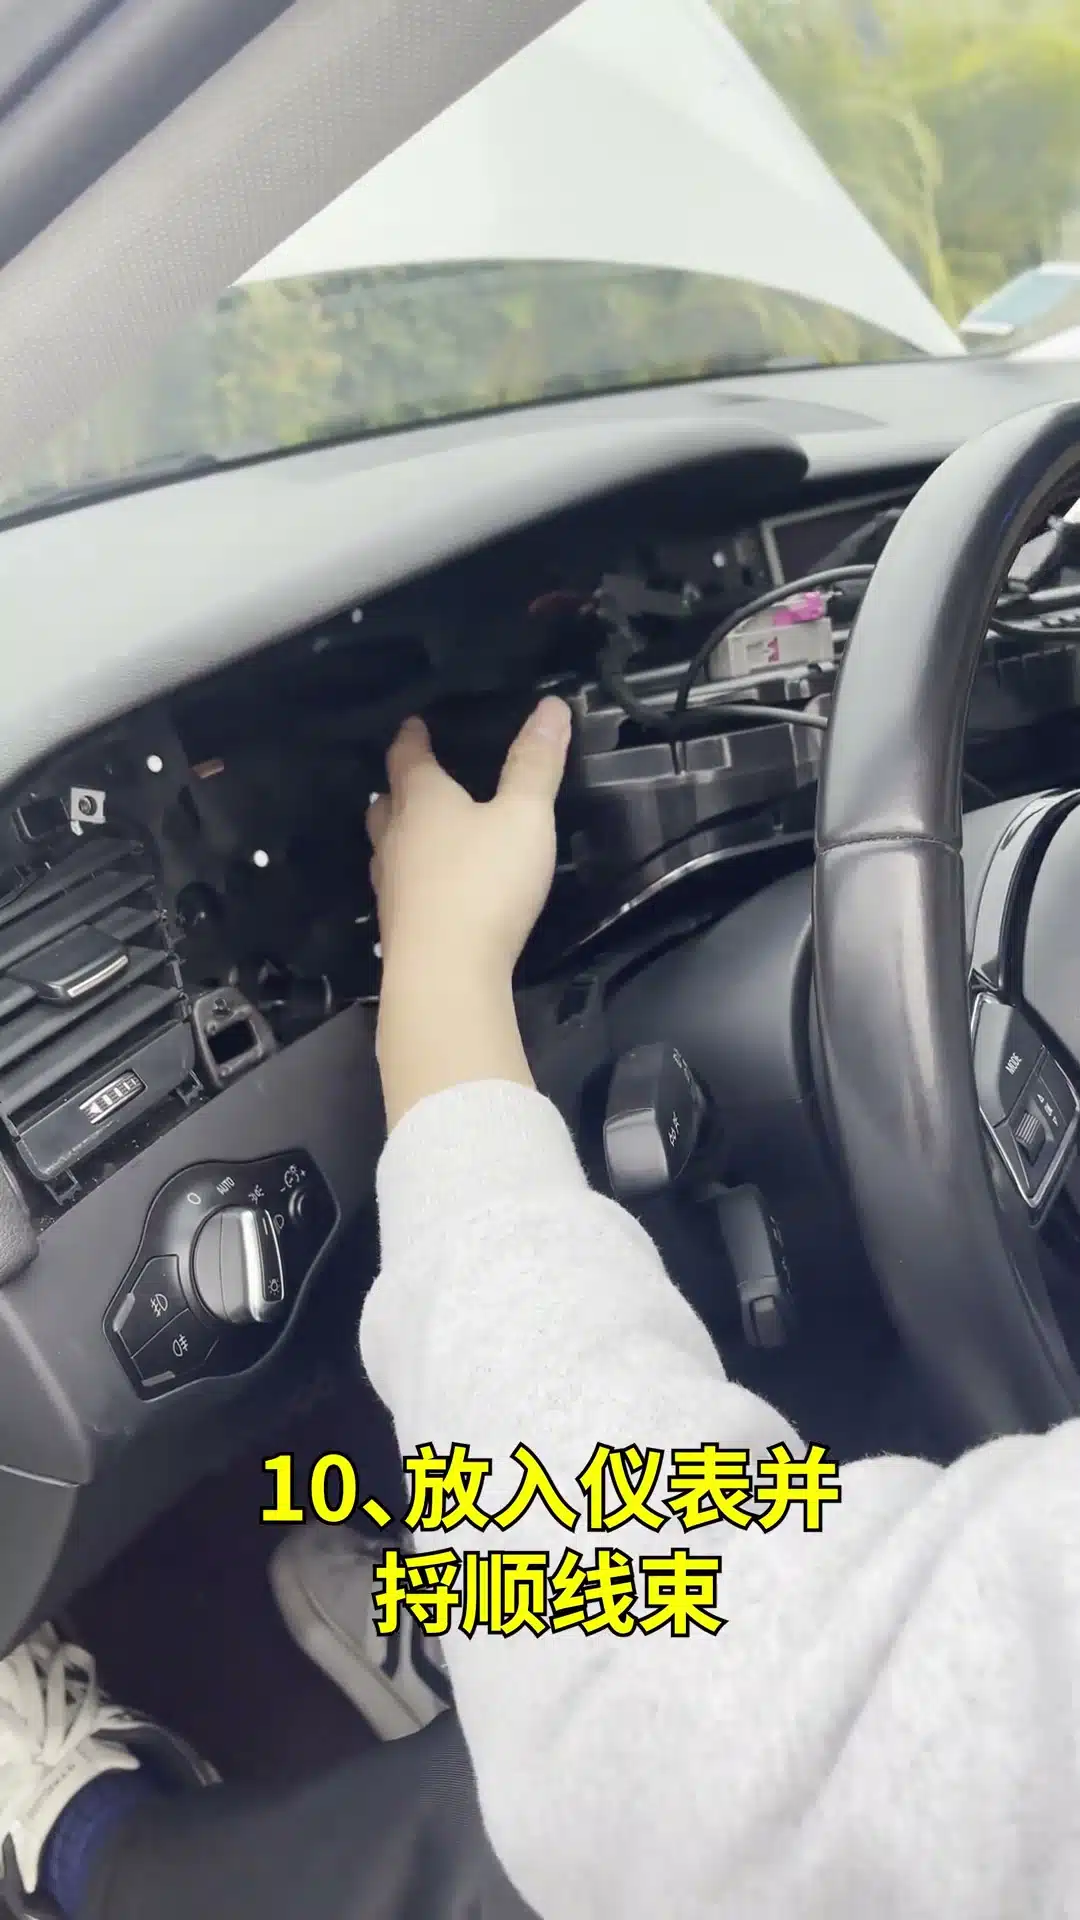
Reuse the correct original dashboard screws and tighten only until secure.
Remove the original sunshade/hood when the confirmed kit requires it.
Secure the new instrument assembly without overtightening into plastic. On the documented trim route, remove the old gauge sunshade/hood before reinstalling the trim because the replacement cluster uses the matched new shape.
Reconnect the Trim, Restore the Steering Wheel and Complete Final Testing
Reconnect the hazard switch before pressing the trim fully into place.
Perform the final ignition-on check after reassembly.
Verify core driving data and warning information one function at a time.

Return the steering wheel to the normal driving position only after wiring is clear.
Reconnect the hazard-switch plug, reinstall the trim evenly and refit the steering-column cover. Check that trim gaps are even and no wiring interferes with steering-column adjustment. Restore your normal steering-wheel position.
What Should You Check After Installing an Audi Digital Cluster?
A screen lighting up is not enough to call an Audi virtual cockpit retrofit installation complete. Compare the new cluster with the baseline recorded before removal.
How Do You Control the iKAGOO Audi Digital Cluster?
Supported Audi A4/A5 B8-family versions use the original vehicle control input prepared for that cluster route. This can include supported multifunction steering-wheel buttons and, on applicable A5 configurations, supported MMI control input. Exact button mapping can differ by vehicle equipment, original protocol and cluster software version.
Button-control check after installation
For the full settings and control reference, use the Hướng dẫn sử dụng cụm đồng hồ kỹ thuật số VW & Audi.
Audi Digital Cluster Settings After Installation
Complete basic setup only after the mechanical installation and core vehicle-data test are successful. Menu names can differ between software versions.
Display Style / Theme
Select an available cluster view or pointer style where your version provides it. Confirm that changing appearance does not alter core vehicle-data behavior.
Ngôn ngữ
Choose from the languages installed in your software package. Language availability is version-dependent.
Độ sáng
Set a comfortable day/night brightness level. Some versions use different adjustment logic depending on the vehicle lighting state.
Time / Display Information
Confirm time and available driver-information pages after the cluster has completed its first stable startup.
LHD / RHD Display Direction
Where provided, select the correct driver-side display orientation for the confirmed left-hand-drive or right-hand-drive setup.
Vehicle Model / Protocol
Do not change model, protocol, CANBUS or engineering values simply to experiment. Use only the configuration assigned to the confirmed vehicle/product route.
Does the Audi Digital Cluster Show Tire / TPMS Information?
Tire-pressure or tire-status display is vehicle- and product-version dependent. On supported configurations, the digital cluster presents information available through the confirmed vehicle-data route. The display does not create missing factory sensor data by itself.
How Do CarPlay, Maps and HDMI Work with an Audi Digital Cluster?
CarPlay, Android Auto, navigation projection, HDMI/DP display and phone mirroring are not one universal function. The correct route depends on the cluster hardware, controller, connected Android head unit and the version supplied with the order.
Built-In / Supported Phone Connectivity
Use the dedicated phone-connectivity route only when your cluster version includes the supported interface.
Open Wireless CarPlay / HiCar Setup →HDMI / DP / Map Display Route
A successful CarPlay connection on the center screen does not automatically mean navigation can appear in the instrument cluster.
Choose the Correct CarPlay / HDMI Route →Đầu phát Android tương thích
If your upgrade goal includes a digital cluster plus Android center screen, the two products need a compatible connection route rather than being selected independently.
Audi A4 A5 Android Radio 2009–2016 →Cluster + Android Upgrade Planning
Review both dashboard systems together when CarPlay, maps, camera display or screen synchronization is part of the purchase decision.
Digital Cluster + Android Head Unit Guide →Do Not Update Firmware Until the Installation Is Verified
A firmware update is not the first fix for a loose connector, incorrect harness, damaged PCB, wrong vehicle route or incorrect configuration. Complete the physical and functional checks first.
- Confirm power and all physical connections.
- Confirm the correct product/vehicle route.
- Check basic settings and supported controls.
- Photograph the cluster's version-information screen.
- Use only the update method and package confirmed for that hardware version.
If an update is actually required, follow the iKAGOO VW/Audi Online & USB Firmware Update Guide .
Audi Digital Cluster Troubleshooting After Installation
| Triệu chứng | Check first | Possible installation area | Hành động tiếp theo |
|---|---|---|---|
| Cluster is completely dark | Main power connector and harness lock | Loose/unseated connector or power route | Ignition OFF, inspect and reseat the confirmed connector route. |
| RPM does not respond | Baseline RPM function, harness, vehicle configuration | Data route / configuration / connection | Do not start changing engineering values blindly; document the symptom first. |
| Fuel reading is incorrect | Original fuel baseline and PCB/harness connection | Original-data route, connection or supported calibration | Compare with pre-install record, then use the correct owner-manual route. |
| Steering-wheel buttons do not control the cluster | Did the buttons work before installation? | Harness, supported control route or vehicle configuration | Check connections and the matched control configuration before software changes. |
| Turn signal / high beam / door status missing | Pre-install function and vehicle data | Original data / PCB / configuration route | Record a video showing the missing signal and contact support if the route should support it. |
| New warning remains after installation | Compare with the original warning-light record | Connection, installation disturbance or separate vehicle fault | Do not assume every warning is a display defect; diagnose the actual vehicle fault/code. |
| Trim will not sit flush | Old sunshade and rear cable position | Physical interference | Remove trim, inspect the documented sunshade step and reroute cables. |
| CarPlay works but maps do not show on the cluster | Installed CarPlay / HDMI / DP route | Display interconnection, not basic cluster installation | Use the dedicated CarPlay / HDMI route guide. |
When Should You Stop Installation and Contact iKAGOO?
- The PCB or connector layout does not match the guide.
- A supplied connector cannot be inserted naturally.
- The cluster does not physically fit the confirmed dashboard route.
- Một cầu chì liên tục bị cháy.
- You see smoke, smell overheating or find damaged wiring.
- The display repeatedly restarts or goes black.
- Critical driving information is incorrect or unavailable.
- You are uncertain which vehicle/protocol/engineering value should be selected.
Hãy gửi iKAGOO order number, exact vehicle model/year, clear wiring/connector photos, version-information screen and a short video showing the symptom. This gives the technical team enough evidence to identify the correct product route.
Installation Is Not the End of the Support Relationship
A verified iKAGOO order remains the reference for product identification, installation guidance, troubleshooting, software guidance, compatible parts and repair/upgrade coordination.
These are separate support commitments. Three-year software support does not extend the 12-month hardware warranty, and five-year parts/upgrade support does not mean all future parts, shipping or repair work is free. Availability is subject to the applicable iKAGOO policy and product platform.
Installation Responsibility and Third-Party Product Boundary
iKAGOO provides product-specific documentation and technical support for verified iKAGOO products. The installer remains responsible for safe physical disassembly and reassembly of the vehicle, correct tool use, correct connection of the supplied hardware, protection of the original PCB and avoidance of forced or unsupported modifications.
| iKAGOO support area | Installer / vehicle work responsibility |
|---|---|
| Confirmed product-specific installation references | Safe trim removal and prevention of physical dashboard damage |
| Product setup and supported function guidance | Correct handling of connectors, wiring and original vehicle electronics |
| Diagnosis of supported product issues | Avoiding forced connections, short circuits and incorrect voltage/wiring |
| Applicable software / firmware guidance | Not changing unverified engineering values or unsupported coding |
| Eligible hardware warranty review | Damage caused by installation error, tools, modified wiring or unrelated vehicle faults is reviewed separately |
Audi A4 / A5 Digital Cluster Installation FAQ
Can I install an Audi A4 B8 digital cluster myself?
Experienced DIY owners can complete the supported route, but PCB handling, dashboard trim, wiring and full post-install testing make this an advanced rather than beginner plug-in job. Use a professional automotive-electronics installer if you are not comfortable handling the original cluster electronics.
Does an Audi A4 or A5 digital cluster require the original PCB?
The supported iKAGOO B8/B8.5 route uses original instrument electronics according to the matched product configuration. Follow the exact board-transfer or retention route supplied for the order rather than assuming every Audi cluster is identical.
Will my original mileage remain after the digital cluster installation?
Mileage behavior follows the confirmed original instrument-data route. Record the original odometer before installation and confirm the reading during the first powered test. If it differs unexpectedly, stop and contact iKAGOO before changing settings.
Do I need dealer coding for an Audi A4/A5 digital cluster?
Do not assume one answer applies to every Audi retrofit product. Supported iKAGOO original-board routes are prepared to retain the relevant original vehicle-data path, but configuration requirements depend on the exact hardware, vehicle and ordered route. Do not perform unrelated coding unless it is specifically required.
Do I need to cut or splice the Audi factory wiring?
The supported matched iKAGOO installation route is designed to avoid intentionally cutting the main factory wiring. If your supplied harness appears to require cutting the factory loom when your confirmed instructions do not show it, stop and verify the product route first.
Can I control the digital cluster from the original steering-wheel buttons?
Supported configurations retain the matched original control route. Button mapping depends on the vehicle equipment and installed cluster version, so verify menu, page-change and confirmation controls immediately after installation.
Why are my steering-wheel buttons not working after installation?
First confirm whether the buttons worked on the original cluster. Then inspect the harness connection and matched vehicle-control configuration. Do not change CANBUS or engineering values randomly because an incorrect setting can create additional symptoms.
Can the Audi digital cluster show CarPlay or navigation?
Some product routes support CarPlay, Android Auto, navigation or other display interconnection functions, but they are kit- and connection-dependent. Use the dedicated CarPlay/HDMI route guide to identify whether your system uses built-in connectivity, an external box, HDMI/DP projection or another supported route.
Does the cluster show tire pressure?
Tire/TPMS display depends on the original vehicle data, equipment and supplied cluster version. A replacement display cannot create factory sensor information that the confirmed vehicle route does not provide.
Should I update firmware if a function does not work immediately?
No. Check the physical installation, original PCB, harness, vehicle configuration and version information first. Firmware should only be updated using the package and method confirmed for the installed hardware.
Can I use this guide for a digital cluster purchased from another seller?
No. Another supplier may use different hardware, firmware, wiring, CANBUS modules, PCB architecture and software. Use the original seller's documentation and support rather than applying an iKAGOO-specific procedure to unknown hardware.
What information should I send iKAGOO if I need technical help?
Send the valid iKAGOO order number, vehicle model/year, LHD/RHD information, product label or version page, clear connection photos, a video showing the problem and the troubleshooting steps already completed.
Related Audi Digital Cluster Guides, Products and Support
Use the page that matches your next task instead of applying settings from an unrelated vehicle or software version.








Add comment
Bạn phải đăng nhập để gửi bình luận.