


Hướng dẫn lắp đặt đầu đĩa Android cho Mercedes W221: 49 bước thực hiện chi tiết, cách khắc phục sự cố không có âm thanh và kiểm tra tính tương thích trước khi mua
Hướng dẫn lắp đặt đầu đĩa Android cho Mercedes S-Class W221: Hướng dẫn chi tiết 49 bước cho NTG3.0 / NTG3.5
Hướng dẫn này của iKAGOO sẽ chỉ ra quy trình lắp đặt đầu đĩa Android cho xe Mercedes-Benz S-Class W221, từ khâu kiểm tra bảng điều khiển cho đến khi hoàn thiện việc lắp ghép các chi tiết trang trí. Hướng dẫn này dành cho các chủ sở hữu xe W221 đang tìm kiếm hướng dẫn lắp đặt màn hình Android cho Mercedes W221, nâng cấp CarPlay cho W221 NTG3.0 / NTG3.5, giữ nguyên hệ thống COMAND nguyên bản, định tuyến âm thanh AUX, kết nối hộp LVDS, cũng như cách khắc phục sự cố không có âm thanh trước khi mua hoặc lắp đặt gói nâng cấp.
W221 không chỉ đơn thuần là một thiết bị thay thế đầu đĩa đa năng. Một bản nâng cấp hệ thống định vị Android đúng chuẩn OEM phải tính đến hệ thống COMAND nguyên bản, bộ khuếch đại âm thanh xuất xưởng, đường truyền cáp quang, đường truyền âm thanh AUX, bộ điều khiển nguyên bản, các nút điều khiển trên vô-lăng, tín hiệu camera, đường truyền màn hình LVDS và sự tương thích với bảng điều khiển trung tâm.
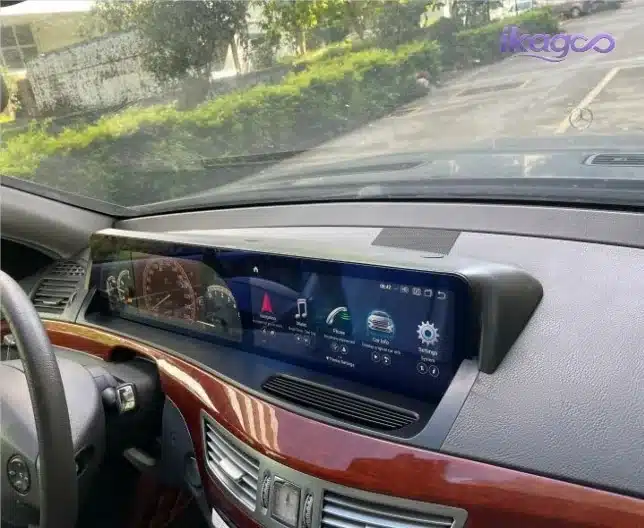
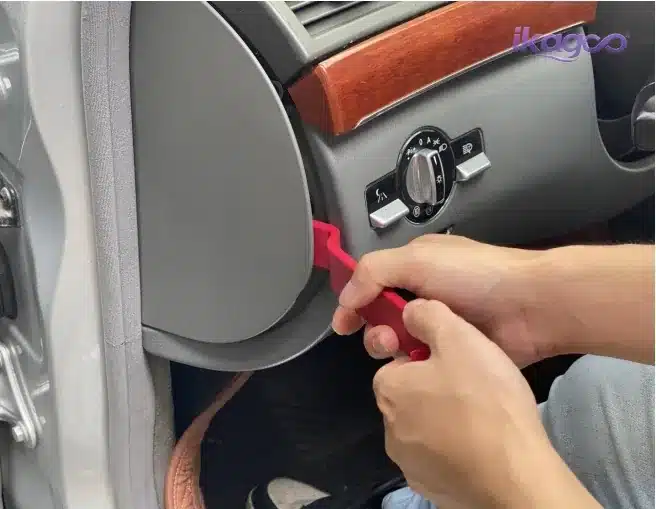
Các bằng chứng cài đặt được sử dụng trong hướng dẫn này
Hướng dẫn này dựa trên các hình ảnh tham khảo về việc lắp đặt đầu đĩa Android cho dòng xe Mercedes-Benz S-Class W221, các điểm kiểm tra đường đi dây điện, cũng như kinh nghiệm đánh giá khả năng tương thích của iKAGOO đối với các mẫu xe NTG3.0 / NTG3.5. Mục tiêu không chỉ là chứng minh rằng màn hình có thể được lắp đặt, mà còn giải thích những rủi ro thực sự trong quá trình lắp đặt: tháo gỡ tấm ốp bảng điều khiển, truy cập vào hệ thống gốc của xe, xử lý cáp quang, đường dẫn âm thanh AUX, đường dẫn tín hiệu LVDS, phản hồi của bộ điều khiển gốc, hoạt động của camera nguyên bản và kiểm tra chức năng cuối cùng.
Cơ sở bằng chứng
- 49 bức ảnh hướng dẫn lắp đặt được sắp xếp theo trình tự từng bước.
- Các điểm kiểm tra lắp đặt đối với bảng điều khiển W221, các chi tiết trang trí, màn hình nguyên bản, bộ điều khiển trung tâm, cổng AUX, cáp quang, đường truyền giao thức và LVDS.
- Quy trình đánh giá tính tương thích mà iKAGOO áp dụng trước khi đề xuất phiên bản sản phẩm phù hợp.
Trọng tâm của việc đánh giá kỹ thuật
- Lắp đặt bảng điều khiển cho Mercedes-Benz S-Class W221 / V221.
- Xác định phiên bản COMAND NTG3.0 / NTG3.5 trước khi mua.
- Âm thanh AUX, cáp quang, hộp LVDS, bộ điều khiển gốc và các giới hạn trong việc khắc phục sự cố camera.
Hạn chế quan trọng
- Các xe cùng năm sản xuất W221 vẫn có thể có hệ thống âm thanh, camera, vị trí vô-lăng và lịch sử lắp đặt hệ thống dây điện khác nhau.
- Không nên chỉ dựa vào khoảng thời gian để quyết định mức độ tương thích cuối cùng.
- Người mua nên gửi ảnh thực tế của xe trước khi đặt hàng.
Hướng dẫn này giúp chủ sở hữu xe W221 đưa ra quyết định như thế nào
Phần này dành cho các chủ sở hữu xe Mercedes S-Class W221 đang chuẩn bị đưa ra quyết định mua hoặc lắp đặt. Thay vì coi việc nâng cấp này như một công việc lắp đặt hệ thống âm thanh ô tô thông thường, phần này sẽ phân tích ba nhu cầu thiết thực: lựa chọn đầu phát Android phù hợp cho Mercedes W221, nắm rõ quy trình lắp đặt, và tránh các sự cố thường gặp khi khắc phục lỗi màn hình Android trên W221.
Trước khi mua thiết bị
- Đầu đĩa Android Mercedes W221
- Màn hình Android trên Mercedes S-Class W221
- Nâng cấp CarPlay và Android Auto cho mẫu xe W221
- Hệ thống định vị Android W221 12,3 inch
- Mua hệ thống âm thanh Mercedes W221 chạy Android
Trước khi bắt đầu lắp đặt
- Lắp đặt đầu đĩa Android cho xe Mercedes W221
- Lắp đặt màn hình Android W221 NTG3.0
- Nâng cấp hệ thống định vị Android W221 NTG3.5
- Hướng dẫn tháo bảng điều khiển xe Mercedes W221
- Hướng dẫn đấu dây màn hình Android cho mẫu W221
Nếu gặp sự cố sau khi lắp đặt hệ thống dây điện
- Màn hình Android của W221 không có âm thanh
- Kết nối âm thanh AUX trên W221
- Kết nối hộp LVDS trên W221
- Camera nguyên bản của W221 không hoạt động
- Hệ thống COMAND nguyên bản trên W221
| Câu hỏi của chủ sở hữu | Câu trả lời thực tế | Tại sao quan trọng |
|---|---|---|
| Đầu phát Android W221 có hỗ trợ cắm là chạy không? | Không, không phải theo nghĩa đơn thuần là một phụ kiện. Nên nhờ chuyên gia lắp đặt. | Quy trình này bao gồm tháo ốp trang trí bảng điều khiển, tháo màn hình nguyên bản, tiếp cận bộ điều khiển trung tâm, cổng AUX, cáp quang, LVDS và kiểm tra chức năng. |
| Rủi ro chính khi lắp đặt là gì? | Không có âm thanh, màn hình đen, hình ảnh LVDS không ổn định, sự cố camera hoặc bộ điều khiển gốc không phản hồi. | Hầu hết các sự cố đều xuất phát từ đường đi của dây điện, đường truyền tín hiệu, đường truyền âm thanh hoặc những giả định sai lầm về khả năng tương thích. |
| Cần kiểm tra những gì trước khi mua? | NTG3.0 / NTG3.5, bảng điều khiển, bộ điều khiển, hệ thống âm thanh, đường dẫn camera, phiên bản tay lái bên trái (LHD)/bên phải (RHD) và hình ảnh các đầu nối. | Chỉ dựa vào năm sản xuất thôi là chưa đủ để xác định chính xác phiên bản sản phẩm. |
| Who is this upgrade best for? | Các chủ sở hữu xe W221 mong muốn một cuộc “lột xác” toàn diện cho khoang lái, chứ không chỉ đơn thuần là lựa chọn CarPlay rẻ nhất. | Giá trị nằm ở giao diện Android màn hình rộng, khả năng tương thích theo tiêu chuẩn OEM, sự tích hợp hoàn hảo và lộ trình hỗ trợ rõ ràng. |
Tính tương thích của xe và đối tượng khách hàng mục tiêu
Hướng dẫn này dành cho các chủ sở hữu xe Mercedes-Benz S-Class W221 đang tìm hiểu về việc nâng cấp lên đầu đĩa Android 12,3 inch / màn hình định vị Android thay thế cho hệ thống NTG3.0 hoặc NTG3.5 nguyên bản. Hướng dẫn này hữu ích cho chủ sở hữu các mẫu xe S350, S400 Hybrid, S450, S500, S550, S600, S63 AMG, S65 AMG và V221 trục cơ sở dài, nhưng vẫn cần kiểm tra tính tương thích cuối cùng trên chính chiếc xe của bạn.
| Phương tiện chính | Mercedes-Benz S-Class W221 / Mercedes S-Class W221 / Mercedes S-Klasse W221 / Mercedes Classe S W221 |
|---|---|
| Trọng tâm chung của hệ thống | COMAND NTG3.0 / NTG3.5, được xác minh thông qua hình ảnh thực tế của menu và bảng điều khiển gốc, chứ không chỉ dựa trên tên mẫu. |
| Các bản nâng cấp được người mua tìm kiếm | Đầu đĩa Android cho Mercedes W221, Màn hình Android cho W221, Nâng cấp CarPlay cho W221, Hệ thống định vị Android 12,3 inch cho W221, Lắp đặt hệ thống âm thanh Android cho W221. |
| Hình ảnh cần gửi trước khi đặt hàng | Ảnh mặt trước bảng điều khiển, ảnh màn hình nguyên bản, ảnh menu COMAND, ảnh bộ điều khiển trên bảng điều khiển trung tâm, bố cục tay lái bên trái (LHD)/bên phải (RHD), thông tin về hệ thống âm thanh/bộ khuếch đại, trạng thái camera, và ảnh các đầu cắm (nếu có). |
| Không phải hướng dẫn này | Đây không phải là hướng dẫn thay thế cụm đồng hồ kỹ thuật số. Đây là hướng dẫn lắp đặt đầu phát Android / màn hình định vị Android. |
| Mục xác nhận | Tại sao điều này lại quan trọng đối với việc lắp đặt đầu phát Android trên xe W221 |
|---|---|
| Hệ thống NTG3.0 / NTG3.5 | Ảnh hưởng đến đường dẫn hiển thị LVDS, cách thức hoạt động ban đầu của hệ thống COMAND, lộ trình đi dây và cấu hình sản phẩm. |
| Hình dáng ban đầu của bảng điều khiển và màn hình | Xác nhận xem khung màn hình vật lý và khuôn bảng điều khiển có phù hợp với xe hay không. |
| Bộ điều khiển bảng điều khiển trung tâm | Giúp xác định liệu có thể giữ nguyên cách hoạt động ban đầu của bảng điều khiển hay không và cách xử lý việc chuyển đổi dòng giao thức như thế nào. |
| Tình trạng sẵn có của AUX / AMI | Liên quan đến đầu ra âm thanh trên Android và các bước khắc phục sự cố thường gặp khi không có âm thanh. |
| Bộ khuếch đại nhà máy và sợi quang | Việc xử lý sợi quang hoặc định tuyến bộ khuếch đại không đúng cách có thể gây ra hiện tượng không có âm thanh hoặc các sự cố liên quan đến hệ thống âm thanh trên xe. |
| Camera lùi cho xe tải | Việc giữ lại camera phụ thuộc vào lộ trình lắp đặt camera ban đầu và bộ phụ kiện đã chọn. |
| Bố trí tay lái bên trái (LHD) / tay lái bên phải (RHD) | Vị trí vô-lăng có thể ảnh hưởng đến việc lắp đặt các chi tiết trang trí trên bảng điều khiển, đường đi của dây cáp và khả năng tiếp cận để lắp đặt. |
| Hệ thống dây điện độ trước đây | Các sửa đổi trước đây có thể làm thay đổi lộ trình đi dây dự kiến và làm tăng rủi ro trong quá trình lắp đặt. |
Hướng dẫn lắp đặt đầu đĩa Android cho xe Mercedes W221 gồm 49 bước
Hướng dẫn dưới đây chia mỗi hình ảnh cài đặt thành một bước riêng biệt. Cấu trúc hướng dẫn được sắp xếp theo logic chuyên nghiệp: trước tiên kiểm tra bảng điều khiển gốc, sau đó tháo nắp ốp, tháo màn hình và bộ điều khiển nguyên bản, xử lý hệ thống dây điện âm thanh/màn hình/điều khiển của W221, lắp đặt khung màn hình lớn, kiểm tra các chức năng và cuối cùng đóng lại bảng điều khiển.
Giai đoạn 1: Xác nhận kết quả mục tiêu và bố cục ban đầu của bảng điều khiển
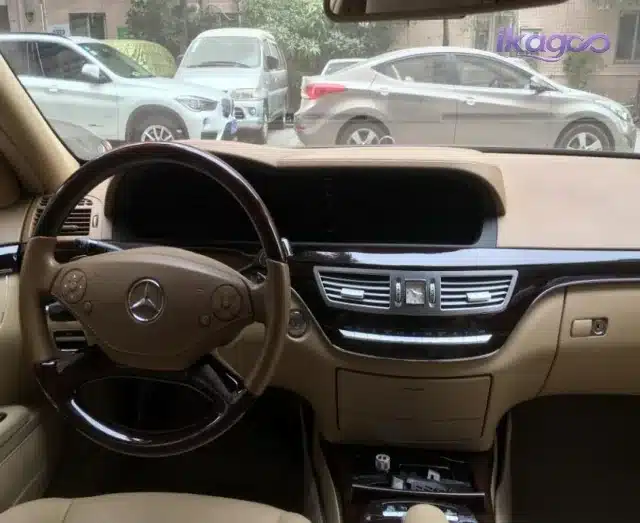
Xem lại quy trình lắp đặt đầu phát Android W221
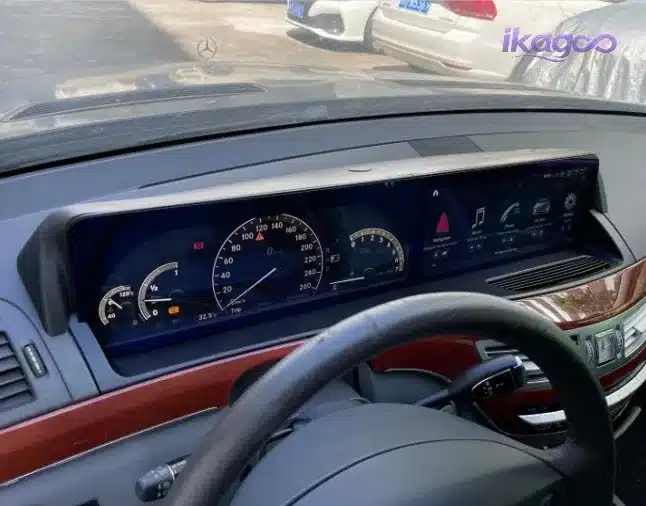
Hình ảnh tham khảo đầu tiên này xác định bối cảnh lắp đặt mục tiêu: nâng cấp hệ thống định vị Android cho xe Mercedes S-Class W221, chứ không phải là việc thay thế màn hình chung chung.
- Kiểm tra: Kiểu dáng bảng điều khiển nguyên bản và khả năng tương thích với màn hình lớn như mong đợi.
- Vì sao điều này quan trọng: Kỳ vọng của người mua phải phù hợp với lộ trình lắp đặt thực tế của mẫu W221.
Kiểm tra lại vị trí trung tâm ban đầu của bảng điều khiển trước khi tháo dỡ
Trước khi bắt tay vào tháo dỡ các chi tiết trang trí, hãy so sánh màn hình gốc, khu vực COMAND, bộ điều khiển trung tâm và hình dáng bảng điều khiển với lộ trình lắp đặt đầu phát Android W221 được hỗ trợ.
- Kiểm tra: Menu NTG3.0 / NTG3.5, bố cục LHD/RHD, kiểu bộ điều khiển.
- Vì sao điều này quan trọng: Việc xác định hệ thống không chính xác có thể dẫn đến việc sử dụng dây nịt không phù hợp hoặc đường dẫn LVDS/âm thanh không đúng.
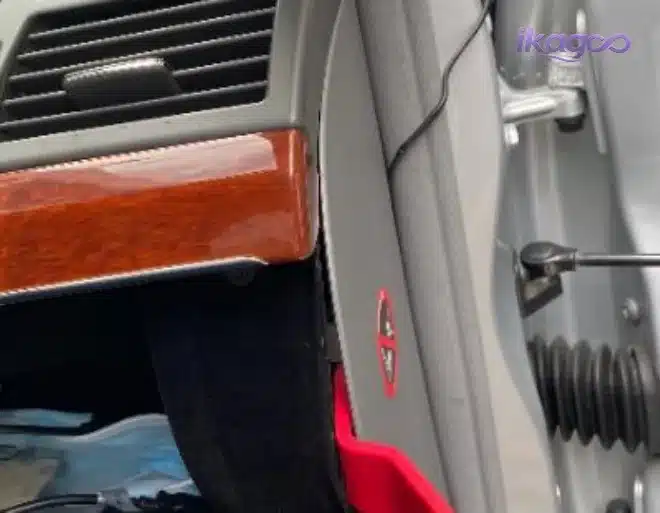
Tháo tấm ốp bảng điều khiển bên trái
Bắt đầu từ miếng ốp bên để mở lối tiếp cận đầu tiên của bảng điều khiển. Sử dụng dụng cụ tháo ốp nhựa và tháo các chốt cố định từ từ.
- Kiểm tra: điện trở tấm, hướng kẹp, thời gian cắt tỉa.
- Rủi ro: Việc ép các chi tiết trang trí cũ vào vị trí có thể làm gãy các chốt giữ hoặc làm xước các bề mặt lộ ra ngoài.
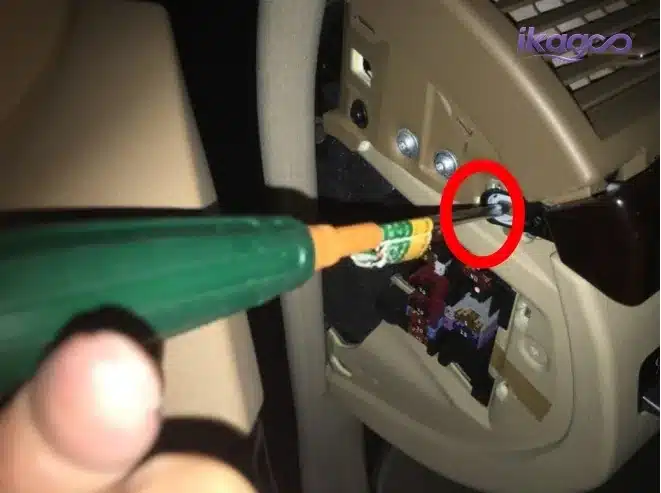
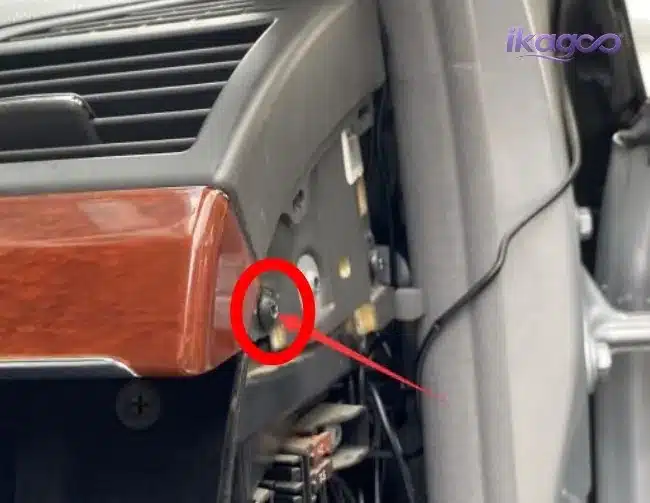
Tháo con vít cố định đầu tiên đang lộ ra ngoài
Sau khi mở được tấm ốp, hãy tháo ốc vít có thể nhìn thấy trước khi chuyển sang tấm ốp tiếp theo. Không được dùng lực mạnh hơn để cạy tấm ốp bị kẹt.
- Kiểm tra: loại vít và vị trí ban đầu.
- Thói quen nghề nghiệp: Bảo quản các ốc vít theo vị trí để lắp ráp lại chính xác.
Tháo tấm ốp bảng điều khiển phía bên phải
Sau khi đã nới lỏng phần bên trái, hãy mở phần ốp bên phải. Điều này giúp cân bằng việc tiếp cận bảng điều khiển và giảm bớt lực tác động không đồng đều.
- Kiểm tra: các đoạn phim ẩn và các điểm giữ.
- Vì sao điều này quan trọng: Việc tháo bỏ các chi tiết trang trí sạch sẽ ảnh hưởng đến vẻ ngoài cuối cùng theo phong cách OEM.
Tháo các vít cố định bảng điều khiển tiếp theo
Tiếp tục tháo các ốc vít dọc theo đường dẫn trên bảng điều khiển đã được lộ ra. Việc này giúp chuẩn bị cho việc tháo gỡ an toàn lỗ thông gió và khu vực màn hình phía dưới.
- Kiểm tra: ốc vít dọc theo các mép viền và các mối nối tấm ốp.
- Rủi ro: Nếu thiếu ốc vít, viền trang trí có thể bị nứt khi bị kéo.
Giai đoạn 2: Mở các lỗ thông gió, tấm điều hòa không khí và viền lưới
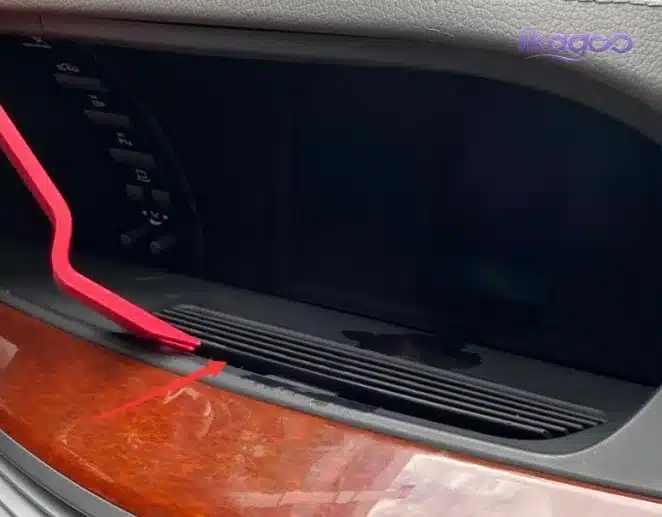
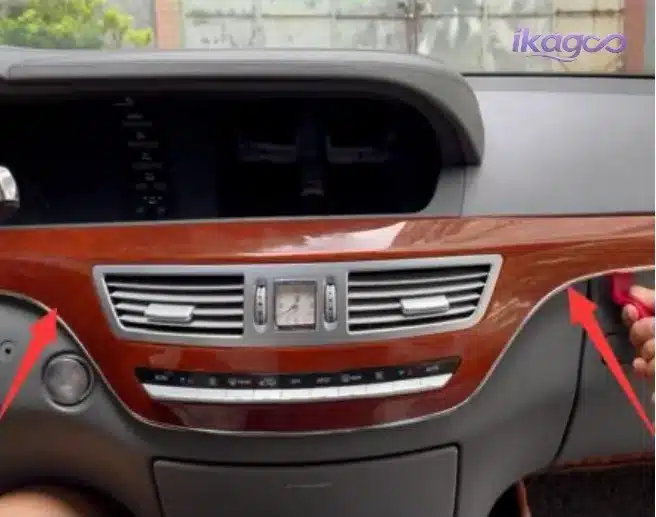
Tháo lỗ thông gió của máy điều hòa một cách cẩn thận
Khu vực lỗ thông gió mở ra lối tiếp cận màn hình phía dưới. Hãy giữ góc nghiêng của dụng cụ cắt ở mức nhỏ để tránh để lại vết trầy xước trên mép bảng điều khiển có thể nhìn thấy.
- Kiểm tra: Giải phóng kẹp thông gió và giảm áp suất ở phần ốp xung quanh.
- Rủi ro: các kẹp ống thông gió bị gãy hoặc các chi tiết trang trí bị trầy xước.
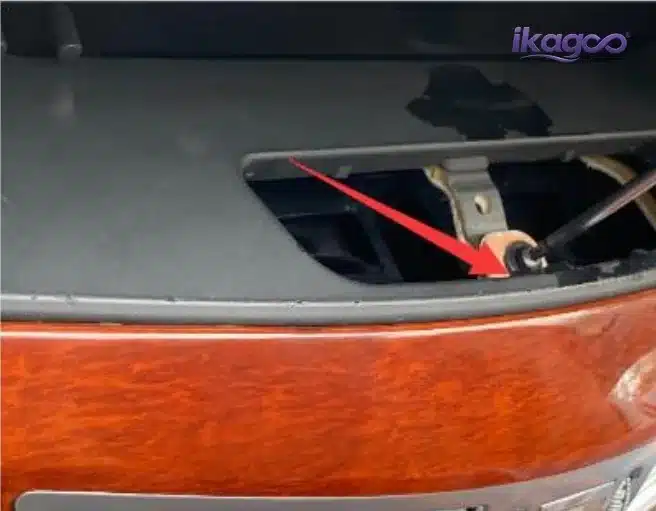
Tháo các vít cố định ở khu vực lỗ thông hơi
Những con vít này dùng để cố định phần ốp trang trí tiếp theo. Việc tháo chúng ra trước sẽ giúp tránh tác động lực không cần thiết lên bảng điều khiển điều hòa và phần ốp trang trí màn hình.
- Kiểm tra: độ sâu và vị trí của vít.
- Vì sao điều này quan trọng: Bảng điều khiển của mẫu W221 có các chi tiết ốp trang trí xếp lớp, chứ không phải là một tấm ốp rời rạc.
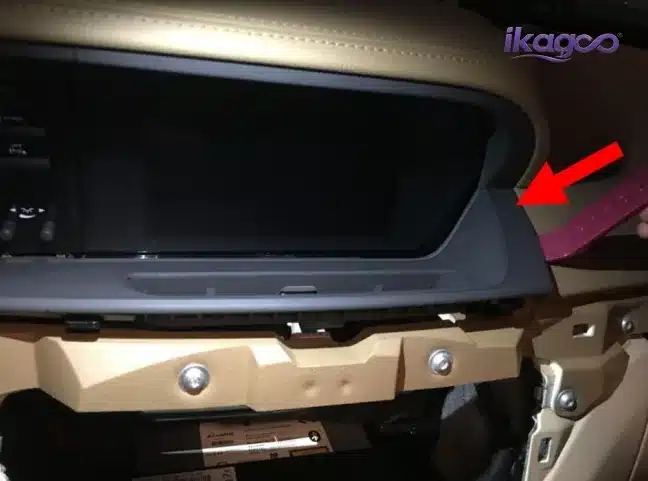
Mở bảng điều khiển điều hòa không khí
Chỉ di chuyển bảng điều khiển sau khi các điểm cố định của nó đã được tháo ra. Bảng điều khiển điều hòa không khí phải được bảo vệ vì nó vẫn là một phần của bố cục bảng điều khiển cuối cùng.
- Kiểm tra: Vị trí đầu nối và sự căn chỉnh của bảng điều khiển.
- Rủi ro: bảng điều khiển bị lỏng hoặc dây cáp bị kẹt trong quá trình lắp ráp lại.
Tháo tấm ốp dưới nằm bên dưới kính chắn gió nguyên bản
Chiếc viền dưới này che phủ đường lắp ốc tiếp theo của khu vực màn hình nguyên bản. Hãy tháo nó ra trước khi chạm vào viền màn hình phía trên.
- Kiểm tra: cắt mép và các điểm giữ.
- Vì sao điều này quan trọng: Phần ốp dưới bị hư hỏng làm giảm đi vẻ đẹp hoàn thiện theo phong cách OEM.
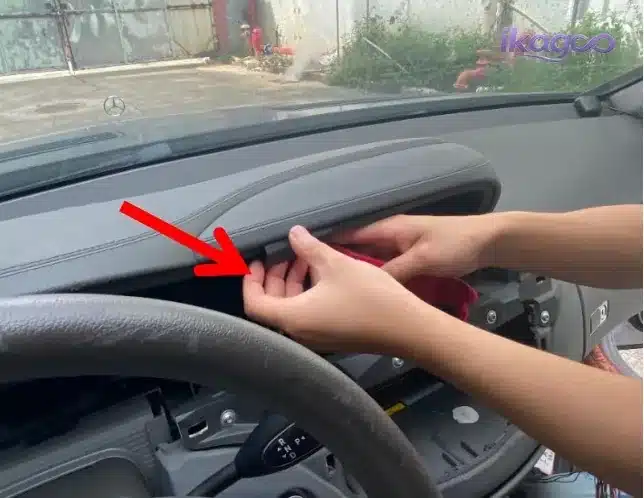
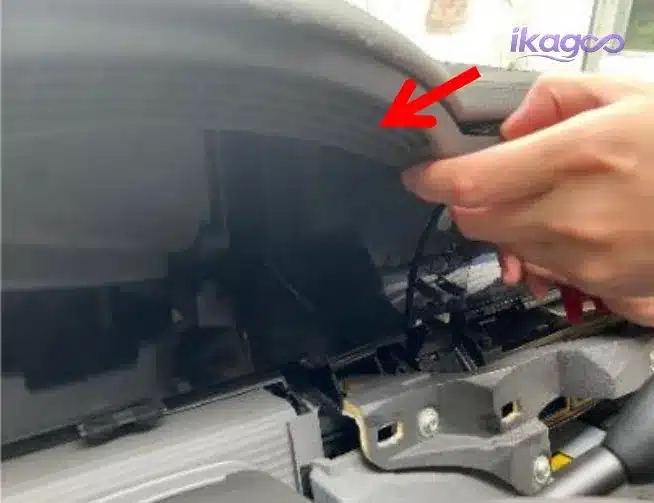
Bắt đầu tháo lớp ốp trang trí phía trên của bảng điều khiển
Phần viền trên phải được tháo ra một cách đều đặn thì mới có thể tiếp cận được màn hình gốc. Không được uốn cong một bên trong khi bên kia vẫn còn bị khóa.
- Kiểm tra: Phát hành clip trên toàn bộ dòng sản phẩm.
- Rủi ro: độ căng viền không đồng đều hoặc biến dạng tấm ốp.
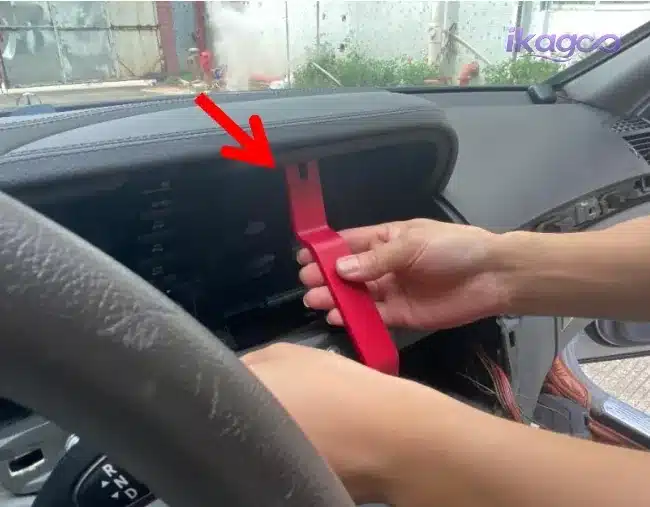
Tiếp tục nới lỏng phần viền trên một cách đều đặn
Thực hiện thao tác dọc theo đường viền bằng những động tác nhỏ. Việc nới lỏng một cách có kiểm soát sẽ giúp tấm ốp giữ được độ thẳng và bảo vệ lớp hoàn thiện bên trong cabin.
- Kiểm tra: liệu phần viền có di chuyển đều hay không.
- Thói quen nghề nghiệp: Hãy dừng lại nếu một bên gặp phải sự kháng cự mạnh hơn bên kia.
Hoàn tất việc tháo dỡ tấm ốp trên
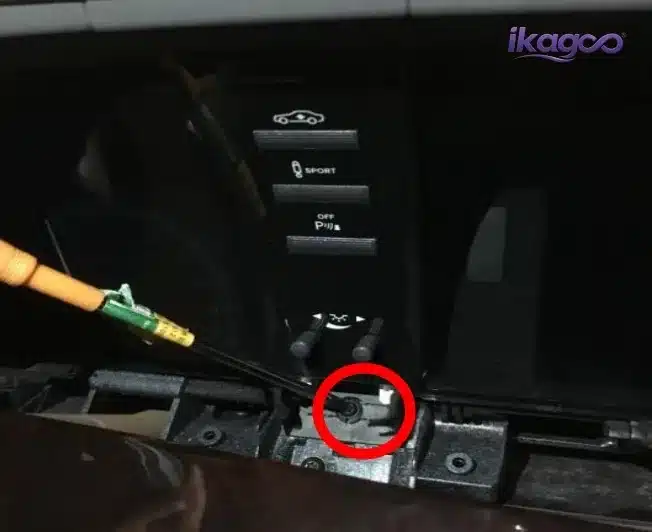
Sau khi tháo miếng viền ra, hãy đặt nó lên một bề mặt được bảo vệ. Các vết xước ở đây sẽ hiện rõ sau khi lắp màn hình Android vào.
- Kiểm tra: các kẹp cố định và các mấu gắn.
- Vì sao điều này quan trọng: Tác phẩm sắp đặt trên màn hình lớn cuối cùng cần được hoàn thiện viền xung quanh cho gọn gàng.
Tháo các ốc vít ban đầu của bảng điều khiển
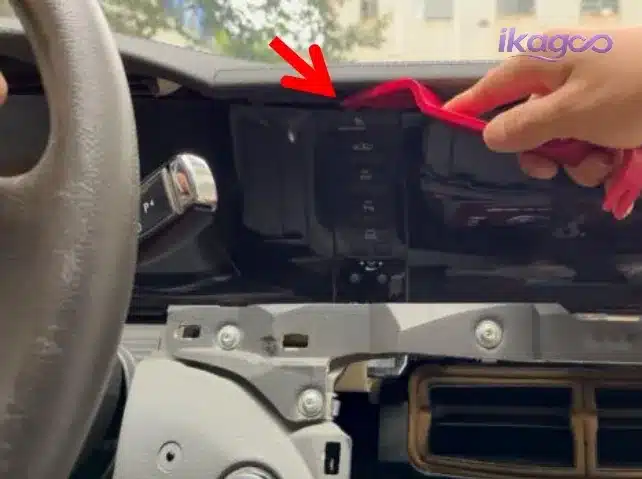
Những con vít này dùng để cố định bộ điều khiển gốc. Việc tháo chúng ra sẽ giúp bảng điều khiển sẵn sàng để di chuyển một cách an toàn mà không làm kéo các đầu nối ẩn.
- Kiểm tra: Vị trí vít và độ chùng của dây cáp.
- Rủi ro: Việc kéo tấm ốp khi nó vẫn còn được cố định có thể làm hỏng các giá đỡ.
Giai đoạn 3: Tháo bảng điều khiển, màn hình hiển thị và phần bảng điều khiển trung tâm của nhà máy
Tháo bảng điều khiển ban đầu
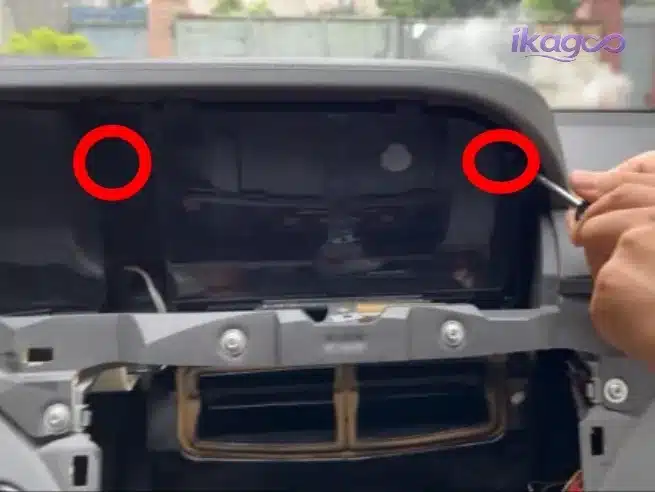
Bảng điều khiển của nhà máy là một phần của lộ trình tương tác W221. Hãy di chuyển nó một cách cẩn thận và ghi nhớ vị trí các đầu nối trước khi tháo bất kỳ đầu nối nào.
- Kiểm tra: khóa đầu nối và đường đi của dây cáp ban đầu.
- Rủi ro: Bộ điều khiển gốc có thể bị hỏng nếu cắm đầu nối một cách gượng ép.
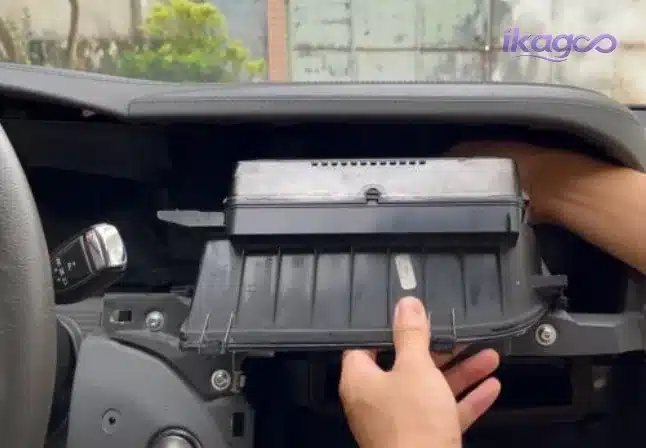
Tháo các vít cố định màn hình được lắp sẵn từ nhà máy
Hãy đỡ màn hình trong khi tháo các ốc vít. Sau khi tháo các ốc vít cố định, màn hình không được treo lơ lửng trên các dây cáp.
- Kiểm tra: hiển thị vị trí các chốt cố định.
- Vì sao điều này quan trọng: Việc tháo tấm chắn màn hình gốc sẽ làm lộ đường dẫn tín hiệu hiển thị.
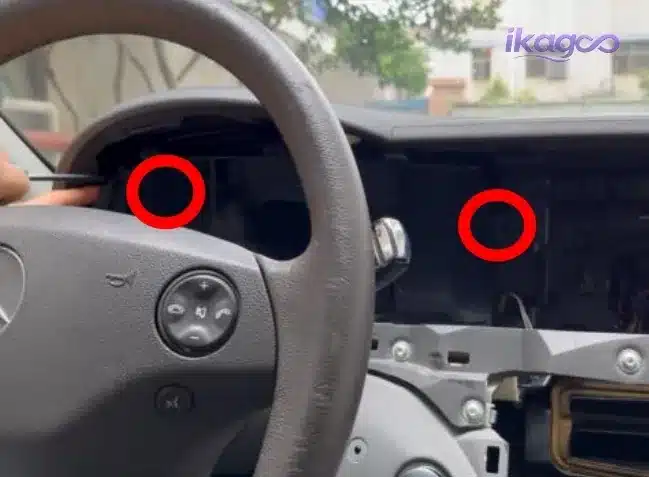
Ngắt kết nối và tháo màn hình nguyên bản ra
Hãy mở chốt khóa đầu nối màn hình trước khi tháo màn hình gốc. Không được kéo từ thân cáp.
- Kiểm tra: hướng của đầu nối và chốt khóa.
- Rủi ro: Đầu nối màn hình bị hỏng có thể gây ra hiện tượng màn hình đen.
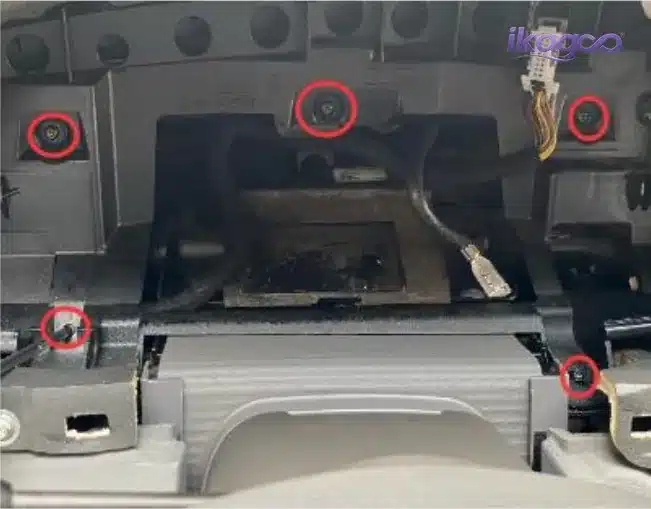
Tháo các vít cố định ở khu vực bảng điều khiển
Cấu trúc màn hình lớn cần có không gian tiếp cận xung quanh khu vực đồng hồ và màn hình. Hãy tháo các ốc vít này trước khi di chuyển phần bảng điều khiển.
- Kiểm tra: vị trí các ốc vít xung quanh khu vực thiết bị.
- Rủi ro: Việc ép phần này có thể ảnh hưởng đến việc căn chỉnh màn hình cuối cùng.
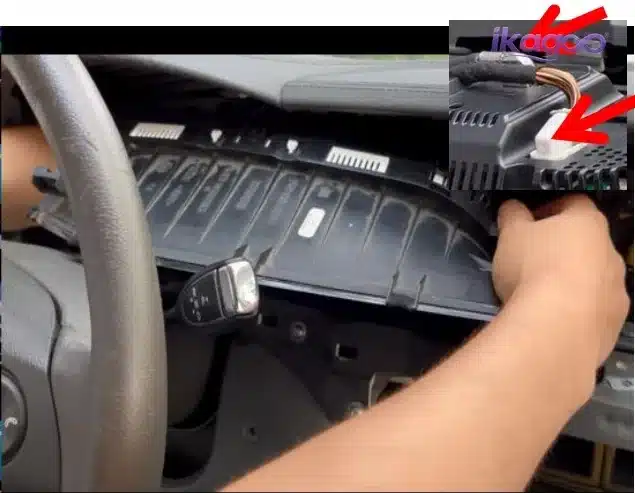
Ngắt kết nối và tháo phần bảng điều khiển gốc ra
Hãy chụp ảnh trước khi rút phích cắm. Điều này sẽ giúp iKAGOO hoặc kỹ thuật viên lắp đặt kiểm tra lại đường đi của đầu nối nguyên bản nếu sau này cần khắc phục sự cố.
- Kiểm tra: vị trí các đầu nối trên máy và chiều dài cáp.
- Vì sao điều này quan trọng: Hệ thống dây dẫn có thể truy xuất nguồn gốc giúp rút ngắn thời gian chẩn đoán.
Giai đoạn 4: Mở khu vực điều khiển trung tâm và khu vực bộ điều khiển chính của nhà máy
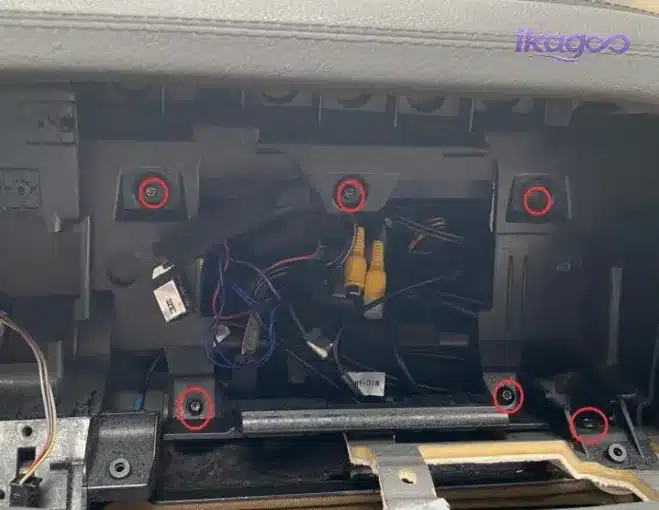
Tháo vít cố định bộ điều khiển trung tâm đầu tiên
Phải tháo nắp khu vực điều khiển trung tâm để tiếp cận hệ thống dây điện bên trong của COMAND và bộ điều khiển chính. Hãy bắt đầu từ vít cố định có thể nhìn thấy.
- Kiểm tra: vị trí vít và chuyển động của tấm ốp.
- Rủi ro: căng thẳng trên tấm nếu chỉ có một mặt được thả ra.
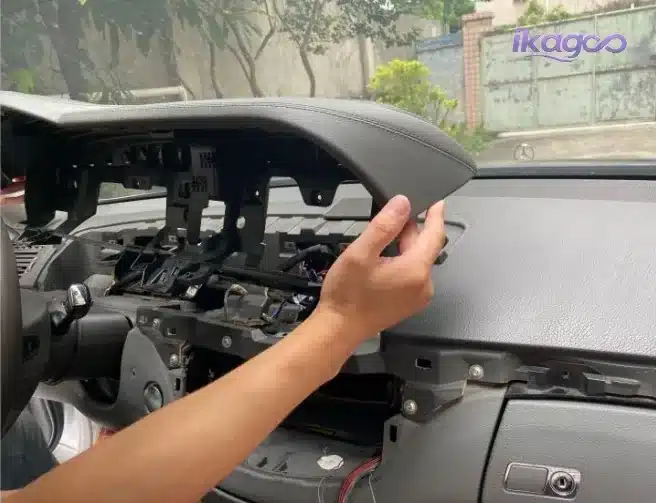
Tháo vít cố định bộ điều khiển trung tâm thứ hai
Hãy tháo vít ghép đôi trước khi nhấc tấm ốp giữa lên. Điều này giúp tấm ốp không bị vặn xoắn trong quá trình tháo gỡ.
- Kiểm tra: cả hai bên đều đã được thả hoàn toàn.
- Thói quen nghề nghiệp: Hãy để các con vít cùng cặp ở gần nhau.
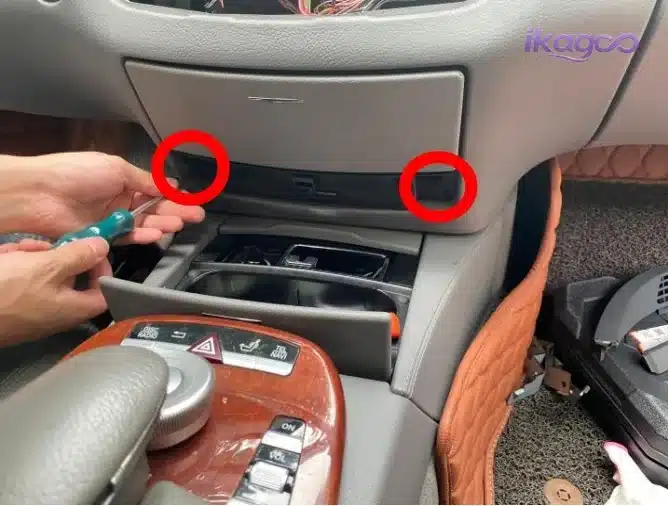
Tháo bảng điều khiển trung tâm ban đầu
Nâng tấm mặt trước lên với lực vừa phải và kiểm tra độ lỏng của dây điện. Bộ điều khiển nguyên bản vẫn có thể tiếp tục được sử dụng sau khi nâng cấp màn hình Android.
- Kiểm tra: Đường đi của cáp và lực căng của đầu nối.
- Rủi ro: Bộ điều khiển ban đầu bị trục trặc do dây điện bị lỏng hoặc bị căng.
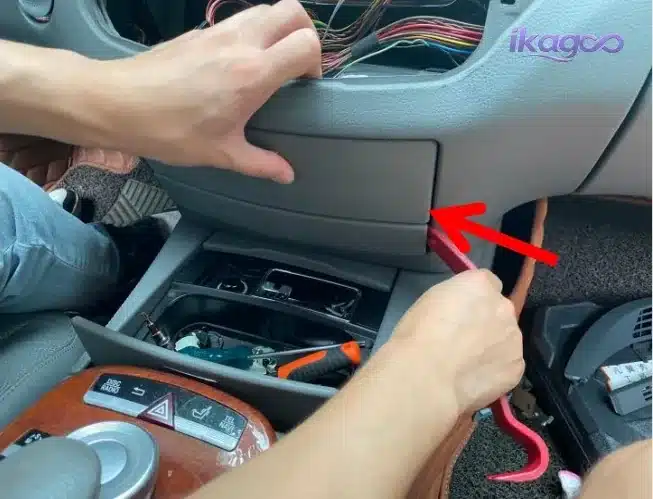
Dùng dụng cụ cạy tấm che CD / bo mạch chủ ra
Tấm ốp này che phủ khu vực máy chủ nguyên bản. Hãy bảo vệ bề mặt này vì nó vẫn sẽ lộ ra sau khi lắp ráp lại.
- Kiểm tra: điều chỉnh hướng clip và cắt bớt các cạnh.
- Vì sao điều này quan trọng: Việc hoàn thiện các chi tiết trang trí một cách gọn gàng sẽ mang lại kết quả cuối cùng chuyên nghiệp.
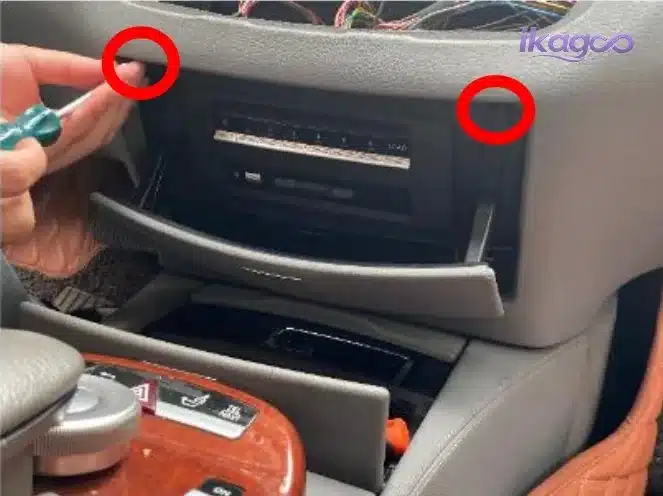
Tháo con vít đầu tiên của khu vực máy chủ được lắp sẵn tại nhà máy
Phải tháo hoàn toàn bộ phận chính ra trước khi tiến hành kết nối dây. Không được kéo bộ phận gốc về phía trước khi các ốc vít vẫn còn được lắp đặt.
- Kiểm tra: Vị trí vít cố định và độ chắc chắn của giá đỡ.
- Rủi ro: giá đỡ bị cong hoặc hệ thống dây điện xuất xưởng bị căng.
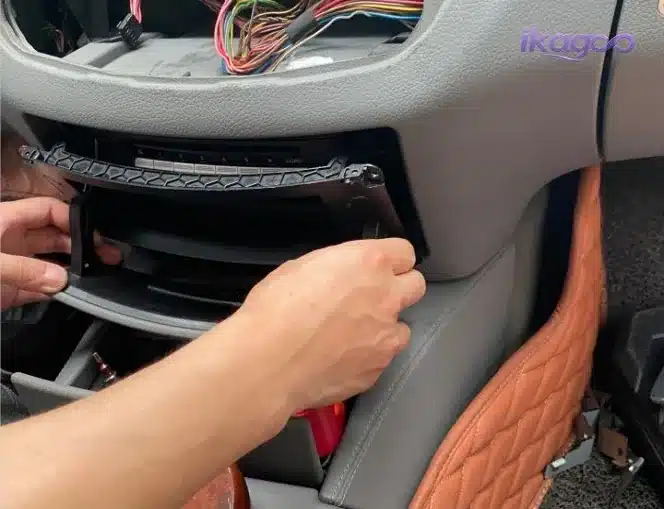
Tháo con vít thứ hai của khu vực chủ trong nhà máy
Thả chốt giữ phía đối diện để tháo bộ phận chính ra một cách đều đặn. Điều này giúp giảm áp lực lên bộ phận và các chi tiết trang trí xung quanh.
- Kiểm tra: Cả hai đầu vít đều hở.
- Vì sao điều này quan trọng: Ngay cả bản cập nhật này cũng bảo vệ thiết bị COMAND nguyên bản của nhà máy.
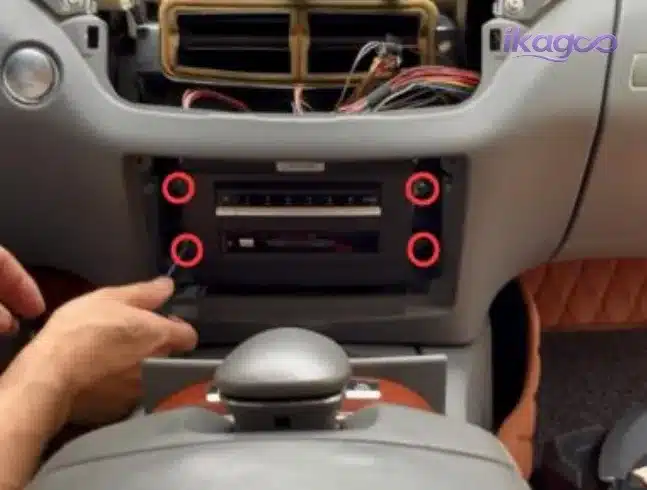
Tháo tấm ốp trang trí bên hông xe
Việc tháo tấm ốp này sẽ tạo ra không gian làm việc cho bộ điều khiển chính và đường đi của dây cáp kết nối với đầu phát Android.
- Kiểm tra: các kẹp cố định và khoảng trống dành cho dây cáp.
- Rủi ro: viền bị lỏng hoặc phát ra tiếng ồn nếu các kẹp bị hỏng.
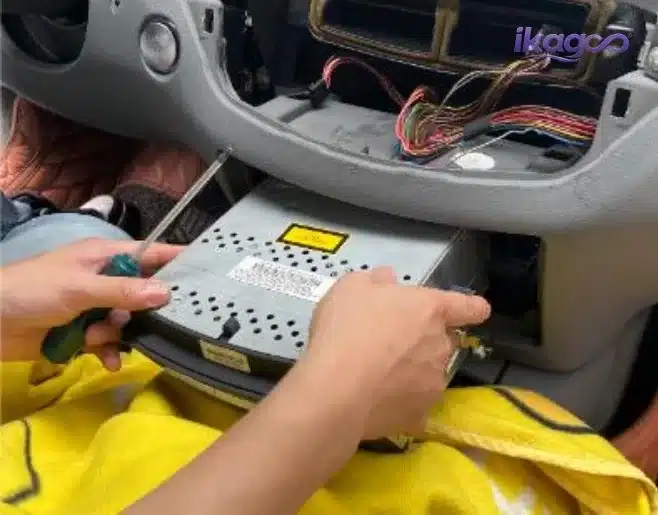
Nới lỏng các vít của bộ điều khiển gốc
Hãy đỡ chắc chắn bộ điều khiển trung tâm của nhà máy trong khi nới lỏng các ốc vít. Hệ thống dây điện phía sau bộ điều khiển không được dùng để chịu trọng lượng của bộ điều khiển.
- Kiểm tra: dây cáp bị chùng phía sau thiết bị của nhà máy.
- Rủi ro: sợi quang bị kéo giãn hoặc đầu nối bị hư hỏng.
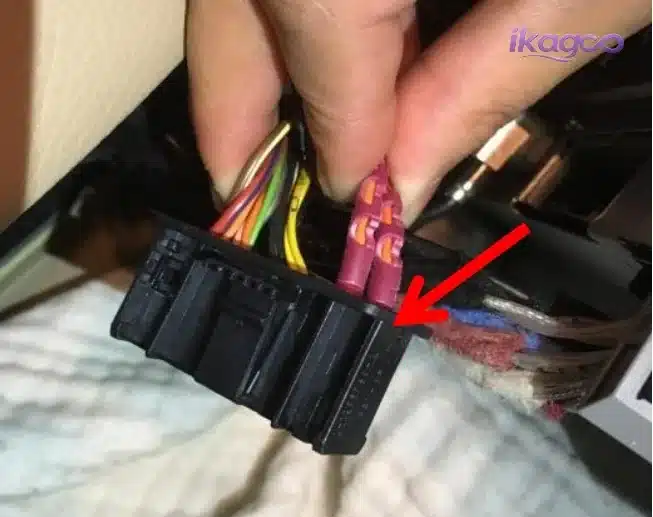
Tháo bộ điều khiển gốc để tiếp cận hệ thống dây điện
Đây là điểm kết nối cho các công việc tích hợp quan trọng nhất: cáp quang, âm thanh AUX, cáp truyền dẫn, đường truyền giao thức và tín hiệu LVDS.
- Kiểm tra: Bố trí các đầu nối trong nhà máy trước khi tháo ra.
- Vì sao điều này quan trọng: Hầu hết các sự cố không có âm thanh hoặc không có hình ảnh đều bắt nguồn từ khu vực này.
Giai đoạn 5: Xử lý cáp quang, tín hiệu âm thanh AUX, đường truyền giao thức và hộp LVDS
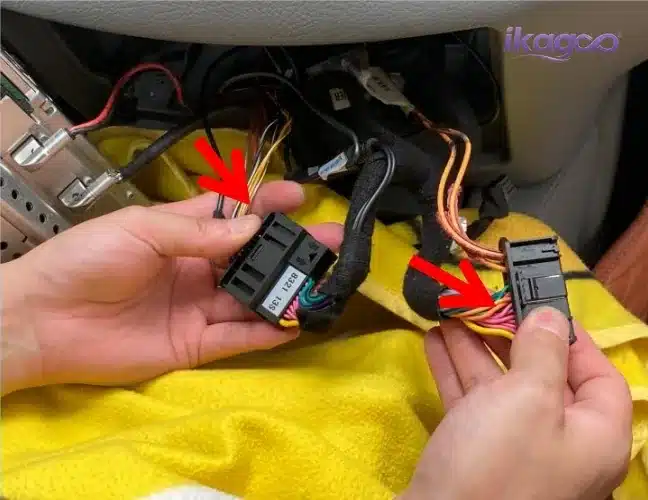
Xử lý cáp sợi quang gốc
Hệ thống âm thanh và liên lạc nguyên bản của W221 có thể phụ thuộc vào đường truyền cáp quang. Hãy đảm bảo cáp quang được lắp đúng vị trí và đi dây đúng cách.
- Kiểm tra: Vị trí đầu nối sợi quang và bán kính uốn cong.
- Rủi ro: Không có âm thanh hoặc gặp sự cố về hệ thống âm thanh nguyên bản.
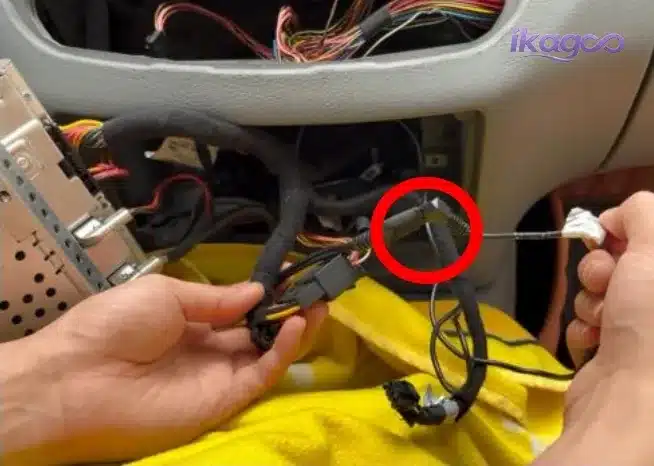
Kết nối cáp truyền tín hiệu của đầu phát Android
Cáp kết nối đóng vai trò cầu nối giữa hệ thống gốc của nhà sản xuất và màn hình Android. Hãy kiểm tra kỹ hướng cắm và vị trí các chân cắm trước khi khóa chặt.
- Kiểm tra: hướng cắm và việc cắm chặt hoàn toàn.
- Rủi ro: nguồn điện không ổn định, mất chức năng ban đầu hoặc sự cố điều khiển.
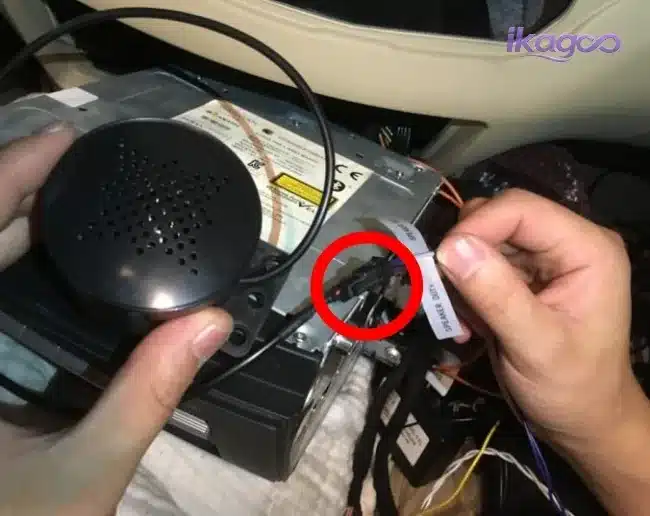
Kết nối cổng âm thanh AUX
Việc định tuyến AUX là một điểm kiểm tra quan trọng khi màn hình Android trên mẫu W221 không có âm thanh. Hãy kiểm tra lại kết nối AUX và lựa chọn nguồn trước khi đóng bảng điều khiển.
- Kiểm tra: Cổng AUX, nguồn âm thanh và đường dẫn tín hiệu đến bộ khuếch đại.
- Rủi ro: Android khởi động bình thường nhưng không có âm thanh phát ra.
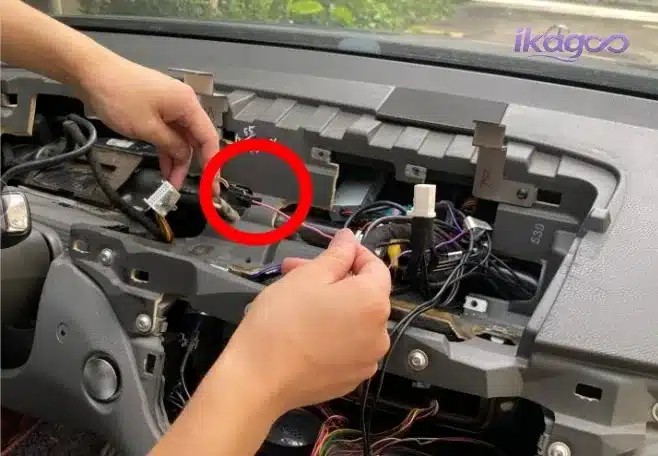
Chuyển đổi loa điều hướng / đường dẫn âm thanh
Bước này xác định cách thức định tuyến hệ thống điều hướng và âm thanh hệ thống trên Android. Hãy kiểm tra đầu ra âm thanh trước khi lắp lại bất kỳ tấm ốp nào.
- Kiểm tra: lựa chọn tuyến đường và đầu ra loa.
- Vì sao điều này quan trọng: Lỗi đường dẫn âm thanh là một trong những khiếu nại thường gặp về việc lắp đặt.
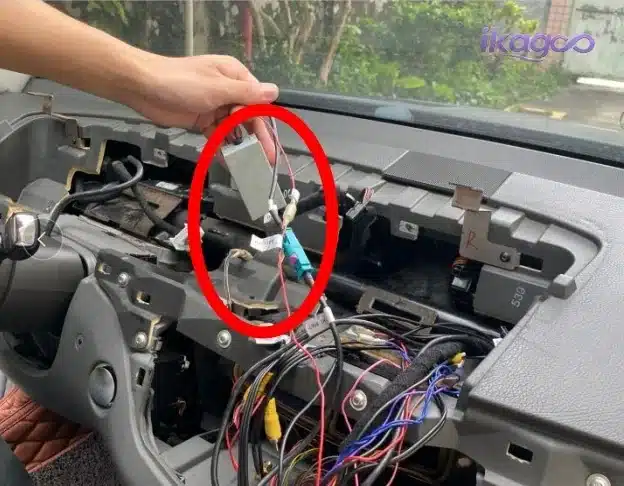
Chuyển sang dòng giao thức bảng điều khiển ban đầu
Dòng giao thức ảnh hưởng đến hoạt động của bộ điều khiển nhà máy. Không được thực hiện việc chuyển đổi dựa trên phỏng đoán; hãy kiểm tra lại lộ trình đấu dây được cung cấp và cấu hình chính xác của W221.
- Kiểm tra: kết nối giao thức và phản hồi ban đầu từ bộ điều khiển.
- Rủi ro: Chức năng ban đầu của núm điều khiển hoặc nút bấm có thể không hoạt động bình thường.
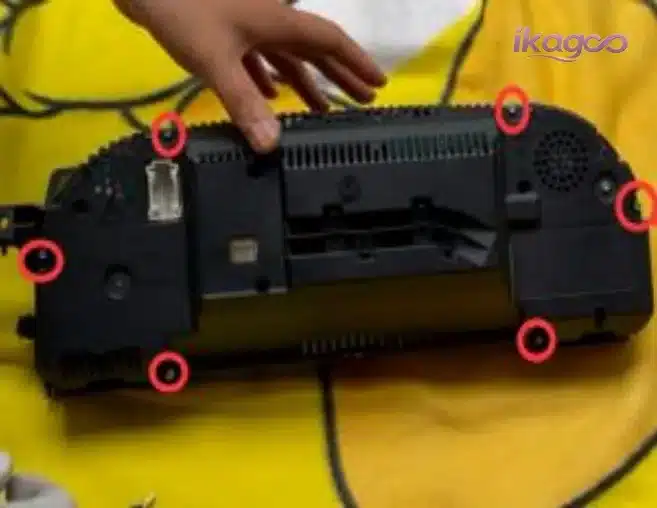
Kết nối hộp LVDS bên ngoài
Hộp LVDS có chức năng tích hợp tín hiệu hiển thị. Hãy cố định chắc chắn hộp và kiểm tra xem dây cáp có bị lỏng hay bị căng quá mức hay không.
- Kiểm tra: Việc lắp đặt cáp LVDS và độ ổn định hình ảnh.
- Rủi ro: màn hình đen, hiện tượng nhấp nháy hoặc đường dẫn hiển thị gốc không ổn định.
Giai đoạn 6: Lắp đặt khung màn hình lớn và các bộ phận khu vực bảng điều khiển gốc
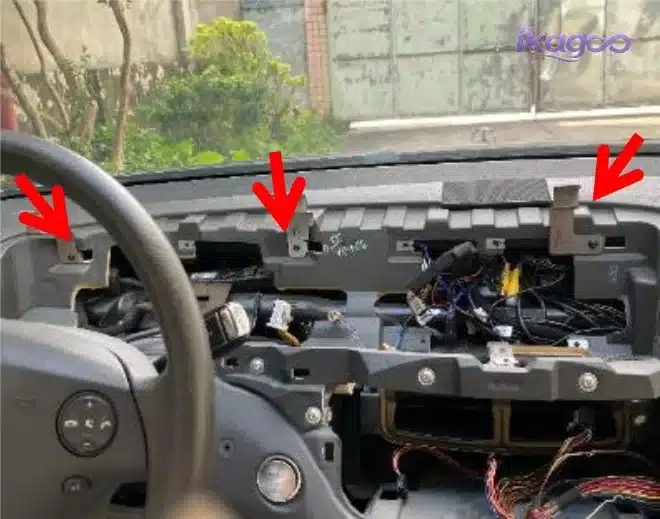
Lắp đặt giá đỡ màn hình lớn
Giá đỡ có vai trò quyết định độ ổn định và độ thẳng hàng của màn hình sau cùng. Hãy lắp giá đỡ sao cho vuông góc trước khi đặt cụm màn hình Android vào.
- Kiểm tra: vị trí giá đỡ, lỗ vít và vị trí lắp đặt trên bảng điều khiển.
- Rủi ro: màn hình không khít hoặc phát ra tiếng ồn do rung.
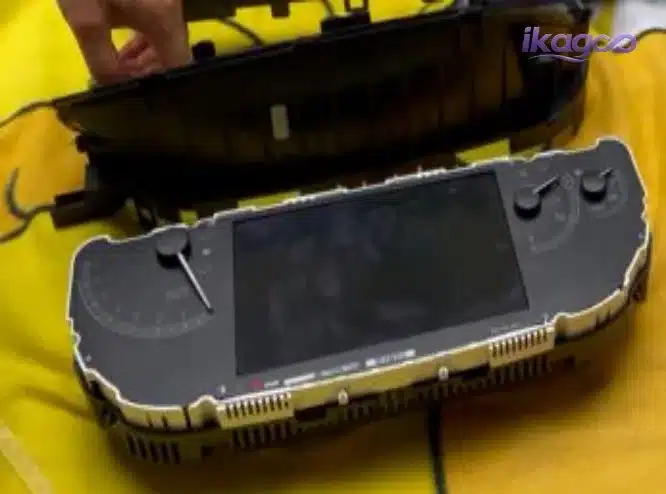
Tháo các vít ban đầu ở khu vực bảng điều khiển
Điều này giúp chuẩn bị khu vực lắp đặt thiết bị để chuyển giao hoặc tích hợp với cấu trúc màn hình lớn.
- Kiểm tra: Vị trí vít và giá đỡ bảng điều khiển.
- Vì sao điều này quan trọng: Việc bố trí hợp lý giúp duy trì sự thống nhất trong bố cục buồng lái.
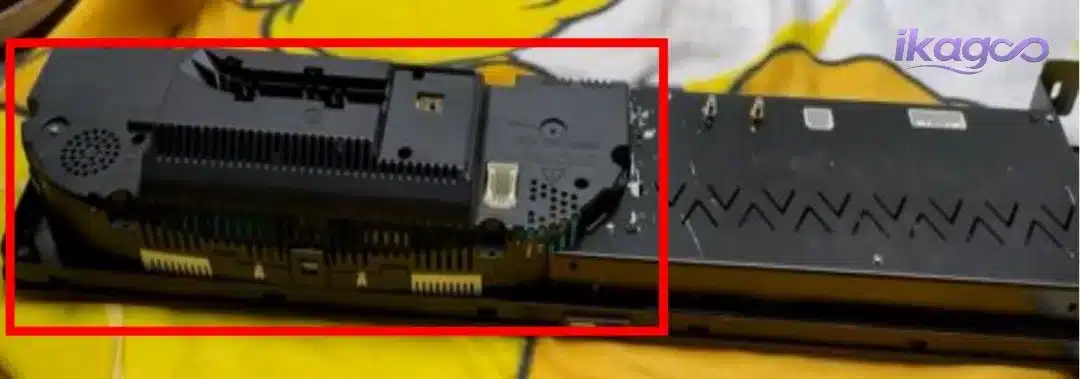
Tháo khung trang trí của đồng hồ đo
Khung trang trí ảnh hưởng đến sự chuyển tiếp về mặt thị giác giữa phần giao diện gốc và cấu trúc màn hình Android.
- Kiểm tra: các đoạn khung và tình trạng hoàn thiện.
- Rủi ro: không được căn chỉnh đúng hoặc có khe hở rõ ràng sau khi lắp đặt.
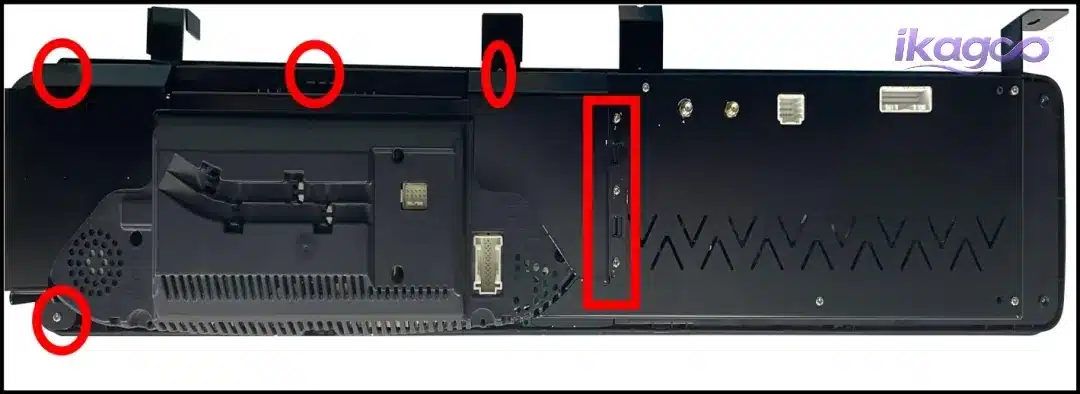
Đặt bảng điều khiển gốc vào khuôn màn hình lớn
Bước này giúp giữ nguyên mối quan hệ giữa các thiết bị ban đầu đồng thời cho phép màn hình Android có kích thước lớn hơn được tích hợp vào bảng điều khiển của mẫu W221.
- Kiểm tra: Khoảng cách giữa các tấm panel và đầu nối.
- Vì sao điều này quan trọng: Điều này giúp phân biệt giữa cách lắp đặt theo kiểu OEM với cách lắp đặt lỏng lẻo theo kiểu máy tính bảng.
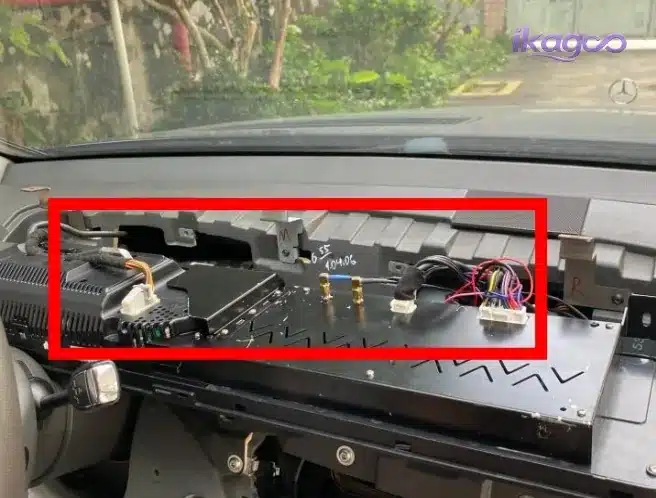
Lắp đặt giá đỡ phần cứng của thiết bị gốc
Vặn chặt giá đỡ sao cho phần thiết bị được cố định chắc chắn và không bị xê dịch sau khi lắp đặt tấm ốp bảng điều khiển.
- Kiểm tra: khả năng khóa vít và độ ổn định của giá đỡ.
- Rủi ro: rung động, sai lệch trục hoặc áp suất cân bằng.
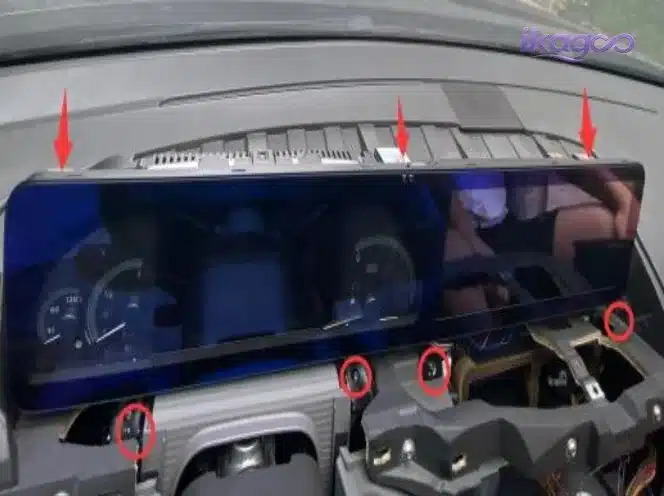
Cắm các đồng hồ đo gốc và màn hình Android vào
Trước khi siết chặt màn hình, hãy đảm bảo rằng tất cả các đầu nối đều có độ lỏng và không bị kẹt phía sau khung màn hình.
- Kiểm tra: Đầu nối đồng hồ đo, đầu nối màn hình Android, áp lực cáp.
- Rủi ro: Chức năng hoạt động không liên tục sau khi chịu rung động do lái xe.
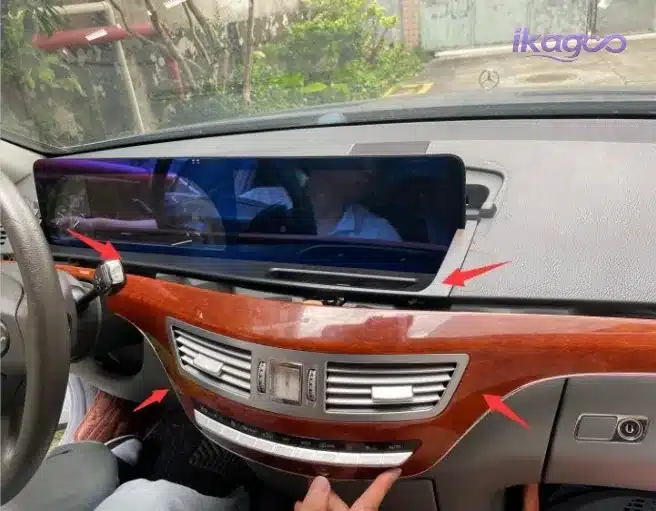
Vặn chặt các ốc vít trên màn hình Android cỡ lớn
Chỉ nên siết chặt lưới lọc sau khi đã kiểm tra kỹ lưỡng độ khít, vị trí cắm của đầu nối và khoảng trống dành cho dây cáp. Kết quả lắp đặt hoàn thiện và gọn gàng phụ thuộc vào cả việc đi dây và sự căn chỉnh cơ khí.
- Kiểm tra: lắp vừa khít, độ căng vít, khoảng trống cho dây cáp.
- Rủi ro: khoảng cách giữa các màn hình không đều hoặc dây cáp bị hư hỏng.
Giai đoạn 7: Kiểm tra chức năng, lắp ráp lại và kết quả lắp đặt cuối cùng
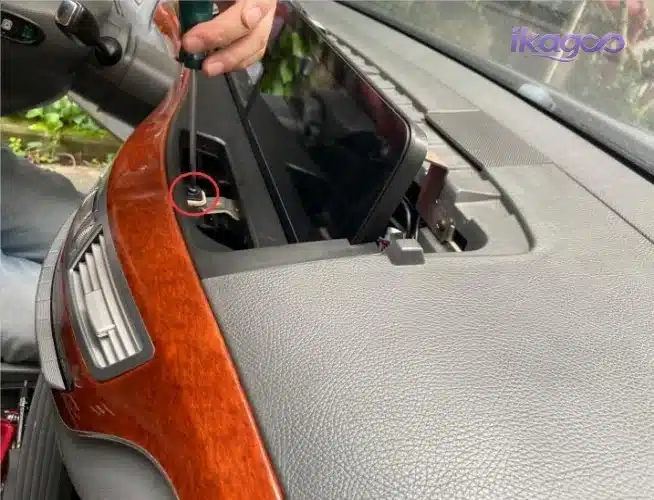
Sau khi kiểm tra, hãy lắp lại bảng điều khiển hệ thống điều hòa không khí
Không được lắp lại tấm màn hình này cho đến khi đã kiểm tra nguồn điện màn hình, độ nhạy cảm ứng, độ ổn định hình ảnh và chức năng phát âm thanh cơ bản.
- Kiểm tra: Vị trí các bảng mạch và trạng thái của các đầu nối.
- Rủi ro: sẽ phải làm lại một cách không cần thiết nếu bỏ qua bước kiểm thử.
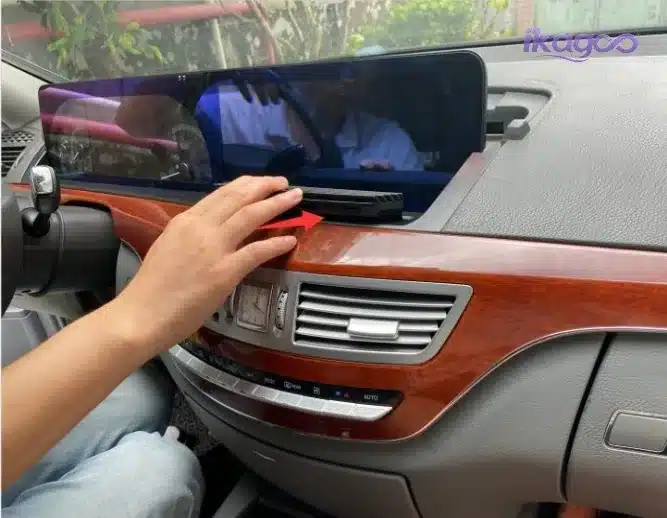
Vặn chặt các ốc vít của bảng điều khiển khí hậu
Hãy sử dụng các ốc vít phù hợp vào đúng vị trí. Việc vặn quá chặt có thể làm biến dạng viền trang trí hoặc khiến tấm ốp bị lệch.
- Kiểm tra: vị trí của vít và độ phẳng của tấm ốp.
- Vì sao điều này quan trọng: Chất lượng lắp ráp lại ảnh hưởng đến niềm tin của khách hàng.
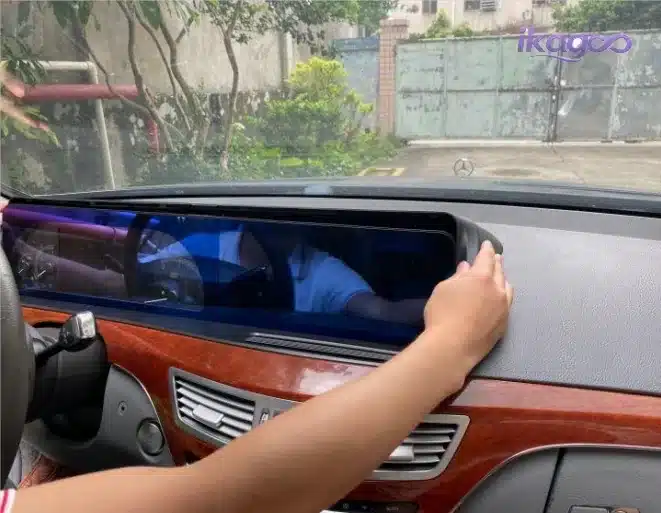
Lắp lại các đầu ra của hệ thống điều hòa không khí
Hãy lắp lại các lỗ thông gió sau khi đã kiểm tra kỹ xem các chi tiết ốp xung quanh đã được lắp đúng vị trí và không có dây điện nào bị kẹt phía sau lỗ thông gió.
- Kiểm tra: Khóa kẹp thông gió và việc căn chỉnh mép bảng điều khiển.
- Rủi ro: lỗ thông hơi bị lỏng hoặc khe hở giữa các tấm ốp có thể nhìn thấy.
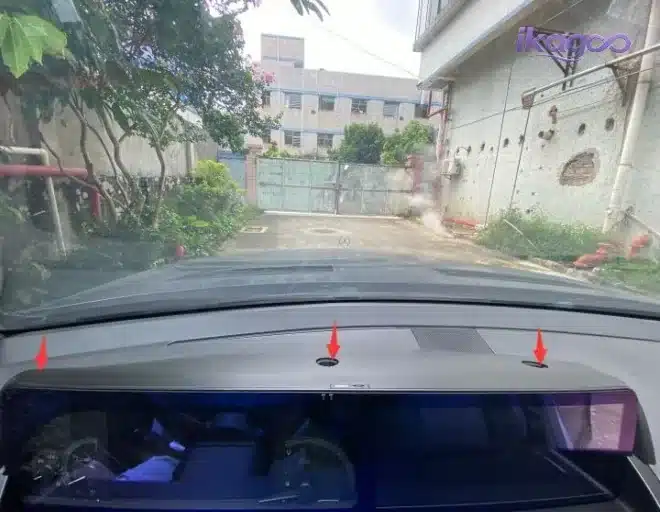
Lắp đặt nắp trang trí mặt trước màn hình Android
Nắp trên giúp hoàn thiện đường nét thiết kế theo phong cách OEM. Hãy kiểm tra độ khít từ cả góc nhìn của người lái và hành khách trước khi khóa nắp lại.
- Kiểm tra: đảm bảo sự thẳng hàng của bìa và độ khít của mép.
- Vì sao điều này quan trọng: Đây là một trong những chi tiết đầu tiên mà chủ nhà để ý thấy.
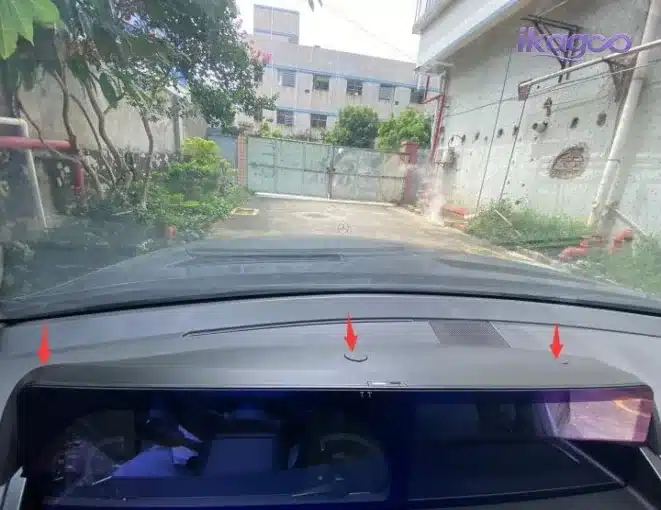
Vặn chặt các vít nắp trên trang trí
Sau khi kiểm tra xem đã thẳng hàng chưa, hãy siết chặt nắp lại. Mục đích là để nắp vừa khít, chắc chắn, không có khe hở hay vết lõm do áp lực.
- Kiểm tra: độ siết chặt của vít và độ ổn định của nắp.
- Rủi ro: tiếng lạch cạch hoặc hiện tượng lệch trục có thể nhận thấy sau khi lái xe.
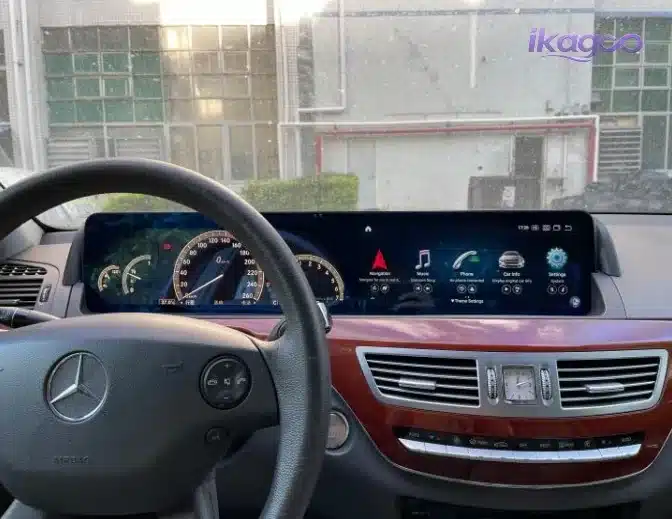
Lắp nắp che lỗ vít
Chi tiết hoàn thiện này giúp che đi các vết lắp đặt và hoàn thiện vẻ ngoài của khoang cabin. Những chi tiết nhỏ cũng rất quan trọng trong nội thất của dòng S-Class.
- Kiểm tra: bọc ghế và bề mặt ốp trang trí.
- Vì sao điều này quan trọng: Điều này giúp cho việc cải tạo không bị trông như chưa hoàn thiện.
Kiểm tra cận cảnh phần hoàn thiện cuối cùng
Kiểm tra các khe hở, vị trí lắp đặt màn hình, độ phẳng của tấm ốp và các vết lõm do áp lực. Việc hoàn thiện cuối cùng phải trông gọn gàng và chuyên nghiệp.
- Kiểm tra: mép màn hình, nắp trên, khe thông gió và viền dưới.
- Rủi ro: Sản phẩm không vừa vặn sẽ làm giảm sự tin tưởng của người mua, ngay cả khi các linh kiện điện tử vẫn hoạt động bình thường.
Xác nhận kết quả hoàn tất của đầu phát Android W221
Kết quả cuối cùng cần mang lại một giao diện màn hình rộng hiện đại, đồng thời vẫn đảm bảo tuân thủ đúng lộ trình tích hợp W221 đã được xác nhận trước khi mua.
- Kiểm tra: Quá trình khởi động Android, chức năng cảm ứng, âm thanh, camera, các phím điều khiển trên vô-lăng, các phím điều khiển gốc và hành vi chuyển sang chế độ ngủ/thức.
- Hành động của người mua: Chỉ đặt hàng sau khi các bức ảnh W221 chính xác của bạn đã được xem xét.
Danh sách kiểm tra chức năng trước khi đóng bảng điều khiển
Việc lắp đặt đầu đĩa Android trên xe Mercedes W221 chưa được coi là hoàn tất chỉ khi màn hình bật lên. Quá trình này chỉ được coi là hoàn tất sau khi đã kiểm tra các chức năng gốc của xe, các chức năng Android, đường dẫn âm thanh, tín hiệu hiển thị, hoạt động của camera và phản hồi điều khiển trước khi đóng nắp ốp trang trí cuối cùng.
Kiểm tra trước khi lắp ráp lại lần cuối
- Quá trình khởi động màn hình và phản hồi cảm ứng trên Android.
- Kết nối CarPlay / Android Auto không dây nếu thiết bị đã chọn hỗ trợ tính năng này.
- Cổng xuất âm thanh AUX và nguồn âm thanh đã chọn.
- Hình ảnh LVDS ổn định, không bị nhấp nháy hay màn hình đen.
- Đường dẫn hiển thị COMAND gốc (nếu bộ phụ kiện hỗ trợ).
- Màn hình camera nguyên bản (nếu có).
- Các nút điều khiển trên vô-lăng (nếu có hỗ trợ).
- Phản hồi của bộ điều khiển gốc và bảng điều khiển trung tâm.
- Hành vi ngủ / thức của hệ thống đánh lửa.
Không được đóng nắp che nếu
- Màn hình Android không có âm thanh.
- Màn hình không hiển thị hình ảnh hoặc tín hiệu LVDS không ổn định.
- Bảng điều khiển gốc không phản hồi.
- Camera tích hợp trên máy không hiển thị đúng.
- Các nút trên vô-lăng không được nhận diện.
- Hộp LVDS hoặc cáp truyền tín hiệu bị lỏng.
- Bất kỳ đầu nối nào cũng phải chịu lực kéo.
- Bất kỳ thông báo cảnh báo nào cũng sẽ xuất hiện sau khi kết nối.
Các sự cố thường gặp trên màn hình Android của Mercedes W221 sau khi lắp đặt
Màn hình Android của xe Mercedes W221 không có âm thanh
Trước tiên, hãy kiểm tra kết nối âm thanh AUX, nguồn âm thanh đã chọn, đường dẫn loa của hệ thống định vị, đường dẫn bộ khuếch đại và cách lắp đặt cáp quang. Không đóng bảng điều khiển cho đến khi đã xác nhận âm thanh từ Android và âm thanh từ hệ thống định vị.
Màn hình Android của W221 không hiển thị hình ảnh hoặc hình ảnh không ổn định
Hãy kiểm tra lại hộp LVDS, cáp màn hình, kết nối nguồn và độ căng của cáp. Màn hình đen hoặc hình ảnh nhấp nháy cần được xem là sự cố về dây dẫn hoặc tín hiệu, không nên bỏ qua.
Camera mặc định không hiển thị
Việc giữ lại camera nguyên bản phụ thuộc vào đường đi của camera ban đầu và bộ phụ kiện đã chọn. Nếu hình ảnh không hiển thị, vui lòng gửi hình ảnh góc nhìn từ camera nguyên bản, ảnh hệ thống dây điện phía sau và một đoạn video ngắn đến iKAGOO.
Bộ điều khiển gốc không phản hồi
Kiểm tra việc chuyển mạch đường truyền, độ khít của cáp truyền dẫn và vị trí ban đầu của đầu nối trên bảng điều khiển. Không nên cho rằng mọi mẫu xe W221 đều sử dụng cùng một đường dẫn điều khiển.
Giới thiệu về iKAGOO: Các giải pháp nâng cấp thiết bị điện tử ô tô theo phong cách OEM, ưu tiên tính tương thích
iKAGOO tập trung vào các giải pháp nâng cấp hệ thống điện tử ô tô theo phong cách OEM dành cho những chủ xe mong muốn sở hữu một khoang lái hiện đại mà không phải biến chiếc xe thành một dự án đấu dây đa năng tiềm ẩn rủi ro. Đối với chủ sở hữu Mercedes-Benz S-Class W221, giá trị không chỉ nằm ở màn hình Android. Giá trị thực sự nằm ở sự kết hợp giữa việc đánh giá tính tương thích dành riêng cho từng dòng xe, lựa chọn sản phẩm phù hợp, nhận thức về rủi ro khi lắp đặt và hỗ trợ khắc phục sự cố sau bán hàng.
Đối với việc nâng cấp đầu đĩa Android cho mẫu W221, iKAGOO không coi thông tin “Mercedes W221 2006–2013” là đủ. Hệ thống COMAND gốc, menu NTG3.0 / NTG3.5, bố cục bảng điều khiển nguyên bản, các nút điều khiển trên bảng điều khiển trung tâm, đường dẫn cáp quang, đường dẫn âm thanh AUX, tín hiệu hiển thị LVDS, camera nguyên bản, các nút điều khiển trên vô lăng và lịch sử đấu dây trước đó đều có thể ảnh hưởng đến kết quả lắp đặt cuối cùng.
Quy trình mua ưu tiên tính tương thích
Trước khi đề xuất đầu đĩa Android phù hợp cho mẫu xe Mercedes W221, iKAGOO yêu cầu người mua cung cấp ảnh thực tế của xe. Điều này giúp giảm thiểu rủi ro chọn nhầm bộ dây cáp và xác định xem xe có phù hợp với lộ trình lắp đặt NTG3.0 / NTG3.5 dự kiến hay không.
- Bảng điều khiển và ảnh chụp màn hình gốc.
- Ảnh menu COMAND.
- Ảnh bộ điều khiển trên bảng điều khiển trung tâm.
- Thông tin về âm thanh, camera và cổng kết nối (nếu có).
Triết lý nâng cấp theo phong cách OEM
Mục tiêu của iKAGOO là mang đến một bản nâng cấp hiện đại nhưng vẫn tôn trọng thiết kế nguyên bản của xe. Một bộ hệ thống định vị Android được lắp đặt bổ sung cho mẫu W221 chất lượng cao cần phải trông như một phần tích hợp sẵn, giữ cho bảng điều khiển gọn gàng và tránh các thay đổi không cần thiết, không thể đảo ngược khi sử dụng bộ phụ kiện phù hợp và quy trình lắp đặt đúng cách.
- Giao diện Android màn hình rộng hiện đại.
- Thiết kế bảng điều khiển theo phong cách nhà máy.
- Xác định rõ ranh giới lắp đặt.
- Kiểm tra chức năng trước khi lắp ráp lại lần cuối.
Hỗ trợ sau khi quá trình cài đặt bắt đầu
Nếu trong quá trình cài đặt gặp phải các sự cố như không có âm thanh, màn hình đen, hình ảnh LVDS không ổn định, sự cố camera hoặc vấn đề về phản hồi của hệ thống điều khiển gốc, iKAGOO có thể xem xét các hình ảnh hoặc video ngắn về quá trình cài đặt và hướng dẫn các bước khắc phục sự cố tiếp theo.
- Đánh giá về AUX và đường dẫn âm thanh.
- Kiểm tra tín hiệu LVDS và tín hiệu hiển thị.
- Đánh giá về cáp quang và cáp truyền dẫn.
- Khắc phục sự cố liên quan đến camera và hệ thống điều khiển trên vô-lăng.
Quyết định mua hàng cuối cùng: Ba tiêu chí của iKAGOO cho bản nâng cấp W221 này
Sau khi xem qua 49 bước hướng dẫn lắp đặt, quyết định mua hàng trở nên rõ ràng hơn: bộ đầu Android nâng cấp cho Mercedes W221 này mang lại giá trị cao về trải nghiệm trong khoang lái, nhưng cần được mua và lắp đặt như một giải pháp nâng cấp theo phong cách OEM đòi hỏi sự tương thích cao, chứ không phải chỉ là một màn hình Android đa năng thông thường.
Sự cần thiết phải nâng cấp
Lý do thuyết phục để nâng cấp
Bản nâng cấp này mang lại giá trị lớn cho các chủ sở hữu xe W221 mong muốn sở hữu khoang lái hiện đại, màn hình định vị lớn hơn, tính năng CarPlay/Android Auto không dây, phát phương tiện qua Bluetooth, định vị bằng ứng dụng, cùng giao diện lái xe tiên tiến hơn so với hệ thống COMAND ban đầu.
- Trình độ hiện tại: Có lý do thuyết phục để nâng cấp.
- Người mua tốt nhất: Các chủ sở hữu xe W221 vẫn giữ lại chiếc xe và mong muốn một cuộc “lột xác” thực sự cho khoang lái.
- Lý do khấu trừ: không phải là lựa chọn tốt nhất dành cho những người mua chỉ muốn mua mô-đun CarPlay rẻ nhất.
- Khái niệm về người mua: đáng mua nếu mục tiêu là nâng cấp toàn diện về mặt hình ảnh và trải nghiệm người dùng.
- Tiêu chuẩn: Tiêu chuẩn về sự cần thiết của việc nâng cấp iKAGOO
Khả năng tương thích với xe nguyên bản
Yêu cầu về thẻ thông hành có ảnh xác nhận
Không thể xác định tính tương thích với W221 chỉ dựa trên “S-Class 2006–2013” hoặc “NTG3.0 / NTG3.5.” Mức điểm đạt yêu cầu là 95/100 sau khi xác nhận hình ảnh xe. Nếu không có hình ảnh bảng điều khiển, hệ thống COMAND, hệ thống âm thanh, camera, LVDS, cổng AUX và các đầu nối, điểm số cuối cùng không được coi là đã được xác nhận.
- Trình độ hiện tại: Mục tiêu 95/100 sau khi xác nhận chính xác phương tiện.
- Chưa có kết quả cuối cùng cho đến khi: Các hình ảnh thực tế về bảng điều khiển W221, menu COMAND, bộ điều khiển, hệ thống âm thanh, camera và các đầu nối đã được kiểm tra.
- Rủi ro khấu trừ chính: phiên bản thương mại, bộ khuếch đại, đường dây camera, bố trí tay lái bên trái/bên phải, hoặc hệ thống dây điện độ trước đó.
- Khái niệm về người mua: Hãy gửi ảnh trước khi mua để tránh trường hợp chọn nhầm dây cáp, không có âm thanh, không có hình ảnh hoặc bộ điều khiển gốc bị hỏng.
- Tiêu chuẩn: Tiêu chuẩn tương thích xe gốc của iKAGOO
Mức độ dễ dàng khi lắp đặt
L4 • Nên nhờ chuyên gia lắp đặt
Đây không phải là công việc lắp đặt phụ kiện đơn thuần. Hướng dẫn này trình bày chi tiết các bước tháo dỡ lớp ốp trang trí bảng điều khiển, tháo màn hình nguyên bản, tiếp cận bộ điều khiển trung tâm, xử lý cáp quang, định tuyến âm thanh AUX, chuyển đổi loa hệ thống định vị, chuyển đổi đường truyền giao thức, kết nối hộp LVDS bên ngoài, lắp đặt giá đỡ và kiểm tra chức năng.
- Trình độ hiện tại: L4 — Nên nhờ chuyên gia lắp đặt.
- Trình cài đặt được khuyến nghị: thợ lắp đặt thiết bị điện tử ô tô chuyên nghiệp hoặc kỹ thuật viên có kinh nghiệm trong lĩnh vực nâng cấp xe Mercedes.
- Lý do khấu trừ: công việc gia công chi tiết sâu, sợi quang, AUX, LVDS, đường truyền giao thức và kiểm tra chức năng.
- Điều kiện dừng: không tương thích đầu nối, không có âm thanh, màn hình đen, hình ảnh LVDS không ổn định, lỗi camera hoặc bộ điều khiển gốc không phản hồi.
- Tiêu chuẩn: Hướng dẫn về mức độ khó khi cài đặt iKAGOO
| Chỉ số | Điểm / Cấp độ | Lý do | Hành động của người mua |
|---|---|---|---|
| Sự cần thiết phải nâng cấp | 88/100 • Lý do thuyết phục để nâng cấp | Giao diện COMAND nguyên bản của W221 đã trở nên lỗi thời so với màn hình Android 12,3 inch tích hợp tính năng định vị, CarPlay/Android Auto, phát phương tiện qua Bluetooth và hỗ trợ ứng dụng. | Đây là một lựa chọn đáng cân nhắc nếu chủ xe muốn tân trang lại khoang lái một cách triệt để và có ý định tiếp tục sử dụng chiếc xe này. |
| Khả năng tương thích với xe nguyên bản | Mục tiêu 95/100 • Yêu cầu phải đạt chuẩn được xác nhận qua hình ảnh | Việc lắp đặt cho mẫu W221 phụ thuộc vào việc xác nhận NTG3.0 / NTG3.5, bố cục bảng điều khiển, hệ thống âm thanh, cáp quang, cổng AUX, LVDS, camera và các nút điều khiển nguyên bản. | Vui lòng gửi ảnh bảng điều khiển, menu COMAND, bộ điều khiển, màn hình, hệ thống âm thanh, camera và đầu nối trước khi đặt hàng. |
| Mức độ dễ dàng khi lắp đặt | 58/100 mức độ dễ dàng • L4: Nên nhờ chuyên gia lắp đặt | Công việc này bao gồm tháo bỏ các chi tiết trang trí bên trong, truy cập vào hệ thống chính của nhà sản xuất, định tuyến tín hiệu nhạy cảm với hệ thống dây điện, lắp đặt giá đỡ và kiểm tra chức năng trước khi lắp ráp lại. | Hãy nhờ đến một thợ lắp đặt chuyên nghiệp. Không đóng nắp bảng điều khiển cho đến khi đã kiểm tra kỹ lưỡng chất lượng âm thanh, hình ảnh, camera, các nút điều khiển và độ ổn định của hệ thống LVDS. |
Ghi chú đánh giá kỹ thuật
Hướng dẫn lắp đặt đầu đĩa Android cho xe Mercedes W221 này đã được Đội ngũ Kỹ thuật iKAGOO rà soát về tính tương thích của đầu đĩa Android với mẫu xe cụ thể, khả năng lắp vừa vặn vào bảng điều khiển, đường dẫn âm thanh AUX / cáp quang, đường dẫn tín hiệu LVDS, việc giữ nguyên camera nguyên bản, cách thức điều khiển như ban đầu và các giới hạn rủi ro trong quá trình lắp đặt.
| Được xem xét bởi | Đội ngũ Kỹ thuật iKAGOO |
|---|---|
| Trọng tâm kỹ thuật | Khả năng tương thích của đầu phát Android với Mercedes-Benz W221, xác nhận NTG3.0 / NTG3.5, đường truyền âm thanh AUX, xử lý cáp quang, kết nối hộp LVDS, hoạt động của camera nguyên bản và phản hồi của bộ điều khiển nguyên bản. |
| Lần xem xét gần nhất | Ngày 10 tháng 7 năm 2026 |
| Gợi ý dành cho người mua | Hãy gửi ảnh thực tế của xe trước khi đặt hàng. Đừng chỉ dựa vào năm sản xuất, tên phiên bản hoặc các thông tin về khả năng tương thích trên các nền tảng thương mại điện tử. |
| Các trang iKAGOO liên quan | Khả năng tương thích và cài đặt · Chính sách bảo hành · Hoàn tiền và Trả hàng · Giới thiệu về iKAGOO |
Câu hỏi thường gặp: Lắp đặt đầu đĩa Android cho Mercedes W221
Đầu đĩa Android này có phù hợp với mọi mẫu xe Mercedes S-Class W221 không?
Không. Việc tương thích với mẫu W221 phải được xác nhận dựa trên chính chiếc xe cụ thể đó. Bảng điều khiển gốc, phiên bản COMAND, hệ thống âm thanh, đường dẫn camera, bố trí đầu nối, vị trí vô-lăng và các thay đổi về hệ thống dây điện trước đó có thể ảnh hưởng đến lộ trình lắp đặt chính xác.
Màn hình Android trên xe Mercedes W221 có hỗ trợ cắm là chạy không?
Không, không phải theo nghĩa là một món phụ kiện đơn thuần. Hướng dẫn này trình bày các bước tháo gỡ bảng điều khiển sâu, tháo gỡ màn hình nguyên bản, truy cập vào hệ thống gốc, xử lý cáp quang, định tuyến âm thanh AUX, chuyển đổi đường truyền giao thức, kết nối hộp LVDS, lắp đặt giá đỡ và kiểm tra toàn bộ chức năng.
Tôi có thể tự lắp đặt đầu đĩa Android W221 được không?
Thông thường không được khuyến khích cho những người mới bắt đầu tự làm. Việc này gần giống với một dịch vụ lắp đặt chuyên nghiệp cấp L4 hơn, bởi vì bảng điều khiển và đường đi của dây điện là những bộ phận nhạy cảm. Sử dụng dịch vụ của một thợ lắp đặt điện tử ô tô chuyên nghiệp sẽ an toàn hơn.
Tại sao màn hình Android trên chiếc Mercedes W221 của tôi lại không có âm thanh?
Hầu hết các trường hợp không có âm thanh cần được kiểm tra thông qua đường dẫn AUX, nguồn âm thanh đã chọn, đường dẫn loa hệ thống định vị, đường dẫn bộ khuếch đại và cách xử lý cáp quang. Không được đóng bảng điều khiển cho đến khi xác nhận đã có âm thanh.
Tại sao màn hình Android của W221 không hiển thị hình ảnh?
Kiểm tra hộp LVDS, cáp màn hình, kết nối nguồn và độ căng của cáp. Màn hình đen hoặc hình ảnh không ổn định thường cho thấy cần kiểm tra lại đường truyền tín hiệu trước khi đóng nắp.
Hệ thống COMAND ban đầu có còn hoạt động được không?
Điều này phụ thuộc vào bộ phụ kiện đã chọn và cấu hình xe. Phải xác nhận hoạt động ban đầu của hệ thống trước khi đặt hàng và kiểm tra trong quá trình lắp đặt.
Camera lùi nguyên bản của xe có hoạt động được sau khi nâng cấp lên Android không?
Điều này phụ thuộc vào đường dẫn camera mặc định của nhà sản xuất và phương pháp tích hợp. Gửi thông tin về camera và kiểm tra camera trước khi lắp ráp lại phần viền hoàn thiện.
Tôi nên gửi những bức ảnh nào trước khi mua đầu đĩa Android cho xe Mercedes W221?
Vui lòng gửi ảnh bảng điều khiển, ảnh màn hình gốc, menu COMAND, bộ điều khiển trên bảng điều khiển trung tâm, bố cục tay lái bên trái (LHD)/bên phải (RHD), thông tin về hệ thống âm thanh/bộ khuếch đại, trạng thái camera và ảnh các đầu nối (nếu có). Những bức ảnh này giúp iKAGOO xác nhận chính xác lộ trình của mẫu W221 trước khi mua.
Tôi nên làm gì trước khi trình cài đặt đóng bảng điều khiển?
Kiểm tra âm thanh, hình ảnh, cảm ứng, camera, các nút điều khiển trên vô-lăng, phản hồi của bộ điều khiển gốc, hành vi hiển thị của hệ thống COMAND (nếu được hỗ trợ), độ ổn định của LVDS, và hành vi chuyển sang chế độ ngủ / thức dậy. Nếu một chức năng nào đó không hoạt động, hãy dừng lại và kiểm tra đường đi của dây điện trước khi tiến hành lắp ráp lại lần cuối.
Lựa chọn nâng cấp đầu đĩa Android nào là tốt nhất cho mẫu xe Mercedes S-Class W221?
Lựa chọn tốt nhất là một đầu đĩa Android dành riêng cho dòng xe Mercedes W221, được xác nhận qua các hình ảnh thực tế của xe, chứ không phải là một màn hình đa năng. Thiết bị thay thế phải tương thích với hệ thống COMAND NTG3.0 / NTG3.5 gốc, hình dáng bảng điều khiển, đường dẫn âm thanh AUX, đường dẫn tín hiệu LVDS, cấu hình camera và cách thức điều khiển ban đầu.
Liệu chiếc Mercedes W221 có thể giữ nguyên các chức năng điều khiển gốc sau khi nâng cấp màn hình Android không?
Đúng vậy, các bộ điều khiển nguyên bản có thể được giữ nguyên nếu sử dụng bộ phụ kiện phù hợp và đường đi dây đúng cách. Tuy nhiên, cần phải kiểm tra phản hồi của bộ điều khiển gốc, các nút điều khiển trên vô-lăng, hoạt động của hệ thống COMAND và chức năng chuyển đổi camera trước khi tiến hành lắp ráp lại bảng điều khiển lần cuối.
Tại sao đầu đĩa Android trên xe Mercedes W221 lại không có âm thanh sau khi lắp đặt?
Các nguyên nhân phổ biến nhất bao gồm: định tuyến AUX không đúng, chọn nguồn âm thanh sai, sự cố liên quan đến đường dẫn bộ khuếch đại, vấn đề trong quá trình xử lý cáp quang hoặc kết nối cáp truyền dẫn chưa hoàn chỉnh. Cần kiểm tra hệ thống âm thanh trước khi đóng bảng điều khiển.
Tôi có cần gửi ảnh trước khi mua đầu đĩa Android cho xe Mercedes W221 không?
Đúng vậy. Vui lòng gửi ảnh bảng điều khiển, ảnh màn hình gốc, ảnh menu COMAND, ảnh bộ điều khiển trên bảng điều khiển trung tâm, sơ đồ bố trí tay lái bên trái (LHD)/bên phải (RHD), thông tin hệ thống âm thanh, trạng thái camera và ảnh các đầu nối (nếu có).
Khuyến nghị cuối cùng dành cho các chủ sở hữu xe W221
Nếu mục tiêu của bạn chỉ là kiểm tra xem đầu đĩa Android dành cho Mercedes W221 có vừa vặn về mặt vật lý hay không, hướng dẫn này đã đủ để chứng minh rằng việc lắp đặt là khả thi. Nếu mục tiêu của bạn là mua đúng đầu đĩa và tránh các sự cố như không có âm thanh, không có hình ảnh, camera, COMAND hoặc bộ điều khiển, bước tiếp theo đúng đắn là kiểm tra tính tương thích dựa trên hình ảnh trước khi đặt hàng.
Đối với các chủ sở hữu xe Mercedes S-Class W221 / S-Klasse W221 / Classe S W221, iKAGOO khuyến nghị nên kiểm tra trước hệ thống NTG3.0 / NTG3.5 nguyên bản, hình dáng bảng điều khiển, đường dẫn âm thanh, đường dẫn cáp quang, tình trạng camera và cấu hình bảng điều khiển. Sau đó, trang sản phẩm đầu phát Android dành cho Mercedes W221 sẽ là lộ trình mua hàng chính xác.








Add comment
Bạn phải đăng nhập để gửi bình luận.