


VW Touareg 7L Lắp đặt cụm đồng hồ kỹ thuật số 2003–2010: 37 bước ảnh thực tế
VW Touareg 7L Lắp đặt cụm đồng hồ kỹ thuật số 2003–2010: 37 bước ảnh thực tế
Lắp đặt cụm đồng hồ kỹ thuật số VW Touareg 7L cho Các mẫu 2003–2010 Ở đây, quá trình lắp đặt được ghi lại từ chính chuỗi ảnh lắp đặt thực tế của iKAGOO. Hướng dẫn này tuân theo thứ tự chụp ảnh từ việc tháo ốp bảng điều khiển và lắp cụm đồng hồ, đến việc giữ lại bo mạch chính gốc, luồn dây qua ngăn đựng đồ phía hành khách và thực hiện các bước kiểm tra cuối cùng.
Điểm kỹ thuật quan trọng nhất trong quy trình này có thể thấy ngay trong chính các bức ảnh: bo mạch chính gốc của cụm đồng hồ được giữ lại, được gắn trên giá đỡ và kết nối lại trong khu vực ngăn đựng đồ phía hành khách.
Bạn tháo khung viền và giá đỡ cụm đồng hồ gốc, kết nối và lắp cụm đồng hồ LCD mới, luồn dây nối dài sang phía hành khách, giữ lại bo mạch chính gốc của cụm đồng hồ, kết nối lại bo mạch đó trong khu vực ngăn đựng đồ, sau đó kiểm tra dữ liệu xe và các chức năng cảnh báo được hỗ trợ trước khi lắp lại bảng điều khiển.
Hướng dẫn lắp đặt cụm đồng hồ kỹ thuật số VW Touareg 7L này dựa trên bằng chứng nào?
Câu trả lời trực tiếp: Hướng dẫn này dựa trên trình tự lắp đặt Touareg iKAGOO thực tế: một nắp cùng 36 ảnh các bước, giữ nguyên thứ tự 37 bước gốc. Các hình ảnh ghi lại trực tiếp việc tháo ốp trang trí và giá đỡ, lắp cụm đồng hồ mới, luồn cáp nối dài, giữ nguyên bo mạch chính gốc và đặt ngăn đựng găng tay.
Cùng bằng chứng đó cũng xác định phạm vi của bài viết. Phạm vi sản phẩm được hỗ trợ là VW Touareg 7L 2003–2010, nhưng các bức ảnh không chứng minh rằng mọi xe trong khoảng năm đó có cấu hình nội bộ giống hệt nhau, và chúng cũng không cho thấy quy trình mã hóa, vì vậy không điểm nào được trình bày như một sự thật phổ quát.
VW / Volkswagen Touareg 7L, các năm sản xuất 2003–2010. Sự khớp chính xác vẫn yêu cầu cấu hình cụm đồng hồ và bảng điều khiển gốc phải khớp với quy trình được cung cấp.
Chuỗi nguồn gồm 37 bước từ tài liệu lắp đặt iKAGOO thực tế, với từng ảnh có thương hiệu được tải lên tương ứng với bước gốc của nó.
Bài viết giải thích cách hoạt động của cụm đồng hồ phía người lái kết nối với việc di dời bảng mạch gốc ở giai đoạn sau, thay vì coi mỗi bức ảnh như một chú thích riêng lẻ.
Độ khớp được xác nhận từ cụm đồng hồ gốc, khoang mở táp-lô, nền tảng/cấu hình và chi tiết LHD/RHD—không chỉ từ năm sản xuất.
Làm thế nào để tháo viền cụm đồng hồ trên VW Touareg 7L 2003–2010?
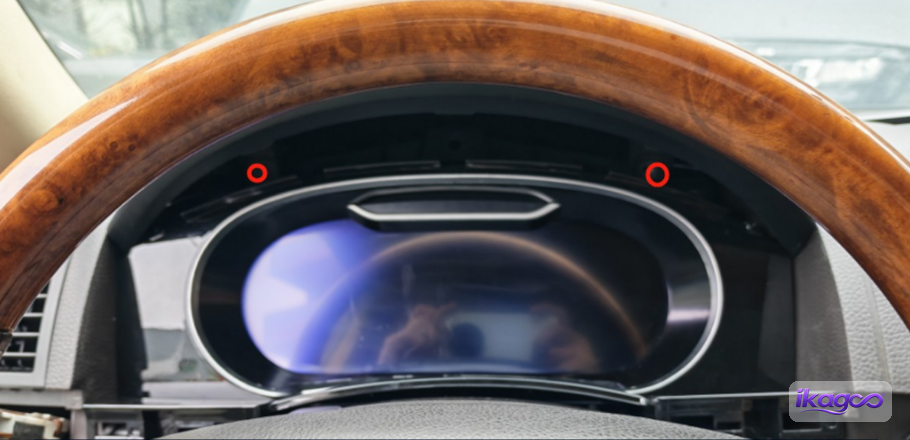
Câu trả lời trực tiếp: Tháo lớp ốp khu vực vô lăng trước, sau đó đến lớp ốp bên và phía trên, tiếp theo là các vít lộ ra và hai giá đỡ lắp đồng hồ. Bước 13 là thời điểm so sánh khoang mở táp-lô đã lộ ra với chuỗi ảnh iKAGOO trước khi kết nối cụm đồng hồ mới.
Ghi lại táp-lô gốc trước khi tháo rời
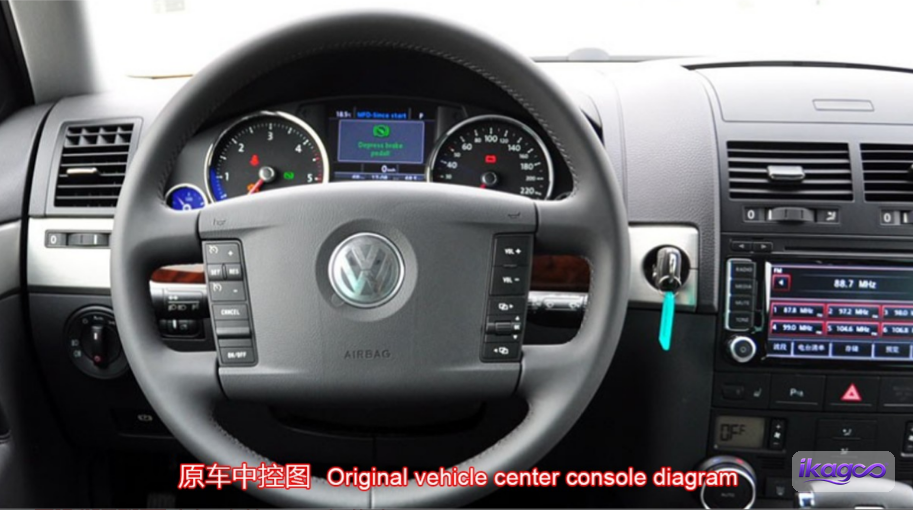
Bắt đầu với chiếc xe đúng như khi nó đến. Bức ảnh đầu tiên là tham chiếu cho vị trí cụm đồng hồ gốc, lớp ốp xung quanh và sự khớp tổng thể của táp-lô. Hãy chụp ảnh của riêng bạn tại thời điểm này; nó sẽ cho bạn thứ cụ thể để so sánh khi cụm đồng hồ mới và lớp ốp được lắp lại.
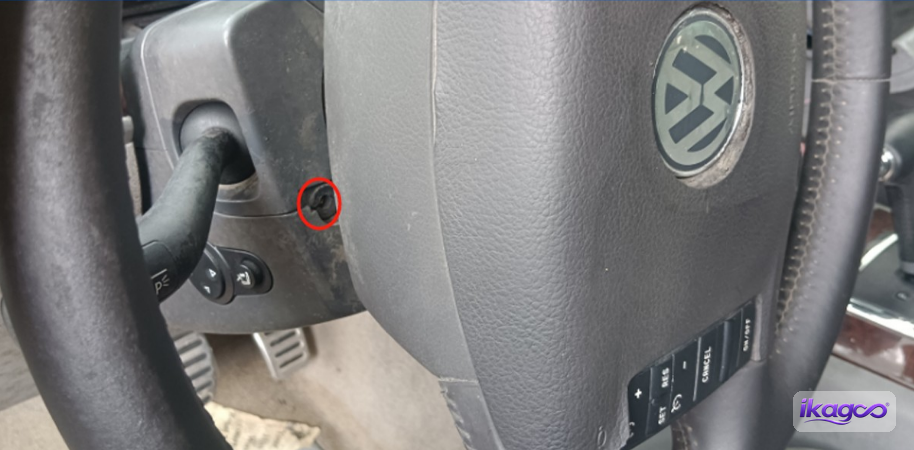
Tháo vít ở khu vực vô lăng
Tháo con vít được chỉ ra quanh khu vực vô lăng. Đây là điểm cố định đầu tiên trong trình tự chụp ảnh và mở đường cho miếng ốp sẽ được tháo ra tiếp theo.
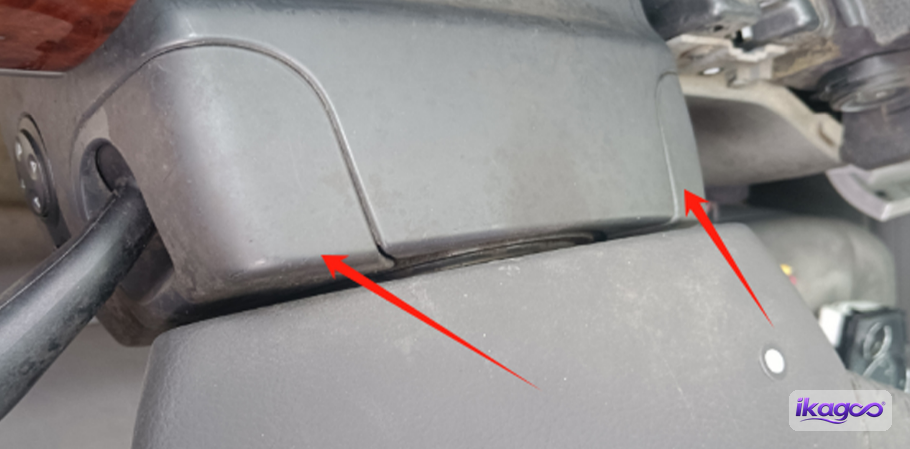
Tháo miếng ốp vô lăng
Sau khi vít được tháo ra, nhẹ nhàng tháo miếng ốp được chỉ ra quanh khu vực vô lăng. Làm việc từ đường nối nhìn thấy được và tháo dần miếng ốp thay vì cố gắng kéo toàn bộ phần này ra trong một chuyển động.
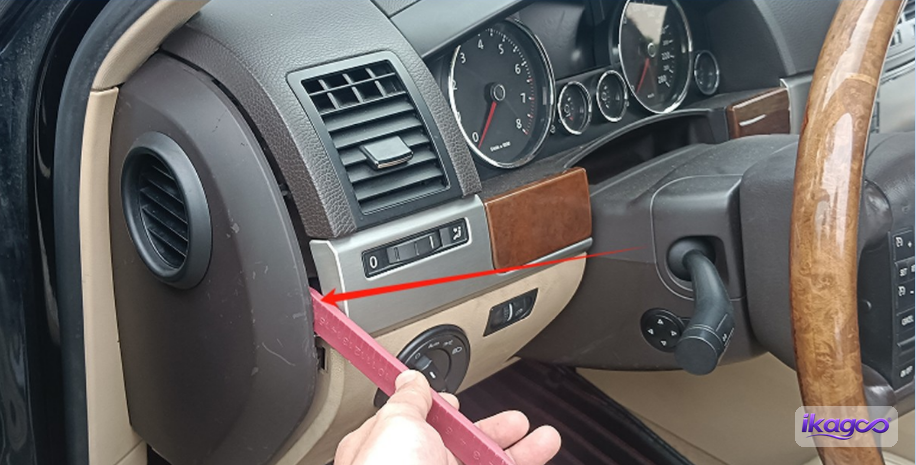
Mở miếng ốp bên cạnh cụm đồng hồ
Di chuyển đến bên cạnh khu vực bảng táp-lô và nhả tấm ốp bên cạnh như trong ảnh. Việc này bắt đầu tách rời các tấm ốp đang khóa viền cụm đồng hồ vào bảng táp-lô.
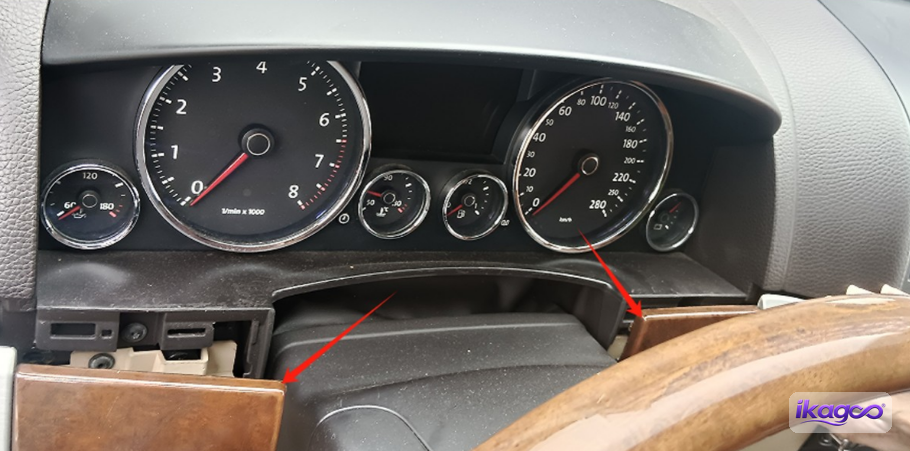
Nhả tấm ốp ở cả hai bên
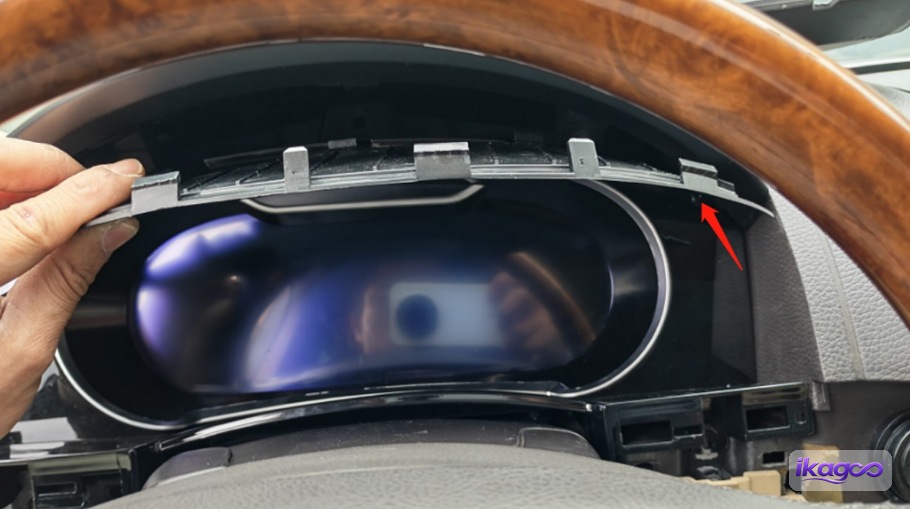
Tiếp tục dọc theo cả hai bên của viền cụm đồng hồ. Khi các mảnh bên đã lỏng, tấm ốp phía trên có thể được tháo ra mà không phải vật lộn với các tấm vẫn còn kẹp với nhau.
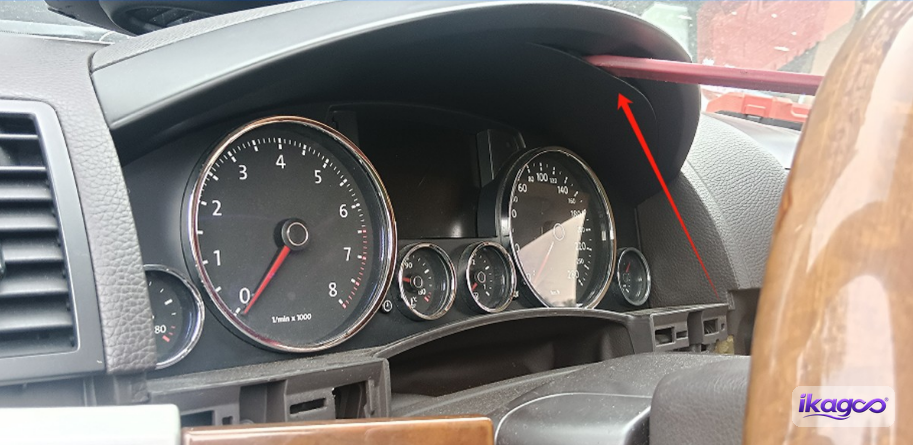
Nhấc tấm ốp trang trí phía trên ra
Nhả mảnh trang trí phía trên cụm đồng hồ. Việc tháo tấm này sẽ lộ ra các điểm gắn chặt tiếp theo trong trình tự lắp đặt.
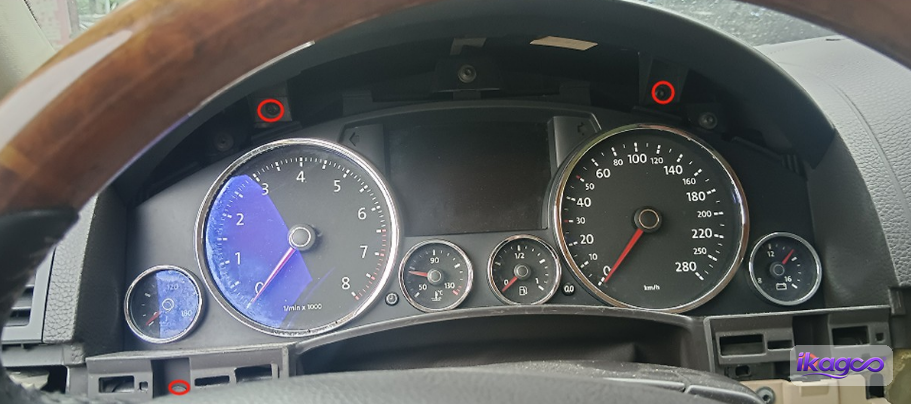
Tháo các vít lộ ra
Sau khi đã di chuyển phần ốp trên sang một bên, hãy tháo các vít hiện đang nhìn thấy. Các chốt này giữ cấu trúc xung quanh, cần phải tháo ra trước khi có thể tiếp cận các giá đỡ lắp cụm đồng hồ.
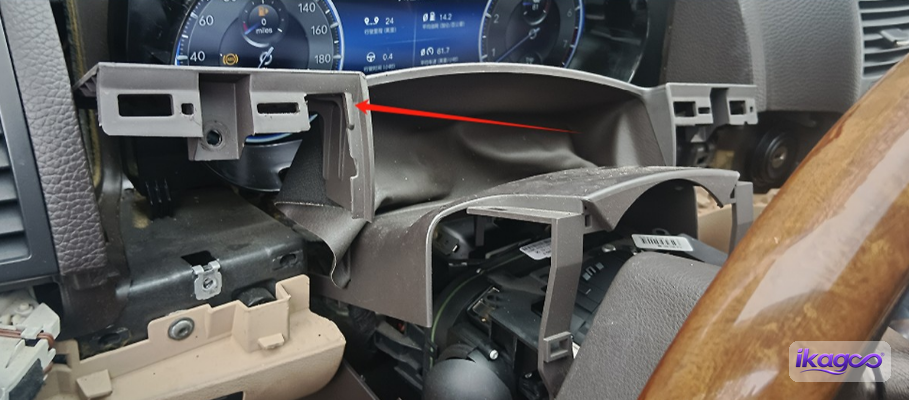
Tháo phần ốp bên còn lại
Ảnh tiếp theo quay lại phần ốp bên. Hãy tháo các mảnh còn lại ở cả hai bên và giữ phần ốp được đỡ khi nó tách ra khỏi bảng điều khiển.
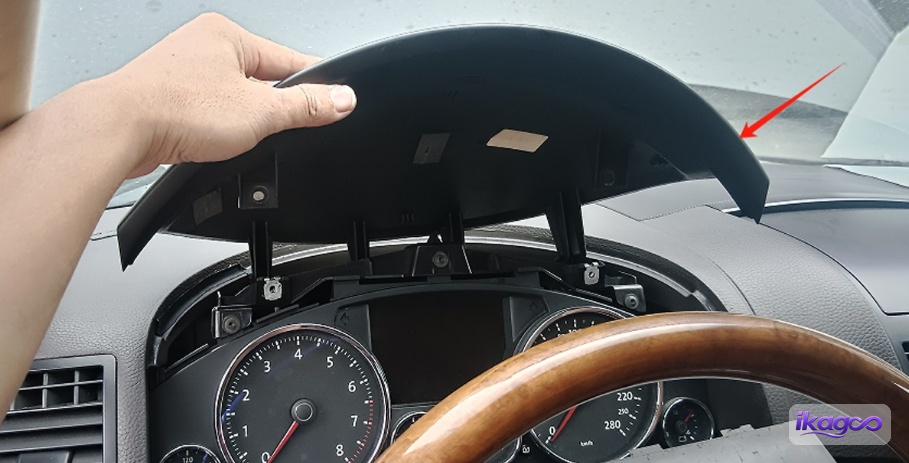
Tháo phần ốp trên xung quanh khu vực đồng hồ
Bây giờ hãy tháo phần ốp trên còn lại như trong ảnh. Lúc này, cấu trúc lắp cụm đồng hồ bắt đầu hiện ra hoàn toàn.
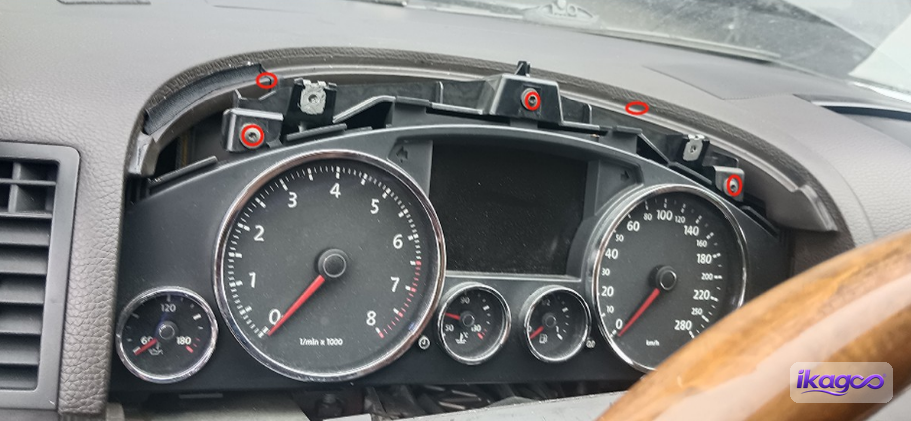
Tháo các vít của giá đỡ lắp cụm đồng hồ
Tháo các vít giữ giá đỡ lắp cụm đồng hồ. Đây là lúc công việc chuyển từ tháo ốp trang trí sang tháo cấu trúc định vị cụm đồng hồ.
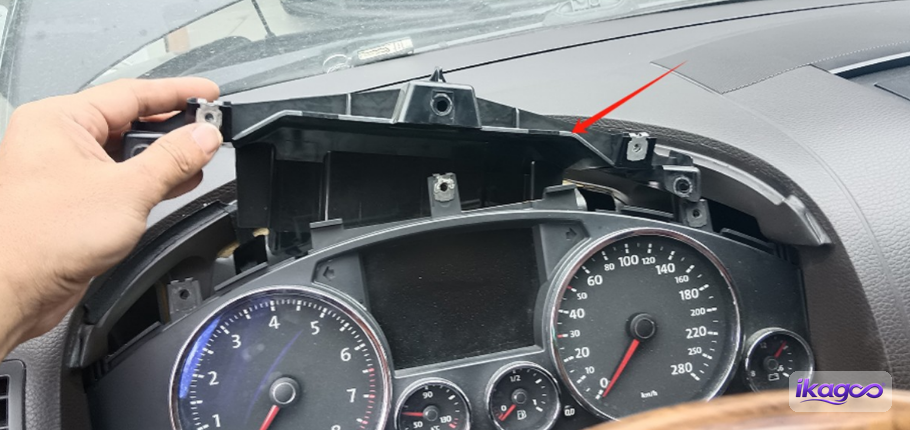
Nhấc giá đỡ lắp đầu tiên ra
Sau khi đã tháo vít, hãy lấy giá đỡ đầu tiên theo trình tự. Giữ nó cùng với các ốc vít của nó vì nó là một phần của tham chiếu lắp đặt gốc.
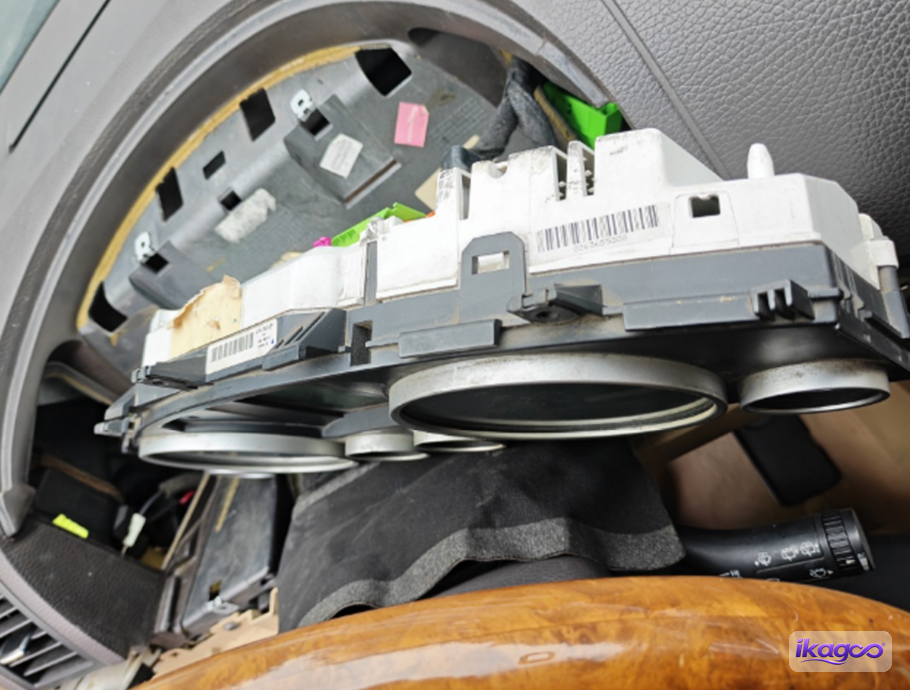
Tháo giá đỡ thứ hai
Tháo giá đỡ thứ hai ở cùng khu vực. Khi cả hai mảnh giá đỡ đã được tháo ra, lỗ mở trên bảng điều khiển đủ rõ ràng để so sánh với đường đi của cụm đồng hồ mới.
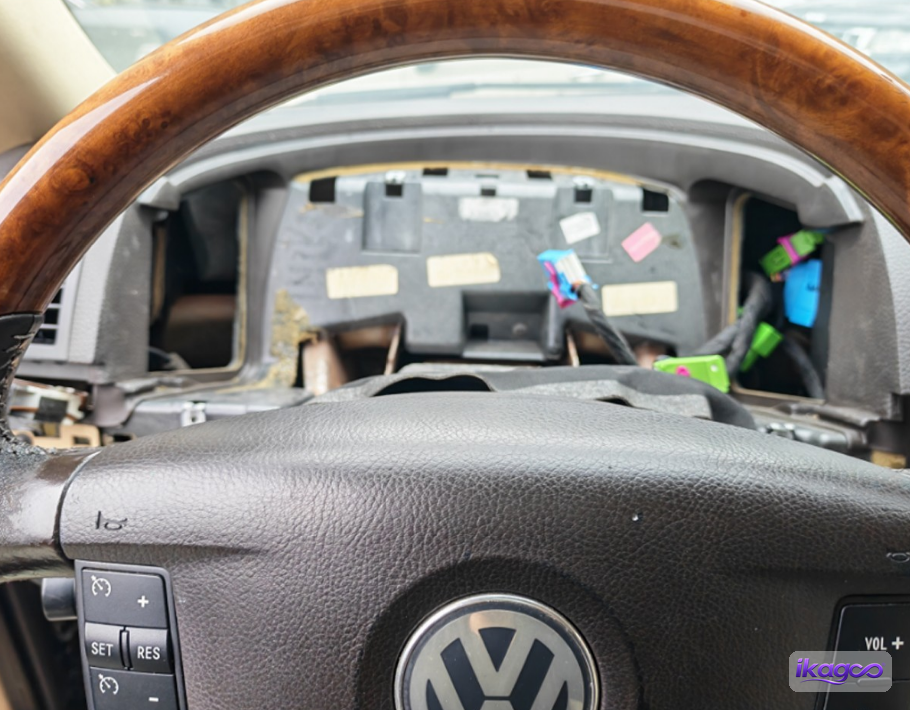
So sánh lỗ mở đã lộ ra trước khi kết nối cụm đồng hồ mới
Dừng lại ở đây và so sánh lỗ mở trên bảng điều khiển của bạn với ảnh. Đây là thời điểm hữu ích nhất để phát hiện sự không khớp trước khi bất kỳ phần cứng mới nào được kết nối hoặc đẩy vào vị trí.
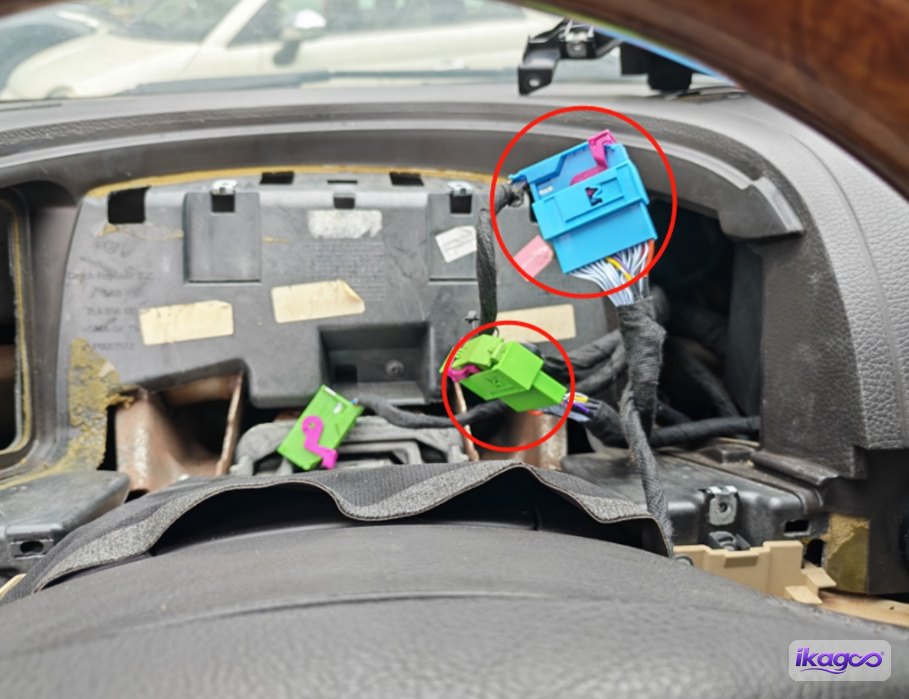
Cụm đồng hồ kỹ thuật số iKAGOO được kết nối như thế nào trong VW Touareg 7L 2003–2010?
Câu trả lời trực tiếp: Kết nối phích cắm nguồn chính và phích cắm mỏng của cụm đồng hồ, căn chỉnh cả hai chân lắp phía dưới với các trụ vít gốc, đặt cụm đồng hồ vào khe mở, luồn cáp nối dài về phía ngăn đựng đồ, sau đó cố định cụm đồng hồ và lắp lại tấm ốp. Kiểm tra khớp nối và đường đi của cáp trước khi đóng kín thiết bị.
Kết nối cáp nguồn chính
Kết nối cáp nguồn chính với cụm đồng hồ LCD mới như hình minh họa. Đầu nối phải khớp với ổ cắm được cung cấp sẵn và nằm đúng định hướng dự kiến.
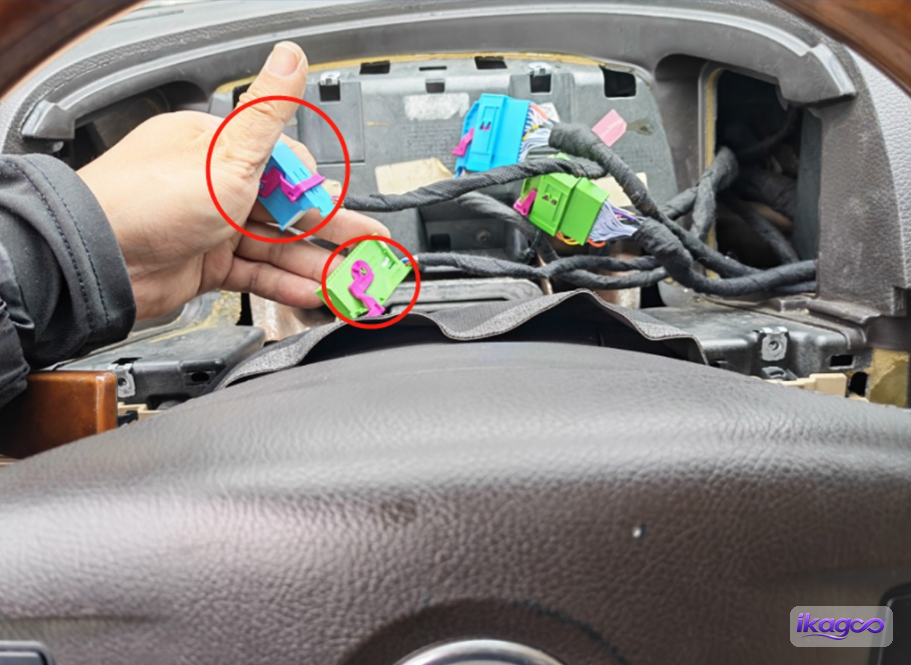
Kết nối phích cắm mỏng với cụm đồng hồ LCD
Cắm phích cắm dây mảnh như trong ảnh vào ổ cắm tương ứng trên cụm đồng hồ LCD. Đảm bảo nó được cắm hoàn toàn khớp trước khi di chuyển cụm đồng hồ về phía khe mở trên bảng điều khiển.
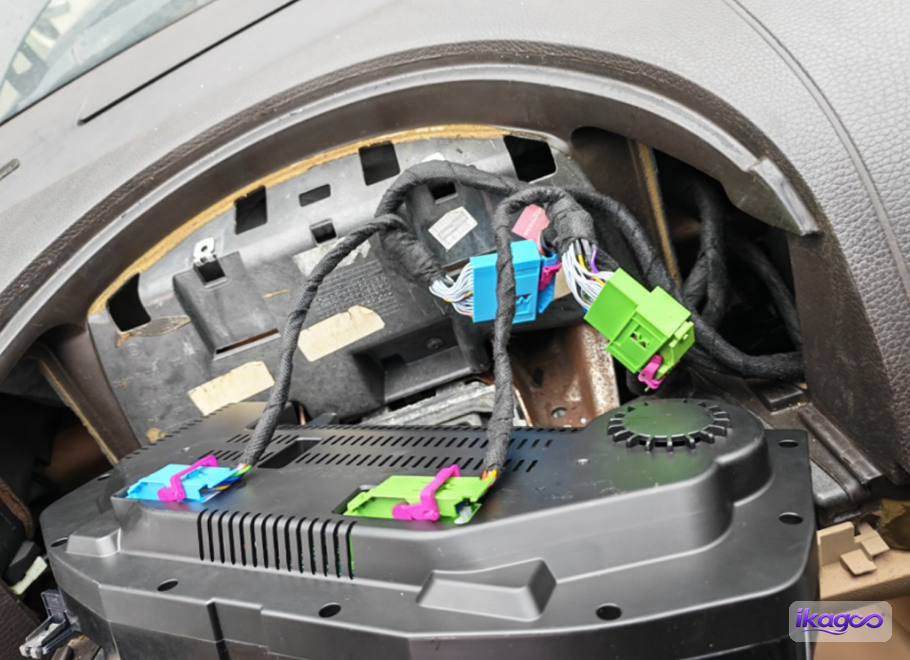
Kiểm tra cả hai kết nối cụm đồng hồ trước khi lắp đặt.
Trước khi màn hình được đưa vào bảng điều khiển, hãy nhìn vào các kết nối đã hoàn thành như trong ảnh. Đây là cơ hội dễ dàng cuối cùng để sửa phích cắm chưa cắm chặt trước khi mặt sau của cụm đồng hồ trở nên khó nhìn.
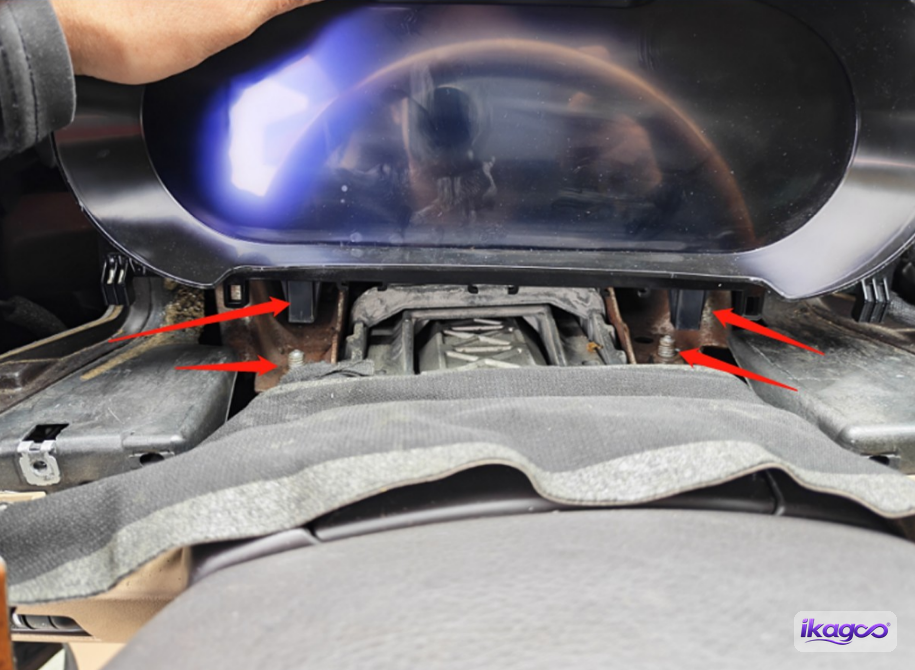
Căn chỉnh hai chân đế phía dưới với các trụ vít gốc.
Căn chỉnh hai chân lắp phía dưới của cụm đồng hồ LCD mới với các trụ vít gốc như trong ảnh. Cả hai bên phải khớp với các điểm lắp của nhà máy trước khi siết bất kỳ con vít nào.
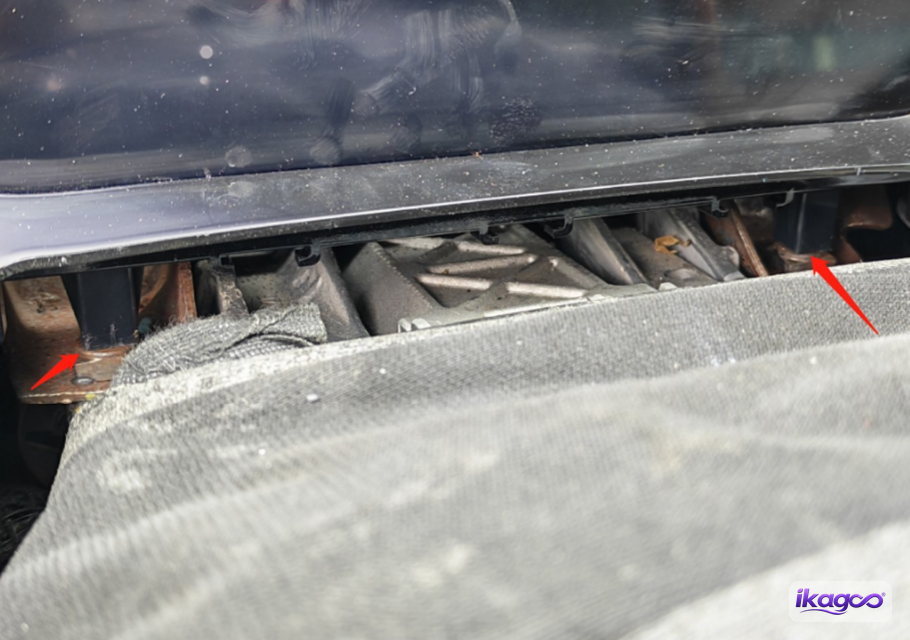
Xác nhận cụm đồng hồ nằm ngay ngắn.
Giữ cụm đồng hồ ở vị trí đã căn chỉnh và kiểm tra khe hở xung quanh vỏ. Thiết bị phải nằm tự nhiên trong khoang mở thay vì bị ép vào hình dạng bởi các vít.
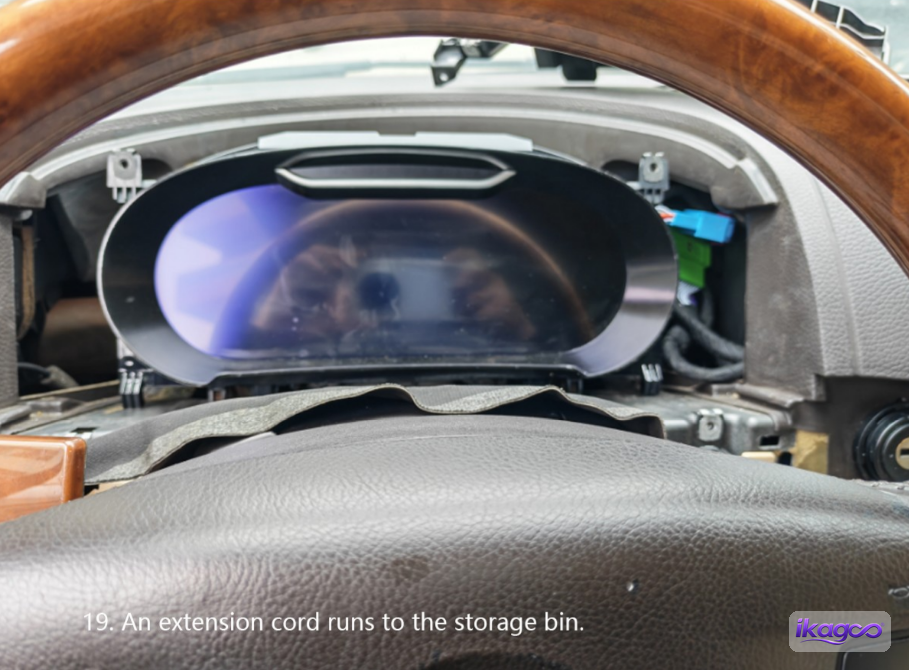
Đặt cụm đồng hồ LCD vào vị trí
Di chuyển cụm đồng hồ vào vị trí cuối cùng trên bảng điều khiển. Giữ dây điện phía sau thiết bị thoáng khi vỏ di chuyển vào trong để việc lắp khít phía trước không phải trả giá bằng dây cáp bị kẹp phía sau.
Luồn cáp nối dài về phía hộp đựng găng tay hành khách
Trình tự nguồn bây giờ giới thiệu cáp nối dài chạy từ khu vực cụm đồng hồ đến hộp đựng găng tay phía hành khách. Luồn cáp theo đường đã được ghi chú và chừa đủ chiều dài cho bo mạch chính gốc được giữ lại sẽ được kết nối sau.
Cố định cụm đồng hồ mới
Khi cụm đồng hồ đã được căn chỉnh và cáp nối dài có đường đi thông thoáng, hãy lắp các vít cố định. Siết chặt thiết bị ở vị trí nó đã nằm đúng, thay vì dùng vít để kéo vỏ vào vị trí căn chỉnh.
Lắp viền cụm đồng hồ LCD
Gắn viền cụm đồng hồ mới vào vị trí xung quanh màn hình. Làm việc dọc theo mép và xác nhận rằng viền nằm khớp đều với lỗ mở của bảng điều khiển.
Lắp lại viền bên nguyên bản
Đưa các mảnh trang trí gốc trở lại cả hai bên của cụm đồng hồ. Đây là kiểm tra trực quan đầu tiên để đảm bảo cụm lắp ráp mới nằm đúng vị trí mà bảng điều khiển gốc mong muốn.
Tại sao bản nâng cấp cụm đồng hồ kỹ thuật số VW Touareg 7L 2003–2010 lại giữ lại bo mạch chính gốc?
Câu trả lời trực tiếp: Con đường iKAGOO được ghi chép này giữ lại bo mạch chính của cụm đồng hồ Touareg gốc thay vì loại bỏ toàn bộ điện tử cụm đồng hồ nhà máy. Các ảnh nguồn cho thấy cụm đồng hồ gốc được mở ra, bo mạch được tháo ra và sau đó được cố định vào một giá đỡ kim loại đi kèm.
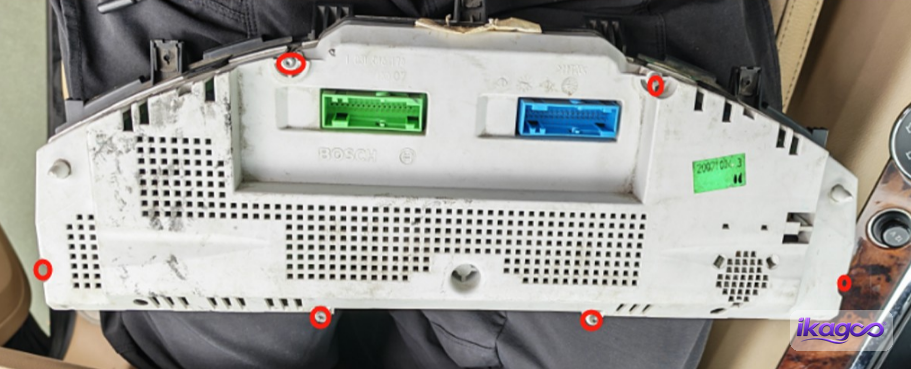
Tháo vít khỏi cụm đồng hồ gốc
Công việc bây giờ chuyển sang chính cụm đồng hồ gốc. Tháo con vít được hiển thị trong ảnh để có thể mở vỏ gốc. Từ thời điểm này trở đi, cụm đồng hồ gốc đang được tháo rời vì một phần điện tử của nó sẽ vẫn nằm trong xe.
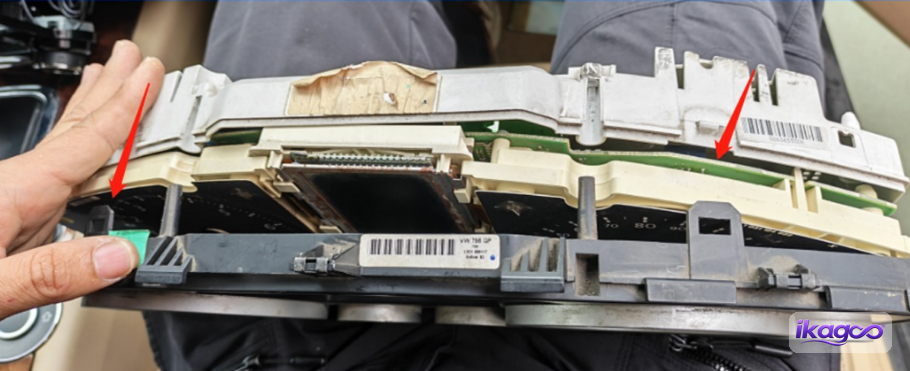
Mở vỏ bảo vệ cụm ban đầu
Carefully separate the original instrument housing. The goal is not simply to dismantle the old cluster; it is to reach the electronics that the photographed retrofit route keeps and relocates.
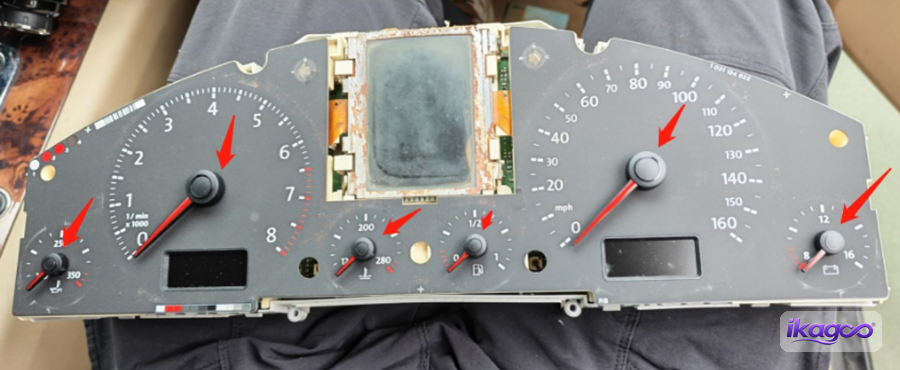
Remove the original pointers
Lift off the pointers shown in the source photo so the cluster can be opened further. Keep the removed original parts together while the board-transfer stage is completed.
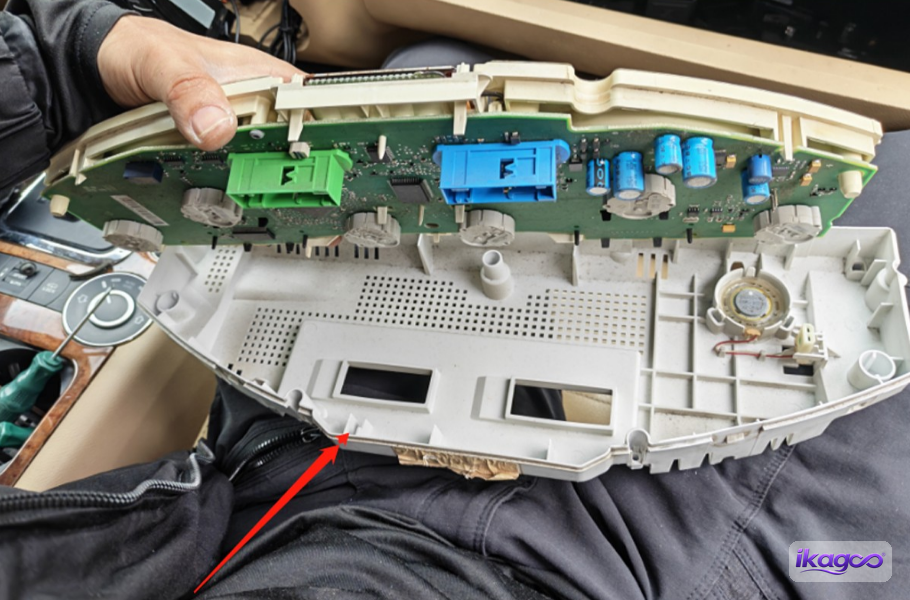
Release the lower housing
Open the lower housing shown in the photo. This exposes the internal connection and the original instrument mainboard used in the next steps.
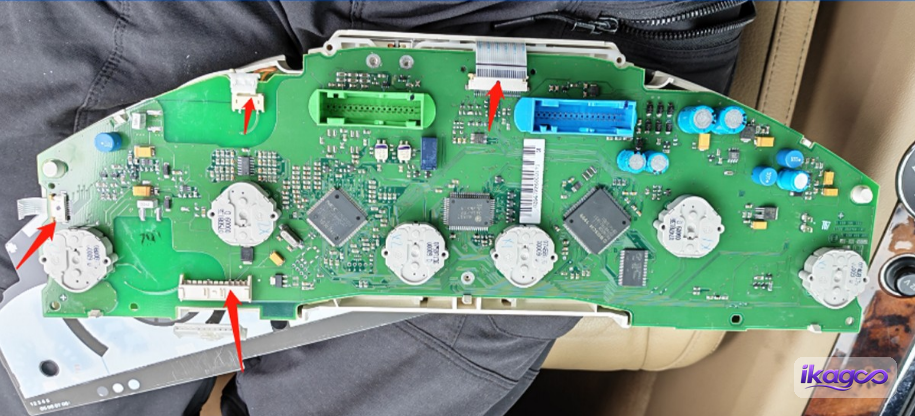
Disconnect the internal instrument cable
Unplug the internal cable shown inside the original cluster. Once this connection is released, the mainboard can be separated from the original housing.
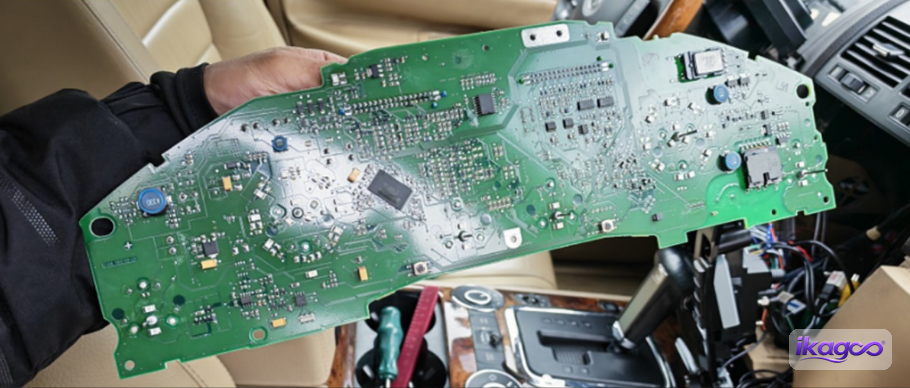
Retain the original instrument mainboard
This is the defining technical step in this installation route: the original Touareg instrument mainboard is kept. The source sequence does not discard it; the board continues into the final installation.
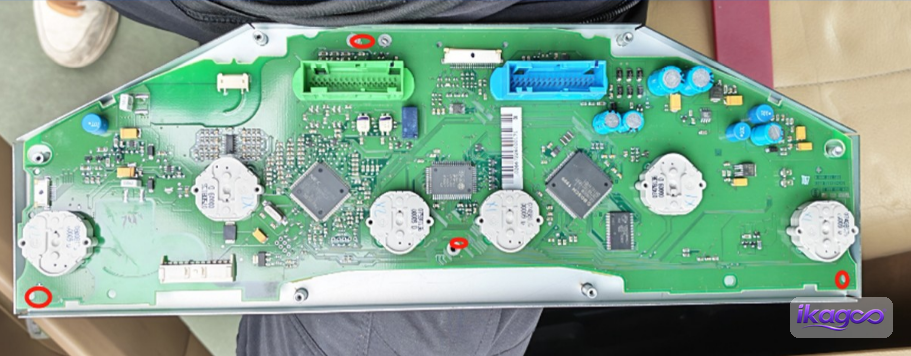
Mount the retained mainboard on the metal support
Position the original mainboard on the supplied metal support exactly as shown in the photo. The support gives the board a stable mounting method after it leaves the original instrument housing.
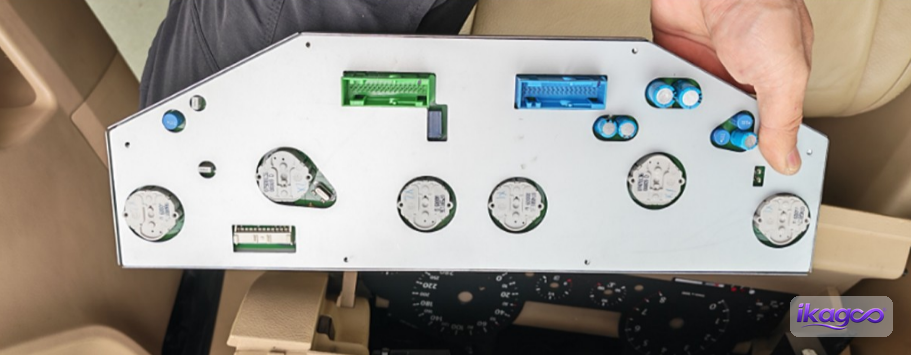
Confirm the original mainboard is secured
Check the finished board mounting before moving it to the passenger side. The board should remain fixed to the support with its connection point available for the wiring shown later.
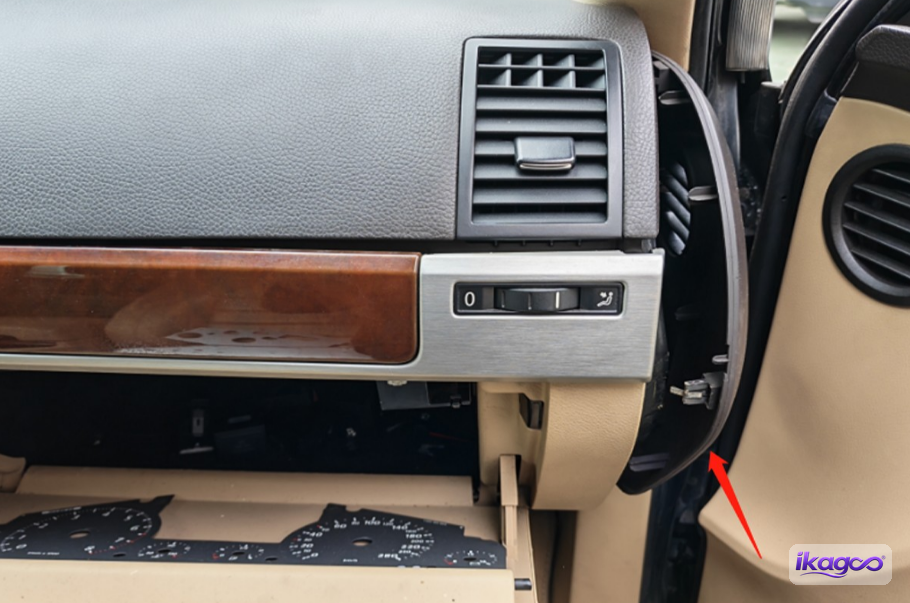
Where does the original VW Touareg 7L 2003–2010 mainboard go after the retrofit?
Câu trả lời trực tiếp: the retained original instrument mainboard is routed to the passenger-side glovebox area. The glovebox trim is opened, the board wiring is reconnected, and the board remains secured there as part of the final retrofit route.
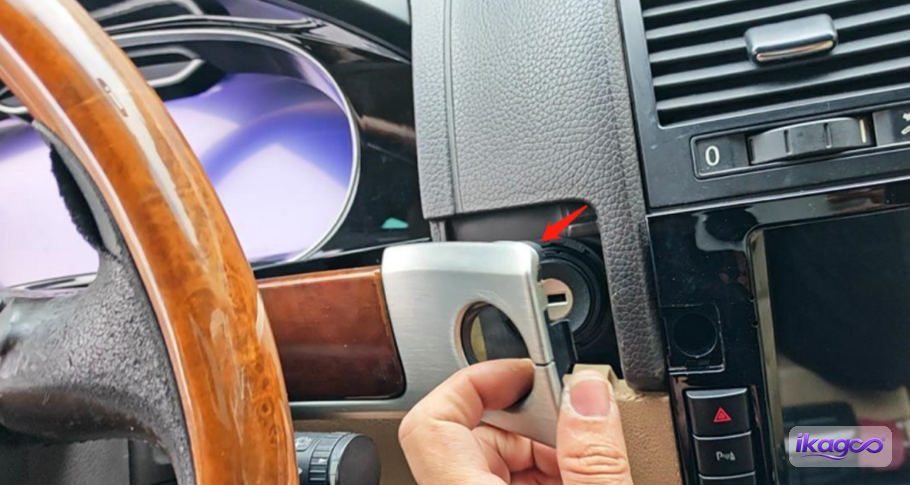
Open the passenger-side panel
Move to the passenger side and release the side panel beside the glovebox. This begins the access path for the extension cable and the retained original mainboard.
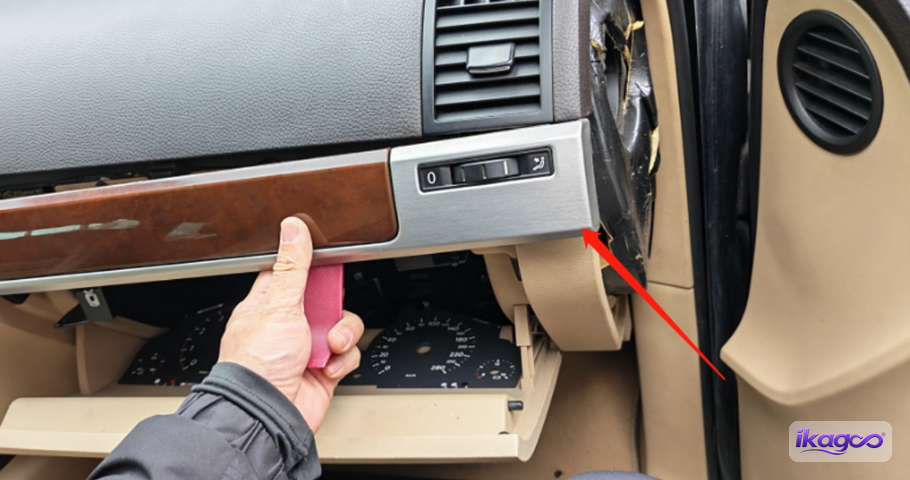
Release the glovebox-side trim
Remove the additional trim piece shown around the glovebox area. Only the panels needed to reach the storage compartment and board location are being opened.
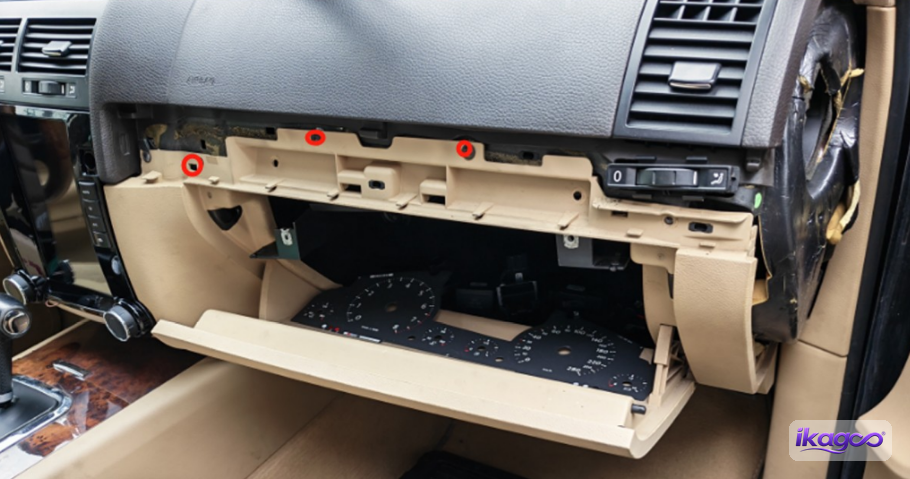
Remove the glovebox screws
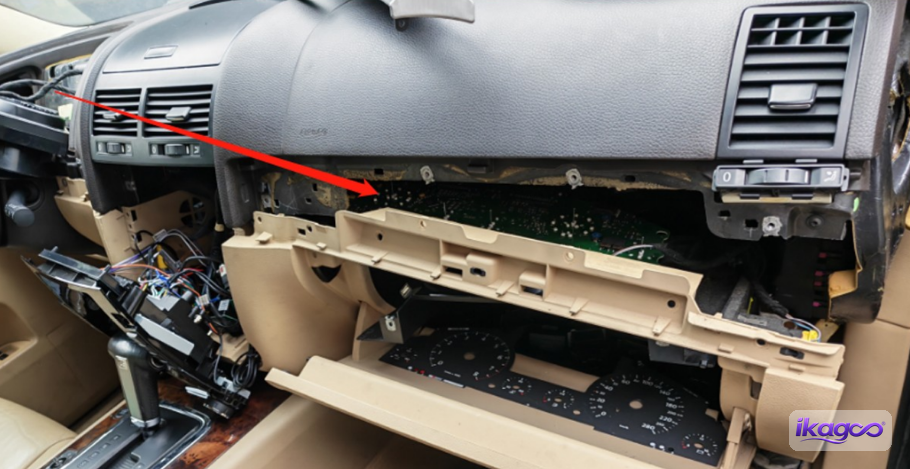
Remove the screws holding the glovebox/storage compartment. This creates the working space needed to connect and position the retained original instrument mainboard.
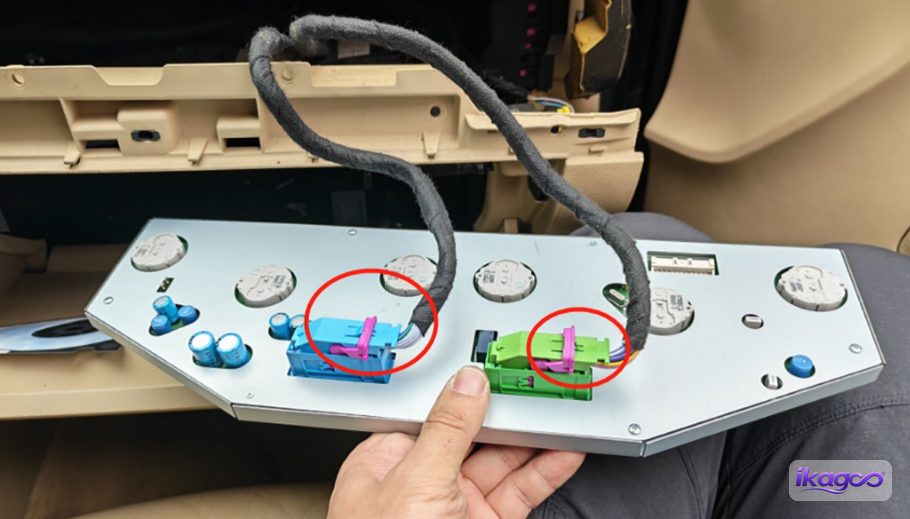
Reconnect the retained original mainboard
Connect the wiring to the retained original mainboard as shown. This connection completes the route that began when the extension cable was pulled across from the new cluster in Step 20.
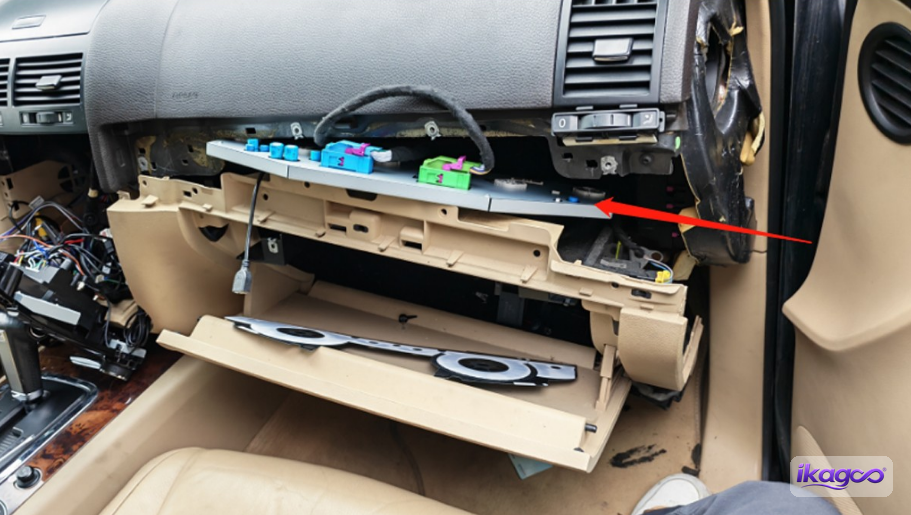
Place the retained mainboard in the glovebox area
Position the retained original mainboard in the passenger-side glovebox area following the photographed arrangement. Before the glovebox is closed, confirm that the board remains fixed to its support and the wiring has enough room to stay connected without being pinched.
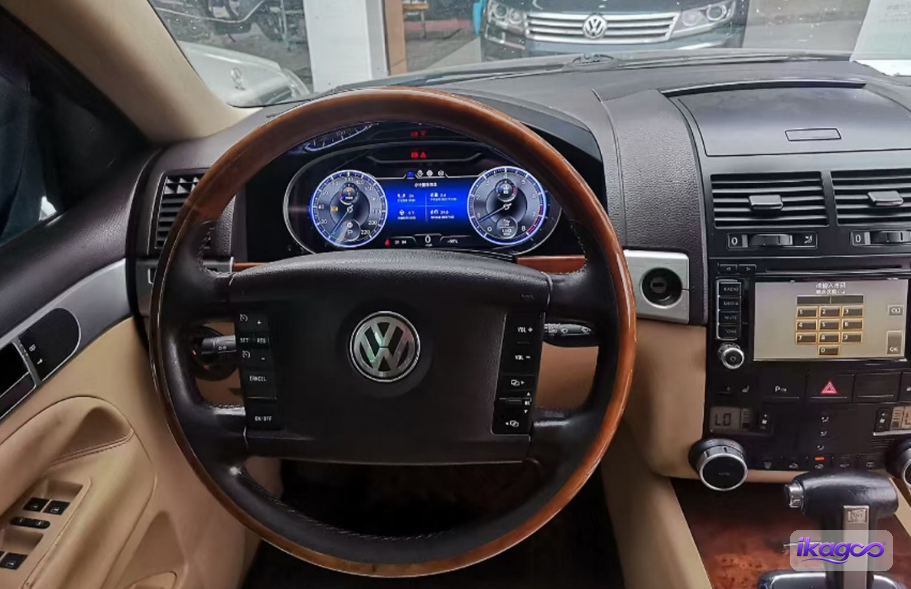
Power on and verify the installation before final closure
The original source describes the final step as the finished installation result, but the extracted step set does not contain a separate Step 37 image. Before normal use, power the vehicle on and verify the functions that apply to the confirmed cluster version.
What should you test after a VW Touareg 7L 2003–2010 digital cluster installation?
Câu trả lời trực tiếp: before closing the dashboard, verify stable cluster startup, supported speed/RPM and vehicle information, warning indicators, cluster communication, the retained-mainboard connection and physical trim fit. Product-specific CarPlay or map-sync behavior should only be checked against the confirmed configuration.
Thông tin lái xe
Check the supported speed and RPM display, fuel and temperature values, gear position and door status for the matched configuration.
Thông tin cảnh báo
Confirm that supported warning indicators appear normally and that no unexplained cluster communication fault remains.
Physical fit
Check that the cluster and trim sit correctly and that the wiring is not being compressed as panels are returned to position.
Product-specific display functions
Navigation or CarPlay map display should only be judged against the function route confirmed for the purchased product version.
Why does long-term support matter for a VW Touareg 7L 2003–2010 digital cluster?
Câu trả lời trực tiếp: long-term support matters because this Touareg retrofit combines a new digital display with a specific harness route and the retained original instrument mainboard. If a later problem appears, the original order, hardware version and wiring route can be needed to identify the correct software, part or repair path.
The current Touareg product page states that iKAGOO keeps long-term after-sales support connected to the original order for software guidance, parts support and repair coordination, alongside a 12-month hardware warranty. That distinction matters: the warranty has a defined coverage period, while the value of keeping a traceable product/support record can continue after installation.
This is one reason the purchase decision should not be based only on the lowest first-day price. A digital cluster may stay in the vehicle for years; having the seller able to identify the supplied route later can reduce the risk of buying incompatible replacement parts or troubleshooting the wrong version.
Is this VW Touareg 7L 2003–2010 digital cluster upgrade suitable for my car?
Is a digital cluster upgrade worth it on a VW Touareg 7L?
The installation evidence shows how the upgrade is performed, not that every owner needs it. The strongest upgrade case is an owner who genuinely wants the digital-cockpit change and plans to keep the vehicle. A Touareg-specific percentage is not invented here while the underlying product-page metric is still being corrected.
Will this iKAGOO digital cluster fit my VW Touareg 7L?
Compatibility is checked against the original cluster shape, dashboard opening, platform/configuration, steering position and any previous modifications. The year range is a product scope, not a substitute for that check.
Can I install this VW Touareg 7L digital cluster myself?
L3 · Advanced DIY. The route removes the cluster and multiple trim sections, routes an extension cable and retains/transfers an original electronic board. That is beyond a simple accessory installation.
When should I stop the installation instead of continuing?
Stop when the connector does not match, the cluster opening differs materially from the documented route, the required original board cannot be retained correctly, or final critical driving information is not behaving normally.
VW Touareg 7L 2003–2010 Digital Cluster Installation FAQ
Is the VW Touareg 7L digital cluster plug-and-play?
Not in the sense of “remove one plug and the job is finished.” This iKAGOO route uses matched connectors, but the real installation also removes dashboard trim and brackets, mounts the new cluster, routes an extension cable and retains the original instrument mainboard. It is better treated as a vehicle-specific retrofit than a simple accessory swap.
Will this digital cluster fit every VW Touareg 7L 2003–2010?
No universal fitment claim should be made from the year alone. The original cluster shape, dashboard opening, left- or right-hand-drive layout, market/configuration and previous dashboard or wiring modifications should be checked before shipment. If the opening in Step 13 does not match the documented route, stop before forcing the new cluster into place.
Does a VW Touareg 7L digital cluster installation require coding or VCDS?
The iKAGOO photo source used for this guide does not show a coding step, so this article does not claim that coding is always required or never required. Touareg owners frequently ask about coding when replacing OEM clusters, but this aftermarket route is different because it retains the original instrument mainboard. Confirm the exact supplied configuration if coding or parameter setup is relevant to your vehicle.
Do I need to program the immobilizer or re-adapt the keys?
The documented iKAGOO installation does not show a key or immobilizer adaptation procedure. Do not automatically apply instructions for swapping a complete used OEM Touareg cluster to this retrofit, because the photographed route retains the original instrument mainboard. If your vehicle or supplied version needs any additional adaptation, that should be confirmed before installation.
Will my original mileage stay the same after the digital cluster retrofit?
The installation photos do not prove the mileage-handling behavior, so this guide does not promise a universal result. Because mileage questions are common on Touareg cluster replacements, ask iKAGOO to confirm the mileage/display route for the exact supplied version before ordering if this is critical to you.
Why does this Touareg digital cluster keep the original instrument mainboard?
Because that is the actual route shown in the iKAGOO installation source. Steps 24–31 open the original cluster, retain its mainboard and secure it to a metal support. It is not treated as discarded hardware.
Where is the original Touareg instrument mainboard placed after installation?
In this documented route, the retained original mainboard is reconnected and positioned in the passenger-side glovebox area. Steps 32–36 show the passenger trim and glovebox being opened, the board wiring being connected and the board remaining in that area.
Will speed, RPM, fuel level and warning lights still work?
Those are core acceptance checks, not features to assume blindly. Before the dashboard is fully closed, verify the supported speed/RPM, fuel/temperature, gear or door information where applicable, warning indicators and cluster communication for the matched vehicle configuration. If critical information is missing or a new unexplained warning remains, the installation should not be treated as complete.
Will CarPlay maps appear on the Touareg digital cluster?
The iKAGOO Touareg product is sold with a CarPlay map-sync route, but the exact display path depends on the matched hardware/controller configuration. CarPlay working on another screen in the vehicle does not by itself prove that navigation will appear in the cluster, so this function should be confirmed against the ordered version.
Can I install the VW Touareg 7L digital cluster myself?
Experienced DIY installers may be able to complete it, but this is not a beginner trim-only job. The real route opens the original cluster, handles the original mainboard, routes wiring across the dashboard and relocates that board to the glovebox area. iKAGOO classifies this type of work as Level 3 Advanced DIY; professional installation is the safer choice if you have not worked on instrument clusters before.
What should I check if the cluster is black, restarts or shows new warning lights?
Keep the dashboard accessible and first document the symptom. Check the main cluster connector, thin plug, extension-cable route and retained-mainboard connection against the installation photos. Send iKAGOO the order number, vehicle details, connector photos and a short fault video before changing unrelated parts or forcing another configuration.
Where can I buy this VW Touareg 7L 2003–2010 digital cluster?
Câu trả lời trực tiếp: the same iKAGOO VW Touareg 7L 2003–2010 digital cluster is available from the linked product page. If the original cluster shape, steering position, dashboard opening or required CarPlay/map route has not already been confirmed, submit the vehicle photos for compatibility review before ordering.










Add comment
Bạn phải đăng nhập để gửi bình luận.